“I think this is what hooks one to gardening: it is the closest one can come to being present at creation.” Phyllis Theroux
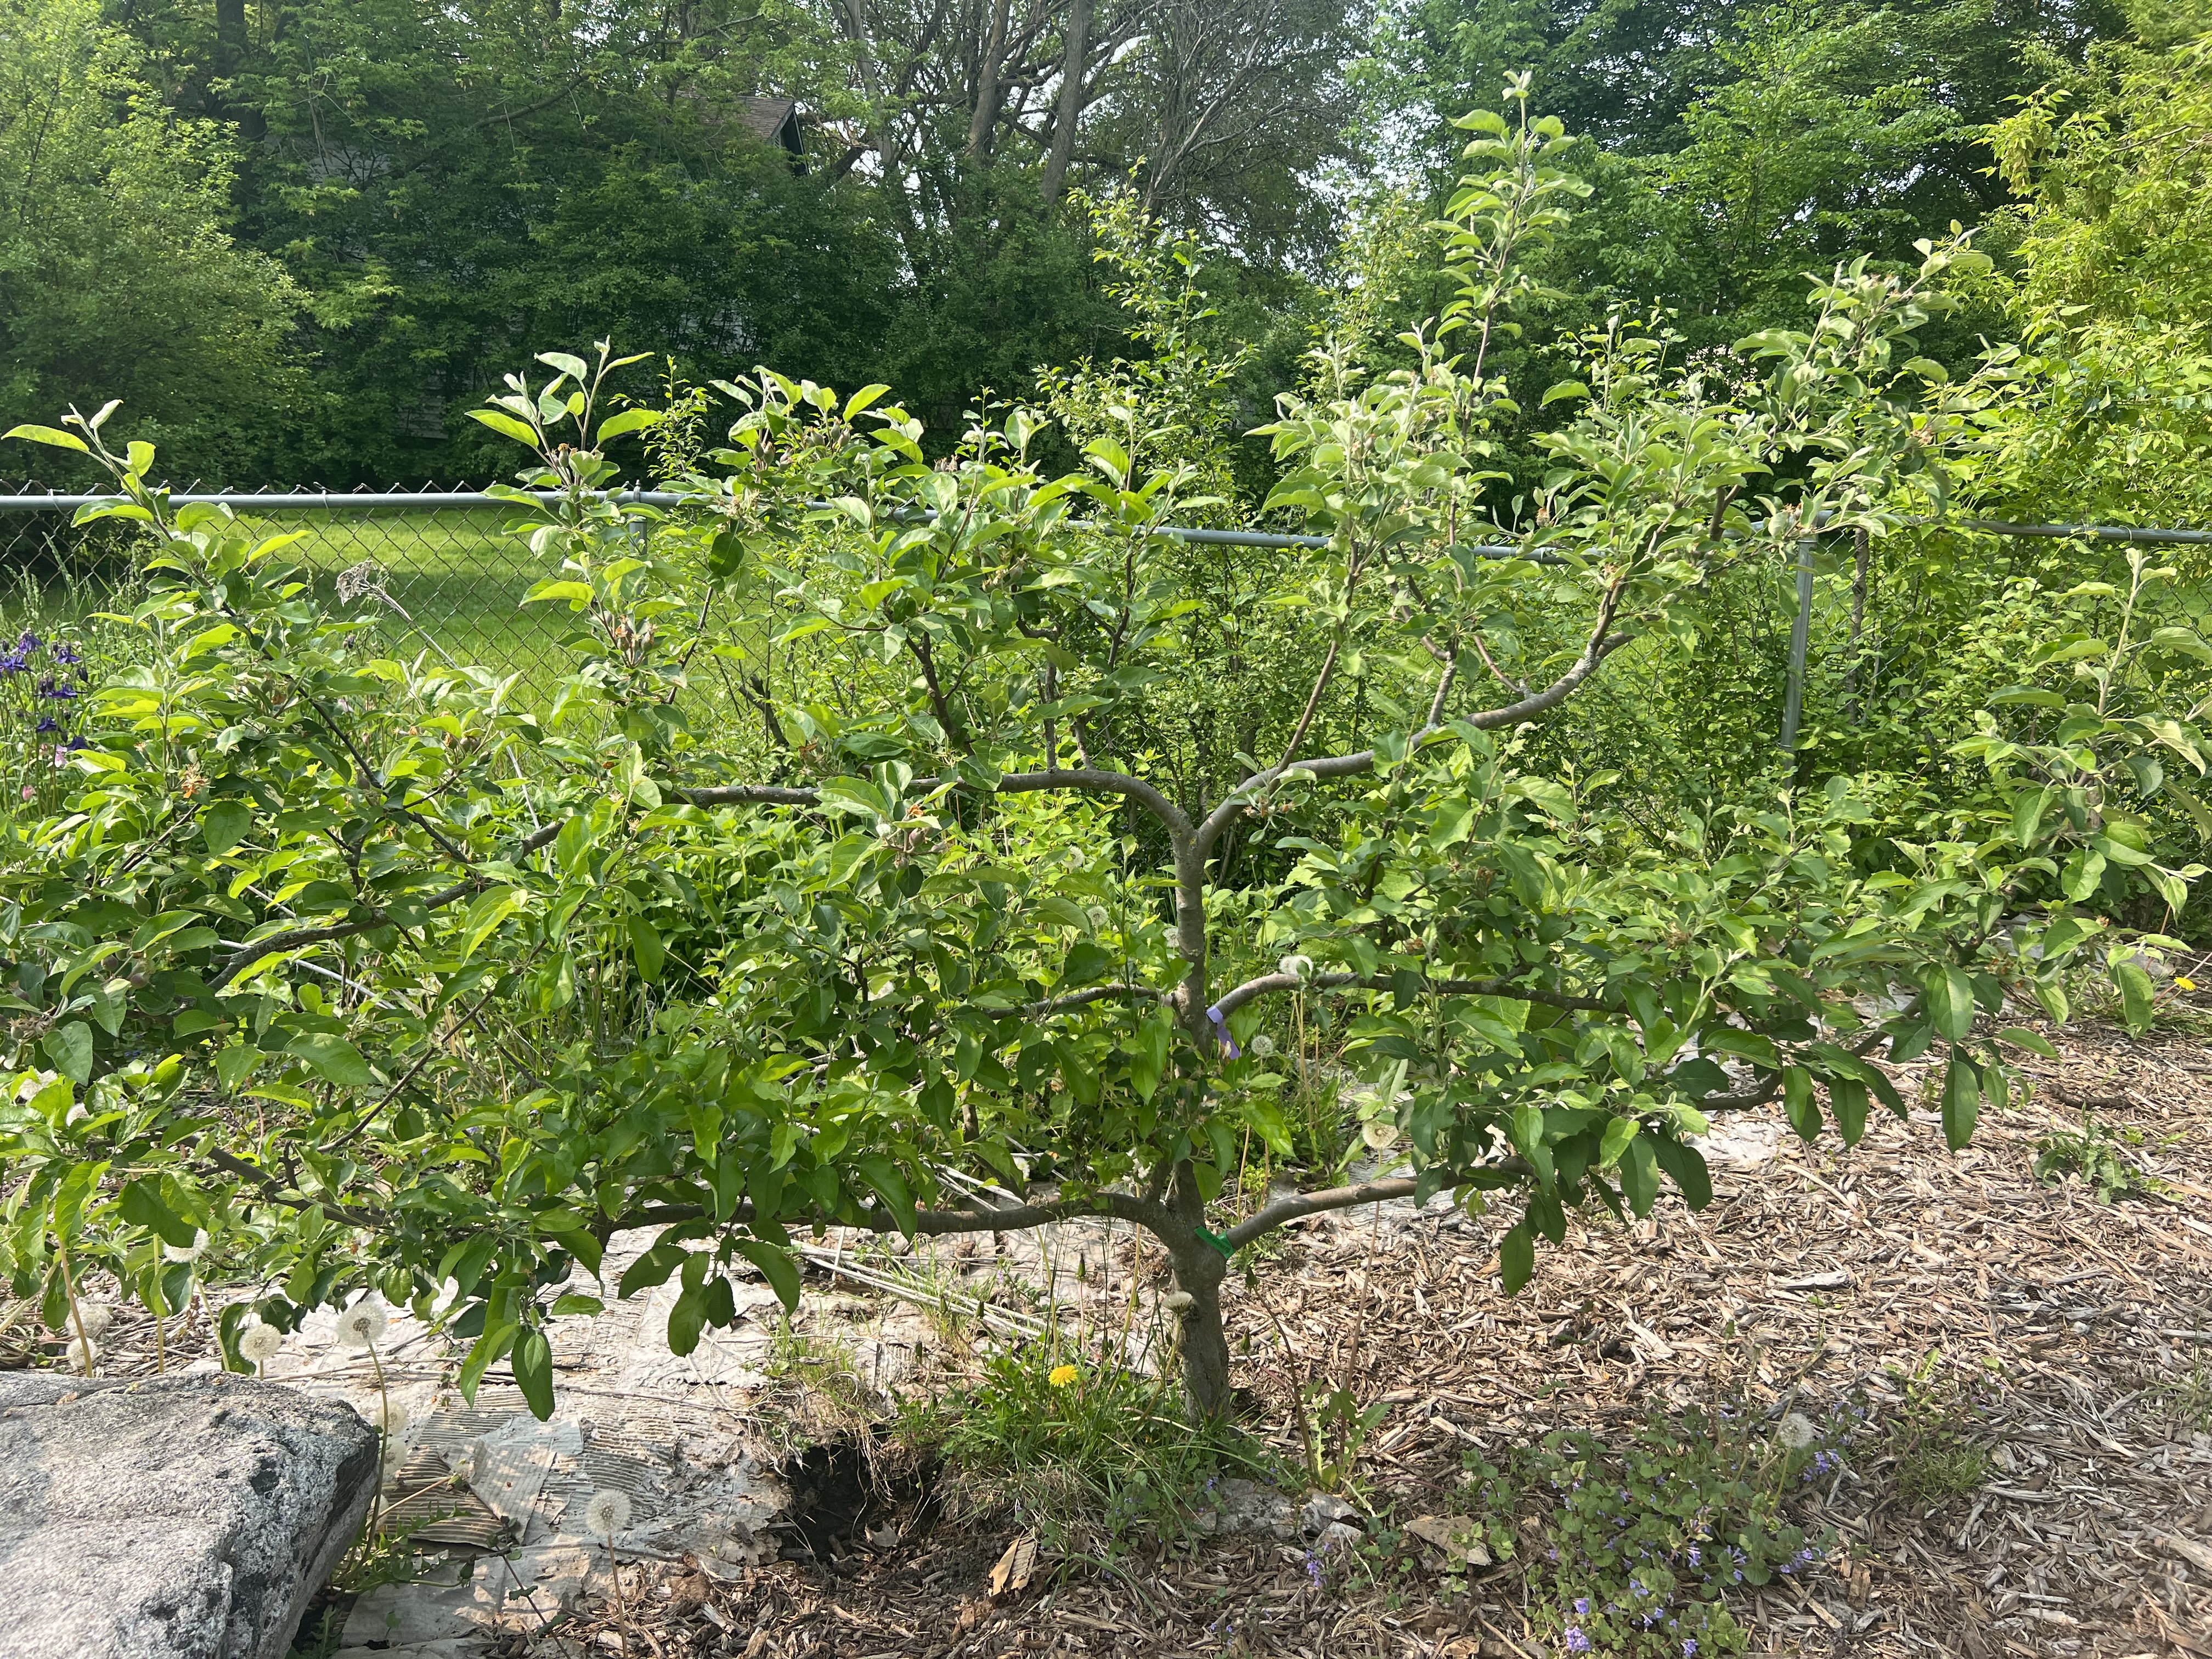
I have always wanted my own espalier… and I finally have one due to my dear friends Allen & Beth. I recently did an Instagram live showing it to all of you! As you all know, I’m pretty true to sticking to heirlooms with a few exceptions, so I was thrilled when this tree arrived with 6 heirloom grafted apples on it! Yes… it has 6 varieties of apples on it due to the wonderful art of grafting. I personally have never done this, but I know many people who have with great success.
So in todays episode, I’m going to show you how you can create a beautiful living wall in your outdoor space with an espalier! If you’ve been looking to add a touch of elegance and beauty to your outdoor space, then this is the information you need!
Have you ever heard of the art of espalier? If not, you’re in for a treat! Espalier is a method of training plants to grow flat against a wall or fence, creating a living wall that is not only visually stunning but also functional. With a little bit of patience and know-how, you too can create your own living wall masterpiece. In this beginner’s guide, we’ll walk you through everything you need to know about espalier, from selecting the right plants to pruning and training techniques. Whether you’re a seasoned gardener or a complete beginner, this guide will give you the tools and inspiration you need to transform your outdoor space into a work of art. So, grab your gardening gloves and let’s get started on this exciting journey into the world of espalier!
Check out my YouTube video below to learn more on how you can create a beautiful living wall utilizing the espalier method!
I certainly hope you are encouraged to garden. Even if you start with only two or three of these things, that’s a great start!
Subscribe to our newsletter to get the latest stories in your inbox.
If you enjoyed this episode, please LIKE, Follow, Share & leave me a comment! I love your feedback!
If you aren’t following me on Facebook or Instagram, go on over & give a LIKE & Follow me for daily tips & tricks for your home & garden!
Until next time friends, eat fresh, shop local, & have a happy day, Jean
Copyright Policy
All text and images on this site are copyright of For Dragonflies And Me. Unless otherwise noted, you may not use this content.
This post may contain affiliate links. If you choose to purchase through an affiliate link, I may receive a small commission at no additional cost to you. You can see my full disclaimer here.
“It is only the farmer who faithfully plants seeds in the Spring, who reaps a harvest in the Autumn. ” B. C. Forbes
You may have recently seen my last episode on Why Trellising Your Tomato Plants is a Must-Do and 5 Tips for Successwhich somewhat relates to today’s topic on vertical gardening. In today’s episode I will be elaborating on this topic and showing you the benefits of gardening vertically!
Vertical gardening is a gardening technique that simply involves growing plants vertically, taking advantage of unused vertical space while creating a stunning visual display. Not only does it allow you to maximize your garden space, but it also has numerous benefits, including easier maintenance, better air circulation, and less pest and disease problems. If you’re new to vertical gardening and don’t know where to start, don’t worry – this beginner’s guide has got you covered. I’ll take you through the basics, from choosing the right plants and materials to setting up your vertical garden and caring for your plants. Get ready to elevate your garden game and create a stunning, space-saving garden that’s sure to impress.
Check out my YouTube video below for the whole scoop on vertical gardening & how it will benefit you!
I certainly hope you are encouraged to garden. Even if you start with only two or three of these things, that’s a great start!
Subscribe to our newsletter to get the latest stories in your inbox.
If you enjoyed this episode, please LIKE, Follow, Share & leave me a comment! I love your feedback!
If you aren’t following me on Facebook or Instagram, go on over & give a LIKE & Follow me for daily tips & tricks for your home & garden!
Until next time friends, eat fresh, shop local, & have a happy day, Jean
Copyright Policy
All text and images on this site are copyright of For Dragonflies And Me. Unless otherwise noted, you may not use this content.
This post may contain affiliate links. If you choose to purchase through an affiliate link, I may receive a small commission at no additional cost to you. You can see my full disclaimer here.
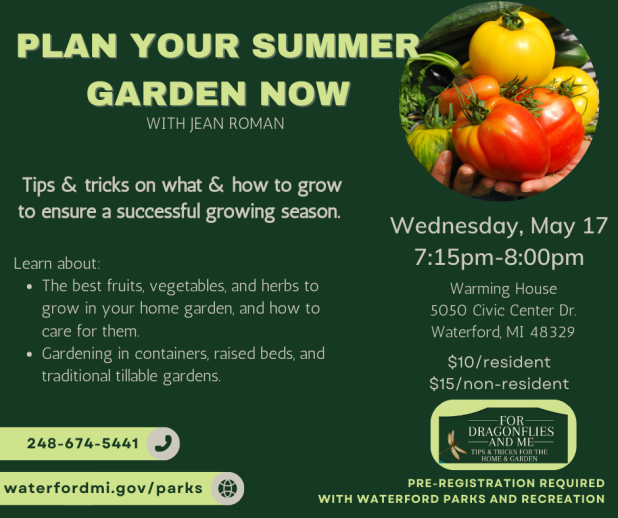
Tips & Tricks on what & how to grow to ensure a successful growing season! In today’s class Jean Roman will discuss the best fruits, vegetables, and herbs to grow in your home garden, and how to care for them. She’ll share her wealth of knowledge on growing and how you can have a bountiful harvest. Roman will provide information on gardening in containers, raised beds, and traditional tillable gardens. Downloadable PDF will be provided to all attendees.
This month I’ll be discussing how to source local food, the issues with locating it, and why it is so important to support our local farmers markets. Be sure to visit my Facebook Event Calendar & register so you don’t miss an episode!
May’s Lineup!
May 3rd, 2023
Walt Gajewski, Market Manager for The Farmington Farmers & Artisans Market!
If you are a regular listener, you all know I love to share the back story with all of you on how I know and met my podcast guest… and this one is really near & dear to my heart.
I met this guy over a decade ago during my Mennonite days behind my table at the Farmington Farmers & Artisans Market. He was a volunteer with the market and always was so happy & energetic about it. He had real passion is the best way to describe it. Of course that’s why we clicked! Our hearts were both in that happy place!!!
Are you a biking enthusiast? Podcast with Bike Dearborn Founder & Lead Biker, Tracy Besek
Join me today as Founder & Lead Biker for Bike Dearborn, Tracy Besek & I chat it up about biking safety, advocacy, and being a part of this great group!
This month’s focus has been on local food, and healthy life choices. I tend to focus a lot on farmers markets, but obviously there are so many other ways to invest in healthy life choices, exercise being another obvious one!
My guest today and I met almost ten years ago during my tenure in Dearborn with both the DDA and the Chamber of Commerce. We collaborated together with the city’s farmers market I managed… OK, yep I’m going to tie in the farmers market again, LOL.
5 Reasons to Support Your Local Farmers Markets: How they benefit people both health wise & the local community!
If there is one thing I’m passionate about, it’s local food & farmers markets! I was a farmer for almost 15 years, and most of that time a farmers market vendor. I know what it’s like to be on both sides of the table~ as a vendor, and a market manager.
My heart is most at home in the garden & the farmers markets. Today I will talk to you about my heart felt desire to inspire every person to shop at the farmers market. When you do you are supporting local producers, your local economy, help the sustainability of farmland, and so much more!
Maybe you’ve even been contemplating becoming a market vendor! Do you create, bake, grow, or develop something? Well, a farmers market might be your first step to a successful business start up. Farmers markets are great starting points for local entrepreneurs!
I want this podcast to inspire you… please let me know in the comments below if I did!
Let’s talk food advocacy with Michigan Farmers Market Association (M.I.F.M.A.), Executive Director, Amanda Shreve.
Food is Medicine! Join Jean as she chats it up with Amanda Shreve, Executive Director for the Michigan Farmers Market Association.
During the month of May Jean will be focusing on local food and how to source it, along with talking to professionals in the industry who fight the good fight advocating for fair food. Jean couldn’t think of a better organization to include than MIFMA~ Michigan Farmers Market Association and its wonderful Director, Amanda Shreve!
Amanda has been part of the MIFMA team since November 2009. She says, “I am passionate about connecting the public with agriculture and growing awareness of what it takes to produce our food supply in a safe, equitable and environmentally sustainable way. I recognize that farmers markets are a very visible and tangible way to establish, maintain and grow this connection.”
May 31st, 2023
Let’s talk about growing food with Dawn Green, Horticulturist & Owner of Dawn Gardens, LLC!
Join Jean as she chats it up with fellow gardener extraordinaire, Dawn Green! We’ll discuss the importance of raising your own food, and the joy & fulfilment it brings!
“The lesson I have thoroughly learnt, and wish to pass on to others, is to know the enduring happiness that the love of a garden gives. ” Gertrude Jekyll
Did you know rhubarb is a vegetable, not a fruit?
Rhubarb is a versatile vegetable, & its tangy flavor can easily be combined with the sweetness of strawberry, or left on its own! It is a favorite among gardeners and chefs alike, thanks to its unique taste and versatility in the kitchen.
Never tried rhubarb? Well, if you’re new to gardening or have never grown rhubarb before, you might be wondering where to start. Fear not! In this episode of Gardening 101, I’ll take you through everything you need to know about planting and caring for rhubarb.
From choosing the right variety to harvesting and cooking, I’ve got you covered. So whether you’re a seasoned green thumb or a novice looking to grow something new & different, this episode will equip you with all the knowledge and skills you need to grow your own delicious rhubarb. Get ready to add a touch of tangy goodness to your garden and your plate!
Watch my YouTube video how-to on How to Grow & Care for Rhubarb, along with some Bonus Recipes, click below~
How’d you like the video? Give you your thoughts & feedback in the comments, & be sure to let me know if you have any additional tips & tricks on How to Grow & Care for Rhubarb!
Check out my video on How to Properly Harvest Rhubarb at my YouTube Channel below~
Did you come back for some Rhubarb recipes? Click these links for some great recipes!
“I grow plants for many reasons: to please my eye or to please my soul, to challenge the elements or to challenge my patience, for novelty or for nostalgia, but mostly for the joy in seeing them grow.” ― David Hobson
Spring is finally here, and if you’re a newbie or avid gardener, you’re probably itching to get your hands in the dirt. Of course many of you know I started several of my seeds indoors early in March, but now it’s time to plant outdoors!
But wait! If you live in zones 4 and 5 like I do, where the winters are harsh & the growing season is short, you may be wondering which vegetables are hardy enough to survive the cold temperatures.
Thankfully, there are plenty of cold hardy veggies you can grow! In today’s blog post, I’m going to discuss my top 10 cold hardy vegetables to plant in zones 4 and 5 this April. From beautiful heirloom lettuces & leafy greens to root vegetables, I’ve got you covered. Not only will these vegetables survive the cold weather, but they’ll also thrive and produce delicious, nutrient-rich crops for you and your family to enjoy. So grab your gardening gloves and let’s get started!
To watch this episode tune into my YouTube Channel!
If you enjoyed this blog , please LIKE, Follow, Share & leave me a comment! I love your feedback!
“From plants that wake when others sleep, from timid jasmine buds that keep their odor to themselves all day, but when the sunlight dies away let the delicious secret out to every breeze that roams about. ” Thomas Moore
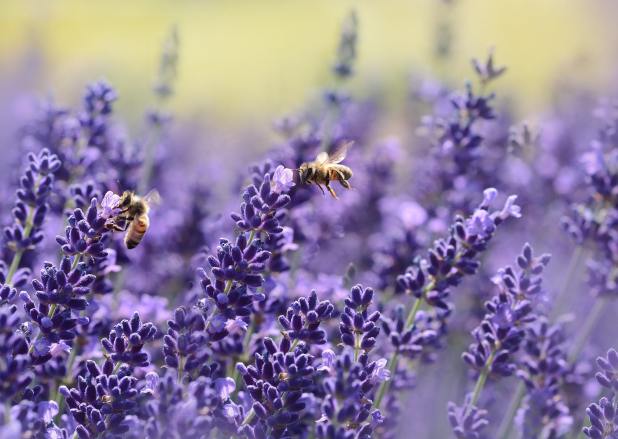
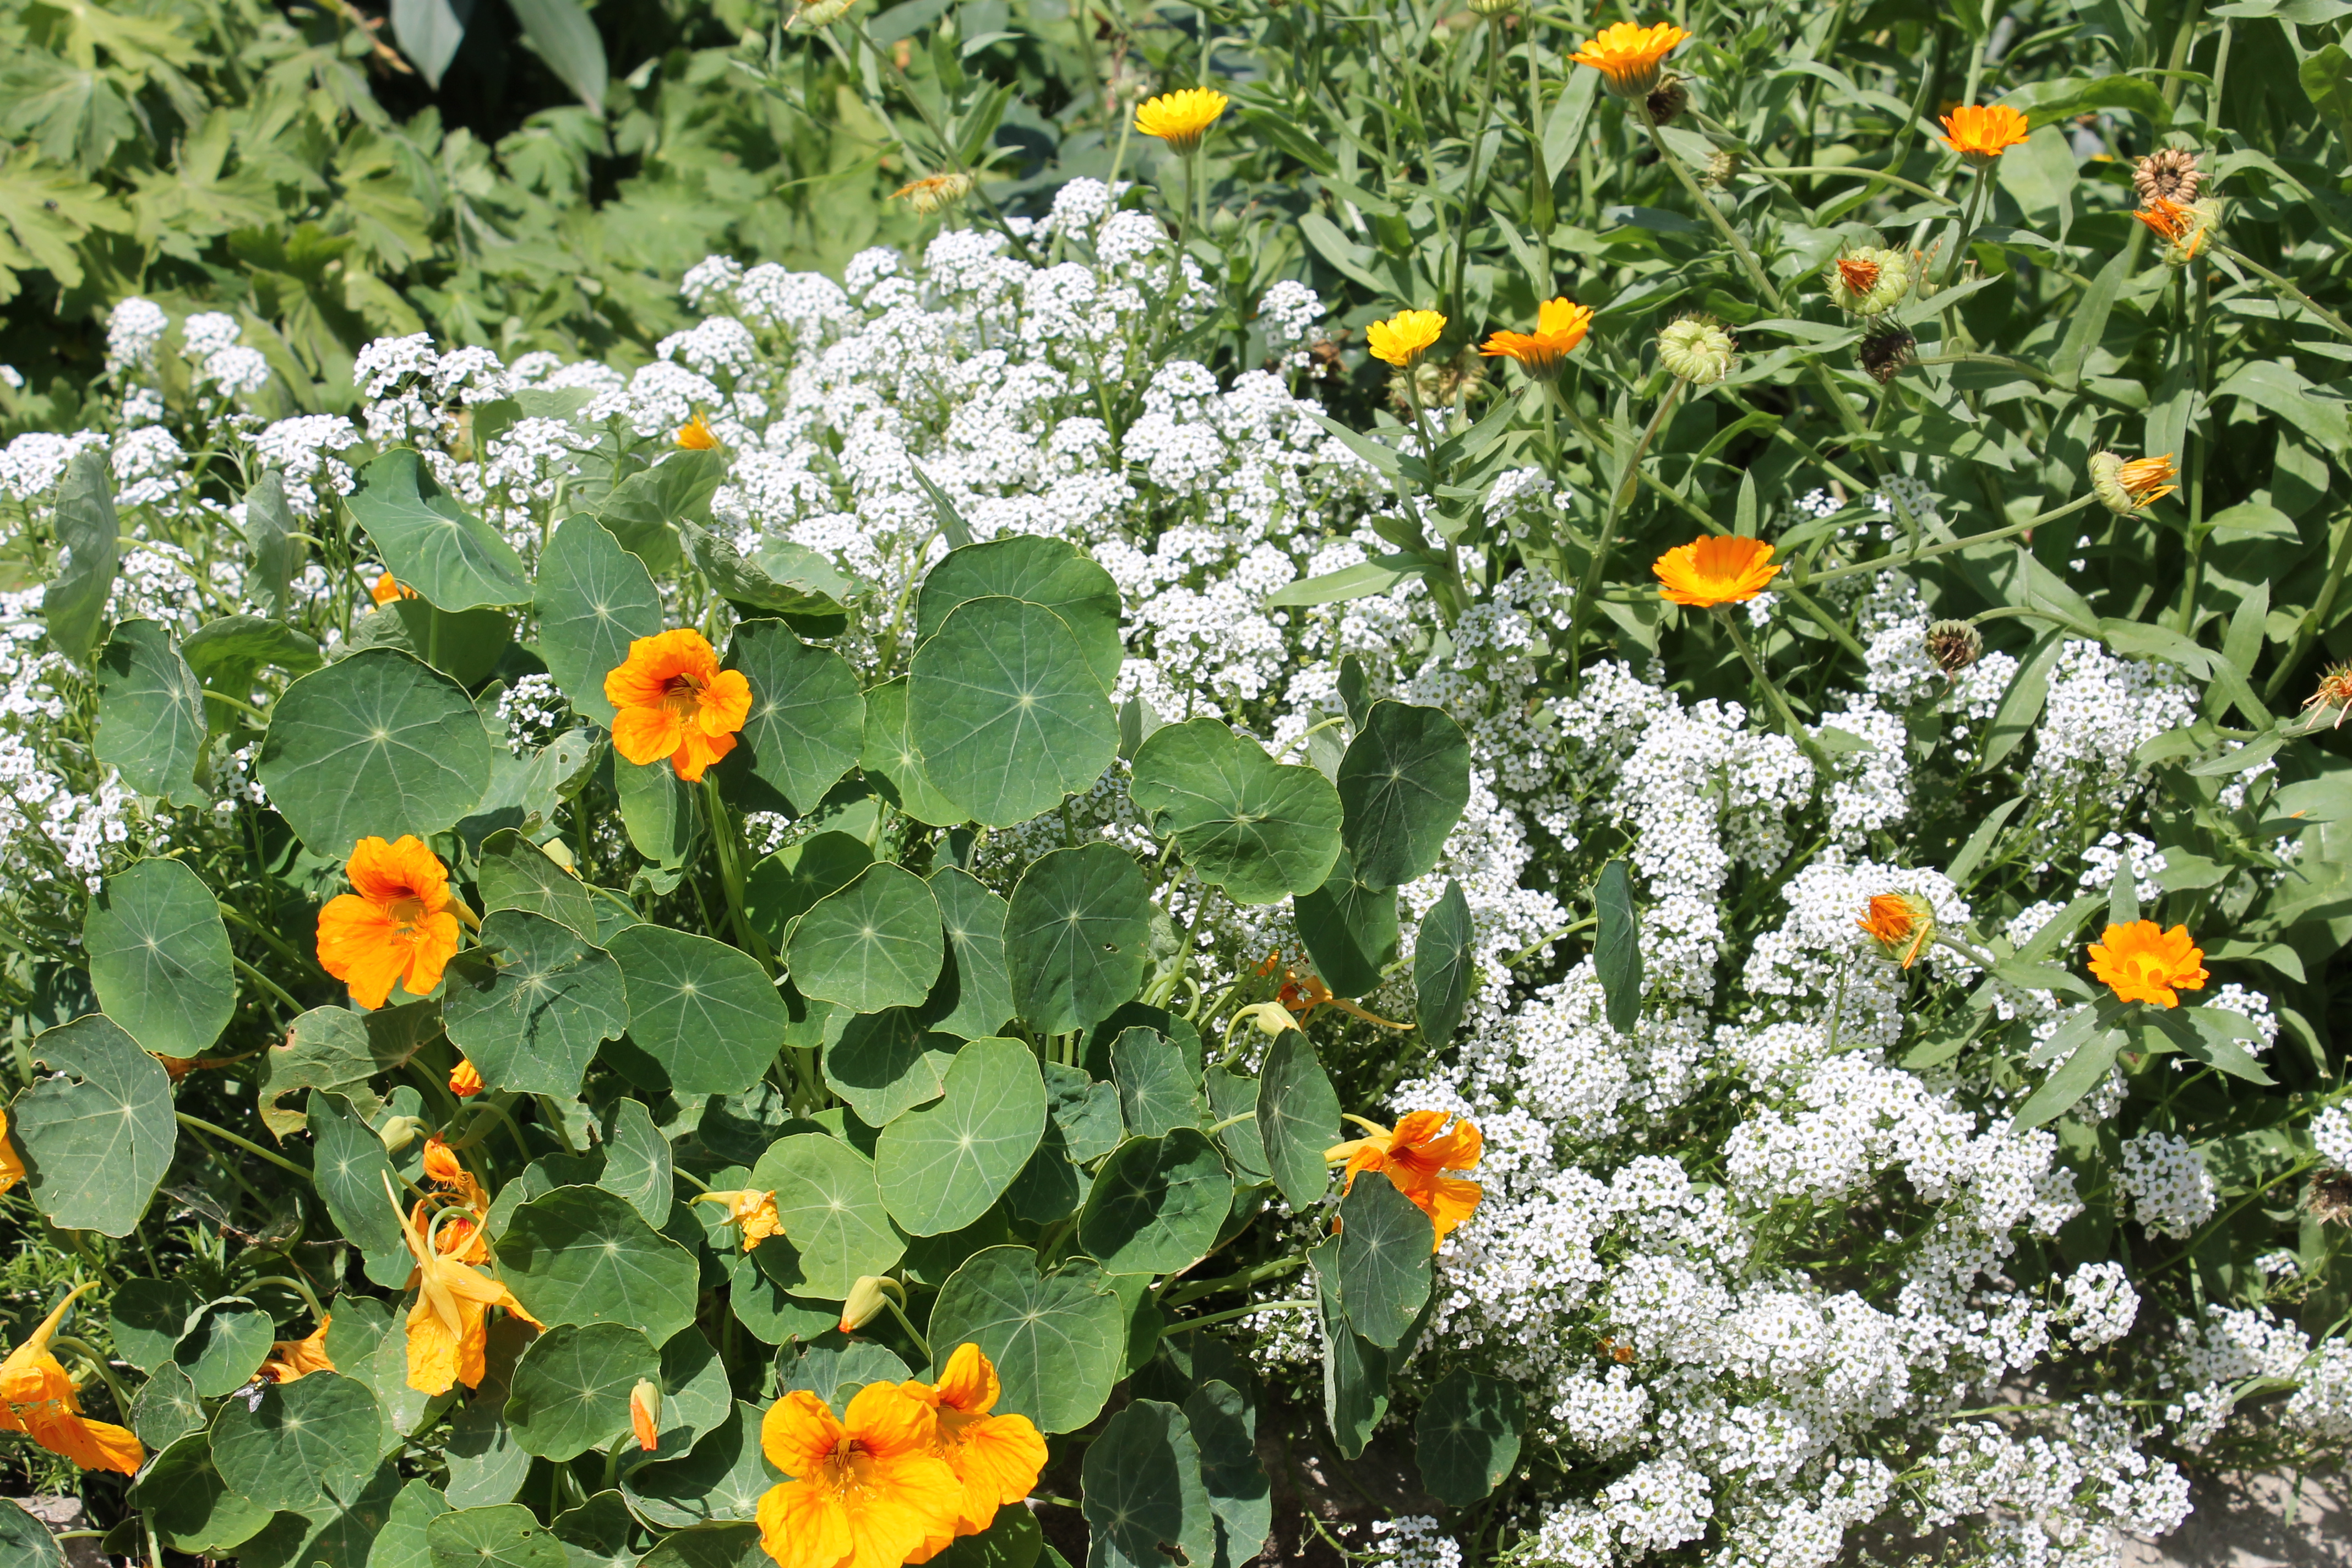
Over the years I’ve shown you oodles of photo’s of my gardens, and have always stressed my love of the cottage garden. That love has not waned once over the years. I have always been fascinated with the charm of a cottage garden. And what better way to create a stunning cottage garden than by incorporating pollinator-friendly plants in it?
In today’s blog post, I’ll start by walking you through the steps to create a beautiful cottage style pollinator garden with both annuals and perennials.
But before we get rolling, be sure to SUBSCIBE below so you don’t miss an episode!
One of the main reasons I’ve always been drawn to the cottage garden is its informal and relaxed appearance, along with a mix of colorful flowers and foliage plants. These gardens are often associated with old-world charm, and the inclusion of pollinator-friendly plants can make them even more appealing.
For more information check out these wonderful resources from ConsumerNotice:
Pollinator gardens are designed to attract bees, butterflies, hummingbirds, and other beneficial insects, which help in pollinating plants, ensuring a bountiful harvest, and keeping the ecosystem in balance.
Let’s Look at the Importance of Pollinator Gardens
Pollinator gardens are essential for supporting the health and survival of our planet’s ecosystem. According to the Pollinator Partnership, pollinators are responsible for over 75% of the world’s food crops, and without them, our food supply would be severely impacted.
Pollinators are also crucial for maintaining the biodiversity of our planet, as they help in the reproduction of plants, which in turn provide food, shelter, and habitat for other wildlife.
What are the Benefits of Using Both Annuals and Perennials in Your Garden?
Annuals and perennials are two types of plants that can be used in pollinator gardens. Annuals are plants that complete their life cycle in one growing season, where perennials come back year after year. It’s beneficial to incorporate both as annuals usually fill in with blooms in between the bloom cycles of your perennials.
Using a mix of both annuals and perennials in your garden can provide several benefits. Annuals bloom all season long, providing a continuous source of nectar and pollen for pollinators. Perennials, on the other hand, provide a more stable source of food and habitat for pollinators.
Let’s Design Your Cottage Style Pollinator Garden!
Designing a cottage style pollinator garden is all about creating an informal, relaxed atmosphere. You can achieve this by incorporating a mix of plants with different heights, textures, and colors.
To create a natural-looking garden, you can plant in irregular groups or drifts, rather than in straight rows. You can also include features such as a birdbath or a small pond to attract birds and other wildlife. I love to use garden art in my gardens. I even have an antique lightning rod!
Consider these factors as well:
Is your garden up against a wall or does it have a backdrop? If so, you want to be sure to have your taller plants placed in the rear, cascading downward in height as you move towards the front of your garden.
Is your garden located in an area where it can be walked around on all sides? If so, you will want the tallest plants placed in the center, then cascading downward to the edges.
Selecting the Right Plants for Your Garden
When selecting plants for your garden, it’s essential to choose varieties native to your region. Native plants are adapted to the local climate and soil conditions, making them more resilient and less reliant on fertilizers and pesticides.
Some excellent choices for a cottage style pollinator garden include lupines, foxglove, hollyhocks, peonies, coneflowers, black-eyed susans, bee balm, and milkweed. These plants are attractive to a wide variety of pollinators and are relatively easy to grow.
Before planting your garden, it is essential to create a planting plan. This plan should take into account the size and shape of your garden, the location of existing plants and features, and the sun and soil conditions.
If it’s a brand new garden spot, then you’ll still need to design this in order to utilize your space and be sure not to over plant. I recommend if this is a new garden you fill in the empty spaces with annuals so it looks full and beautiful. The perennials will fill in the following year.
Start by drawing a rough sketch of your garden, including any existing plants or features. Then, decide on the placement of your pollinator-friendly plants, considering factors such as height, texture, and color.
Once you have a rough plan in place, you can refine it by selecting specific varieties of plants and determining the number of plants needed for each area
Another factor is if you are partial to particular colors. I personally prefer pinks, purples, blues, and whites. I tend to be drawn to plants in those colors. Use what makes you happy and fits into the scheme of things for your gardens.
Some Final Tips for a Successful Pollinator Garden!
Remember to choose plants that are native to your region, create a planting plan, and care for your garden regularly. And most importantly, have fun and enjoy the beauty and diversity of your garden!
Here are some of my favorite flowers to incorporate for pollinator gardening. Take into consideration I am a cottage gardener, so these flowers are well suited to that style. This is by far not an exhaustive list, more so a list of mine & Tim’s personal faves! Pollinator’s aren’t just for bees, I grow some of these specifically for my little feathered friends. Also, my garden themes generally incorporate purples, pinks, blues, and white. I don’t use very many red, and I don’t really include orange or yellow with the exception of Black Eyed Susan’s.
Annuals include:
Cosmos
Mexican Sunflower
Milkweed
Verbena
Zinnias
Sunflowers~ I like to incorporate a row of these in the back of my garden so the blue jays can harvest the seeds once they’ve developed.
Perennials include:
Purple Coneflower or Echinechea~ I don’t cut back the seed heads as goldfinches feast on these in the fall and throughout the winter months.
Alliums
Bee Balm
Black Eyed Susans
Liatris
Lavender
Lupine
Lavender~ my lavender plants are generally covered with honey bees while in bloom. I just love to hear the buzz of the little guys.
Any variety of mint~ this serves two purposes… one for me to make yummy mint tea, and one for the bees!
“Maybe a person’s time would be as well spent raising food as raising money to buy food.“ ― Frank A Clark
Over the years I have grown just about everything possible for my growing zone with the exception of fruit trees. I’ve had an apple tree, but I dare not say I am an expert in this field of horticulture.
My specialty has always been heirloom varieties of fruits and vegetables, with a focus on tomatoes and lettuces.
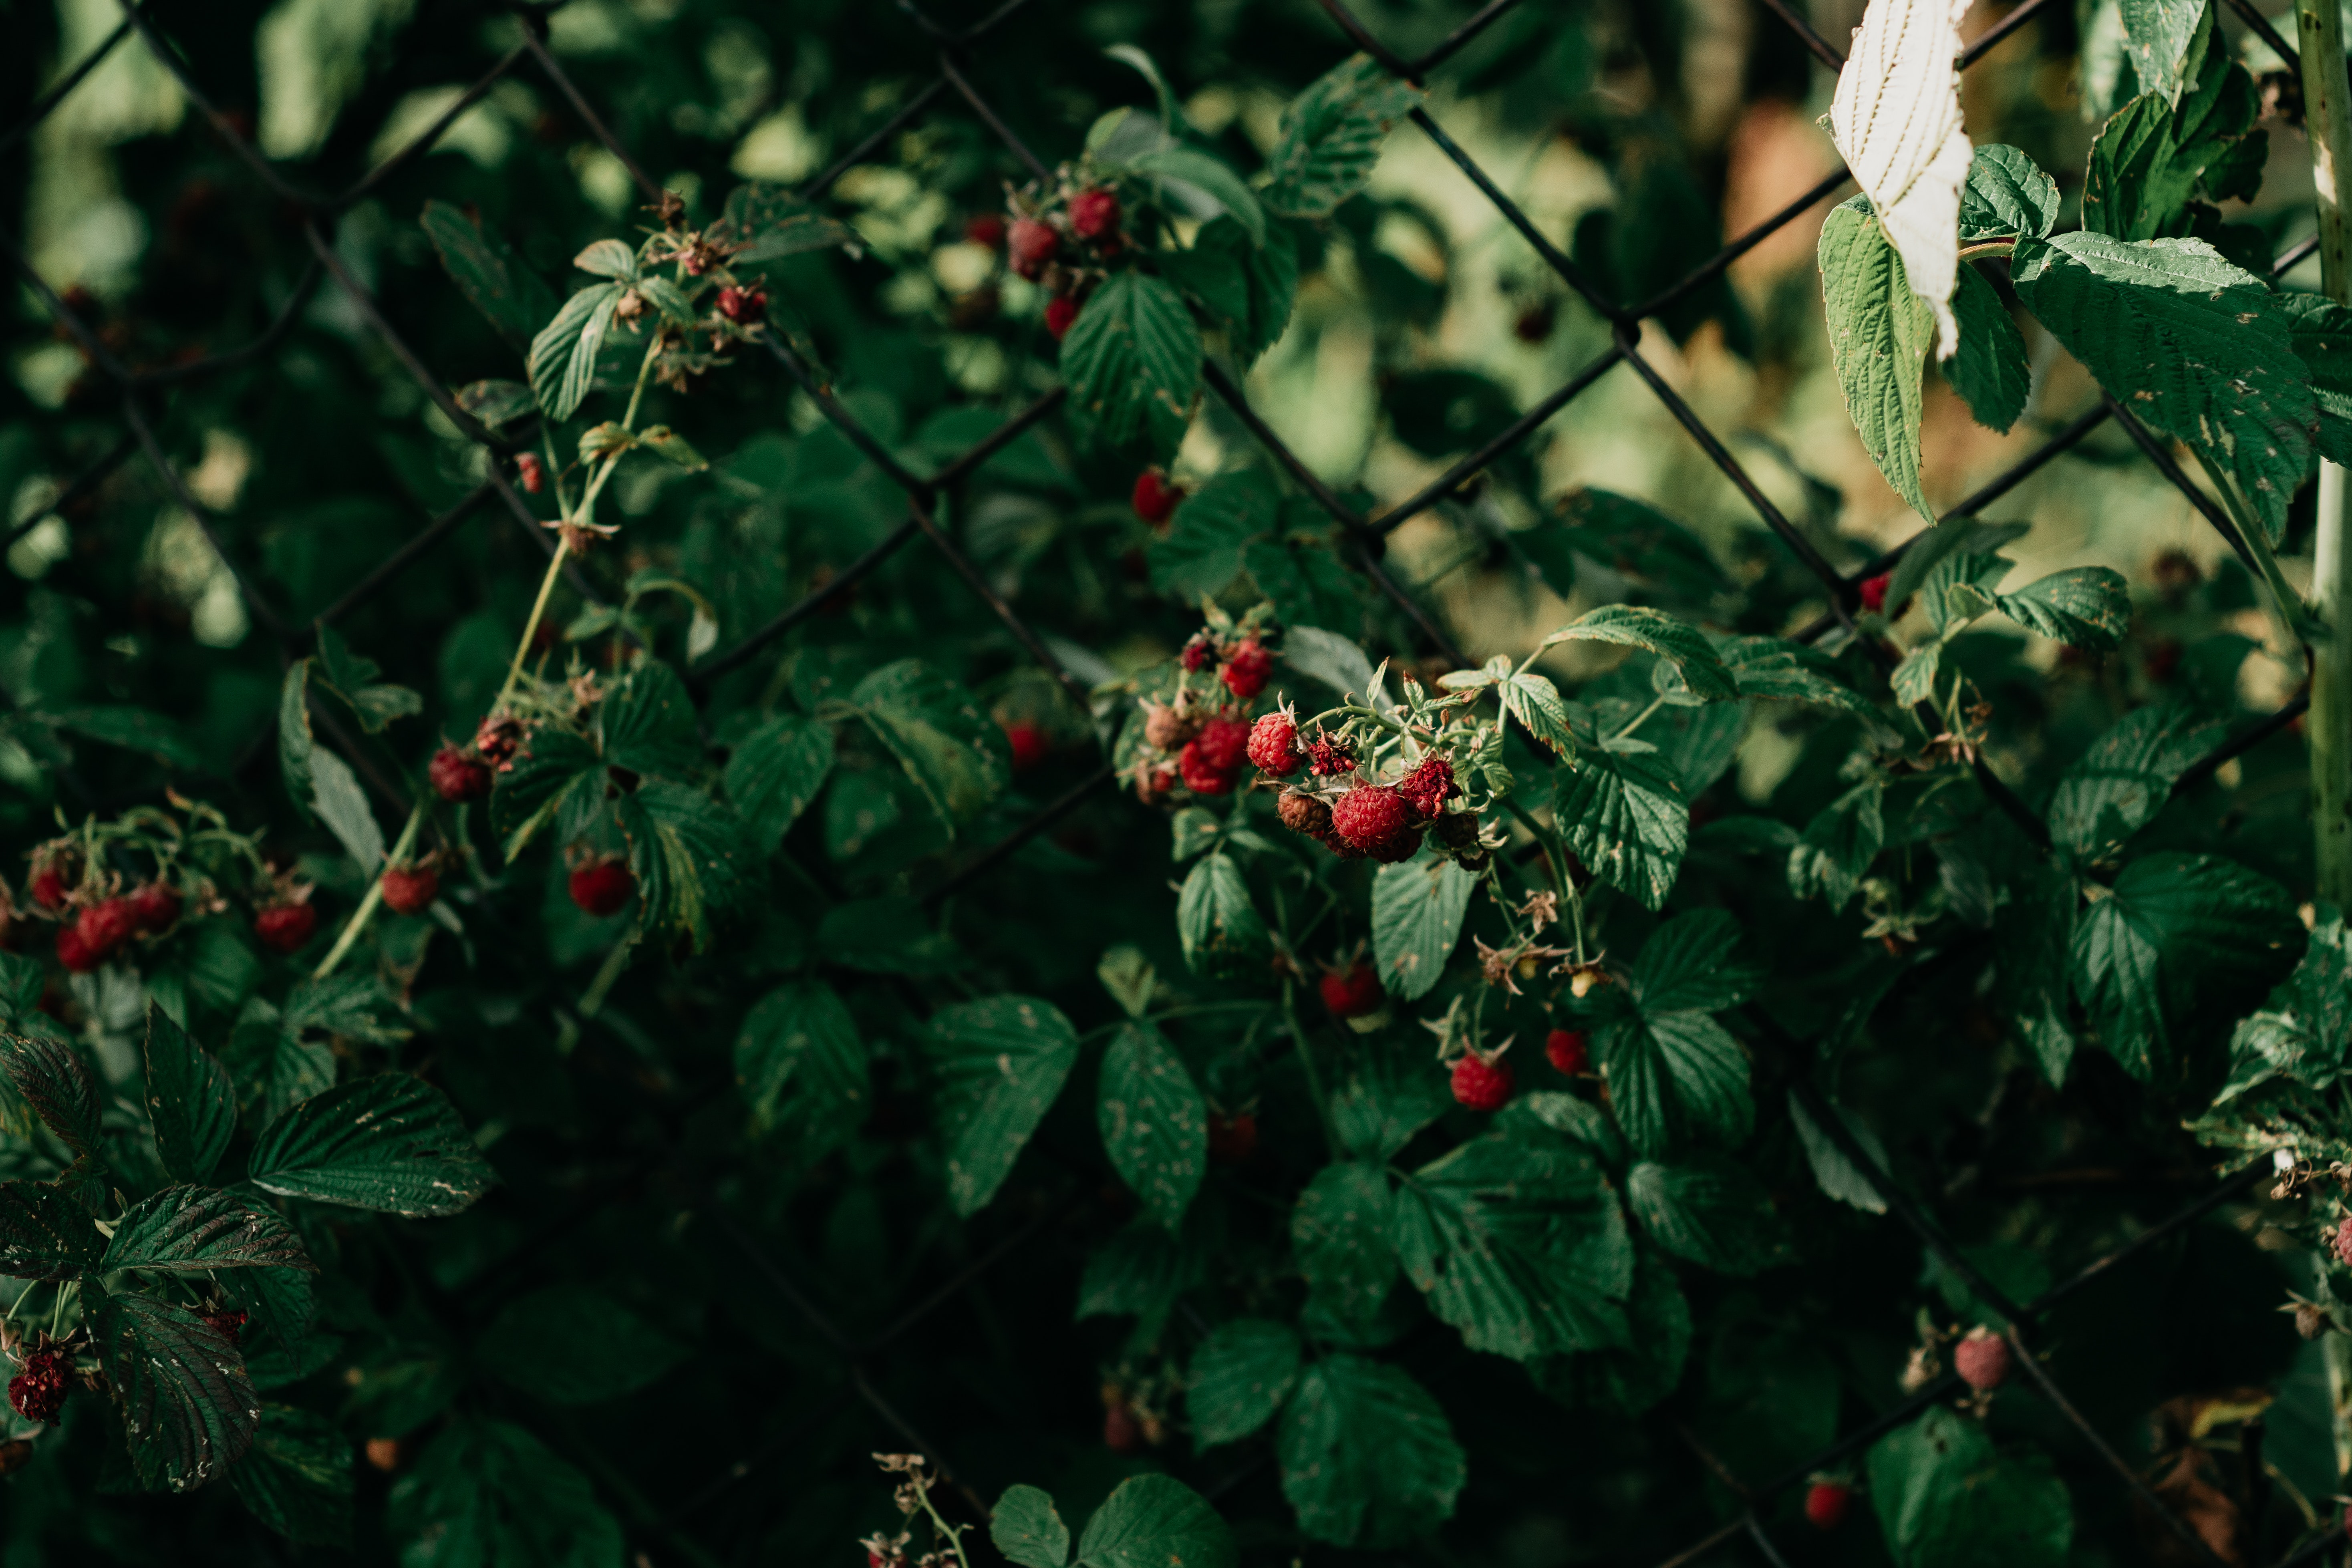
I often talk about my childhood and growing up with my grandmother and mother in the kitchen and our gardens. They are very fond memories that I truly love to share. We always had a beautiful, well kept little vegetable garden in our backyard, which included both raspberries and strawberries. My grandmother never grew blueberries though. She said they took up too much space. Space she didn’t have to give up.
I have personally grown all of these delicious fruits and today I’m going to touch on raspberries. If you missed last week’s blog post on How-to Grow Grapes & Care for Them, check that out as well!
If you are looking to add some delicious and nutritious berries to your garden, then look no further than raspberries! These juicy, sweet berries are easier to grow and care for than you may think that many home gardeners enjoy in their gardens.
In today’s blog post, I will walk you through all the tips & tricks you’ll need to know about planting raspberries, from choosing the right variety and caring for your new berry bushes. We’ll cover all the basics, including when and where to plant, how to space your plants, and what kind of soil and nutrients your raspberries will need to thrive. So whether you’re a novice or die hard gardener, read on to learn how to grow your own delicious raspberries and enjoy fresh, sweet berries all summer long!
Let’s get planting those raspberries!
What Variety of Raspberry Should I Choose?
Before you start planting raspberries, it’s important to choose the right variety for your garden. There are two main types of raspberries: summer-bearing and everbearing. Summer-bearing raspberries produce one large crop in early summer, while everbearing raspberries produce a smaller crop in early summer and a second, smaller crop in fall.
When choosing a raspberry variety, consider your climate and growing conditions. Some varieties do better in certain areas than others. For example, some varieties of raspberries are more cold-hardy than others and can withstand harsh winter conditions. Other varieties are more resistant to certain pests and diseases.
Here are some popular raspberry varieties to consider:
Heritage: A popular variety of everbearing raspberries that produces sweet, juicy berries. Heritage raspberries are hardy and disease-resistant, making them a good choice for gardeners in colder climates.
Caroline: Another popular everbearing variety, Caroline raspberries are known for their large, firm berries and disease resistance.
Tulameen: A popular summer-bearing raspberry variety, Tulameen raspberries are known for their large, sweet berries and high yield.
When and where do I plant my raspberries?
Raspberries should be planted in early spring or fall, when the soil is cool and moist. Planting in the heat of summer can stress the plants and make it harder for them to establish roots. When choosing a location for your raspberry bushes, look for a spot that gets at least six hours of sun per day and has well-draining soil.
It’s also important to choose a location that is free from competing plants and weeds. Raspberries can be quite aggressive and will quickly spread and take over an area if not properly maintained.
Planting raspberries – Step by Step Guide
Once you’ve chosen your raspberry variety and prepared your soil, it’s time to plant your bushes.
Here’s a step-by-step guide to planting raspberries:
Dig a hole that is slightly larger than the root ball of your raspberry plant.
Place the plant in the hole and backfill with soil, making sure the crown of the plant is level with the soil surface.
Tamp down the soil around the plant to remove any air pockets.
Water the plant thoroughly after planting.
When planting raspberries, it’s important to space your plants properly. Raspberries should be spaced about 2-3 feet apart in rows that are 6-8 feet apart. This will give your plant
Pruning raspberry plants
Proper pruning is essential for healthy raspberry plants and good fruit production. Raspberries should be pruned twice per year: once in late winter or early spring, and again after harvest.
In late winter or early spring, prune out any dead, damaged, or diseased canes. Then, thin out any weak or spindly canes, leaving only the strongest, healthiest canes.
After harvest, prune out all of the canes that produced fruit. These canes will not produce fruit again and should be removed to make room for new growth.
Pruning raspberry plants properly is essential!
Proper pruning is essential for healthy raspberry plants and good fruit production. Raspberries should be pruned twice per year: once in late winter or early spring, and again after harvest.
In late winter or early spring, prune out any dead, damaged, or diseased canes. Then, thin out any weak or spindly canes, leaving only the strongest, healthiest canes.
After harvest, prune out all of the canes that produced fruit. These canes will not produce fruit again and should be removed to make room for new growth.
Harvesting and storing raspberries
Raspberries are ready to harvest when they are fully colored and easily detach from the plant. Harvest your raspberries in the morning, when they are cool and dry, to help prevent bruising.
Raspberries are best eaten fresh but can also be frozen or canned for later use. To freeze raspberries, simply wash and dry them, then spread them out on a baking sheet and freeze until solid. Once frozen, transfer to an airtight container or freezer bag.
Common mistakes to avoid in raspberry planting and care
When planting and caring for raspberries, there are a few common mistakes to avoid:
Planting too close together: Raspberries need plenty of room to grow and should be spaced at least 2-3 feet apart.
Over-fertilizing: While raspberries do need regular fertilization, too much fertilizer can lead to excessive growth and weak canes.
Pruning at the wrong time: Pruning at the wrong time of year can harm your raspberry plants and reduce fruit production.
Neglecting pest and disease control: Ignoring signs of pests or disease can quickly lead to a larger problem that is harder to control.
Stayed tuned for next weeks blog post on how to plant and care for blueberries!
If you enjoyed this blog, please LIKE, Follow, Share & leave me a comment! I love your feedback!
If you aren’t following me on Facebook & Instagram go on over & give a LIKE & Follow me for daily tips & tricks for your home & garden!
“You are also far less likely to waste food when you have nurtured it from a seed into a plant.” — Darina Allen
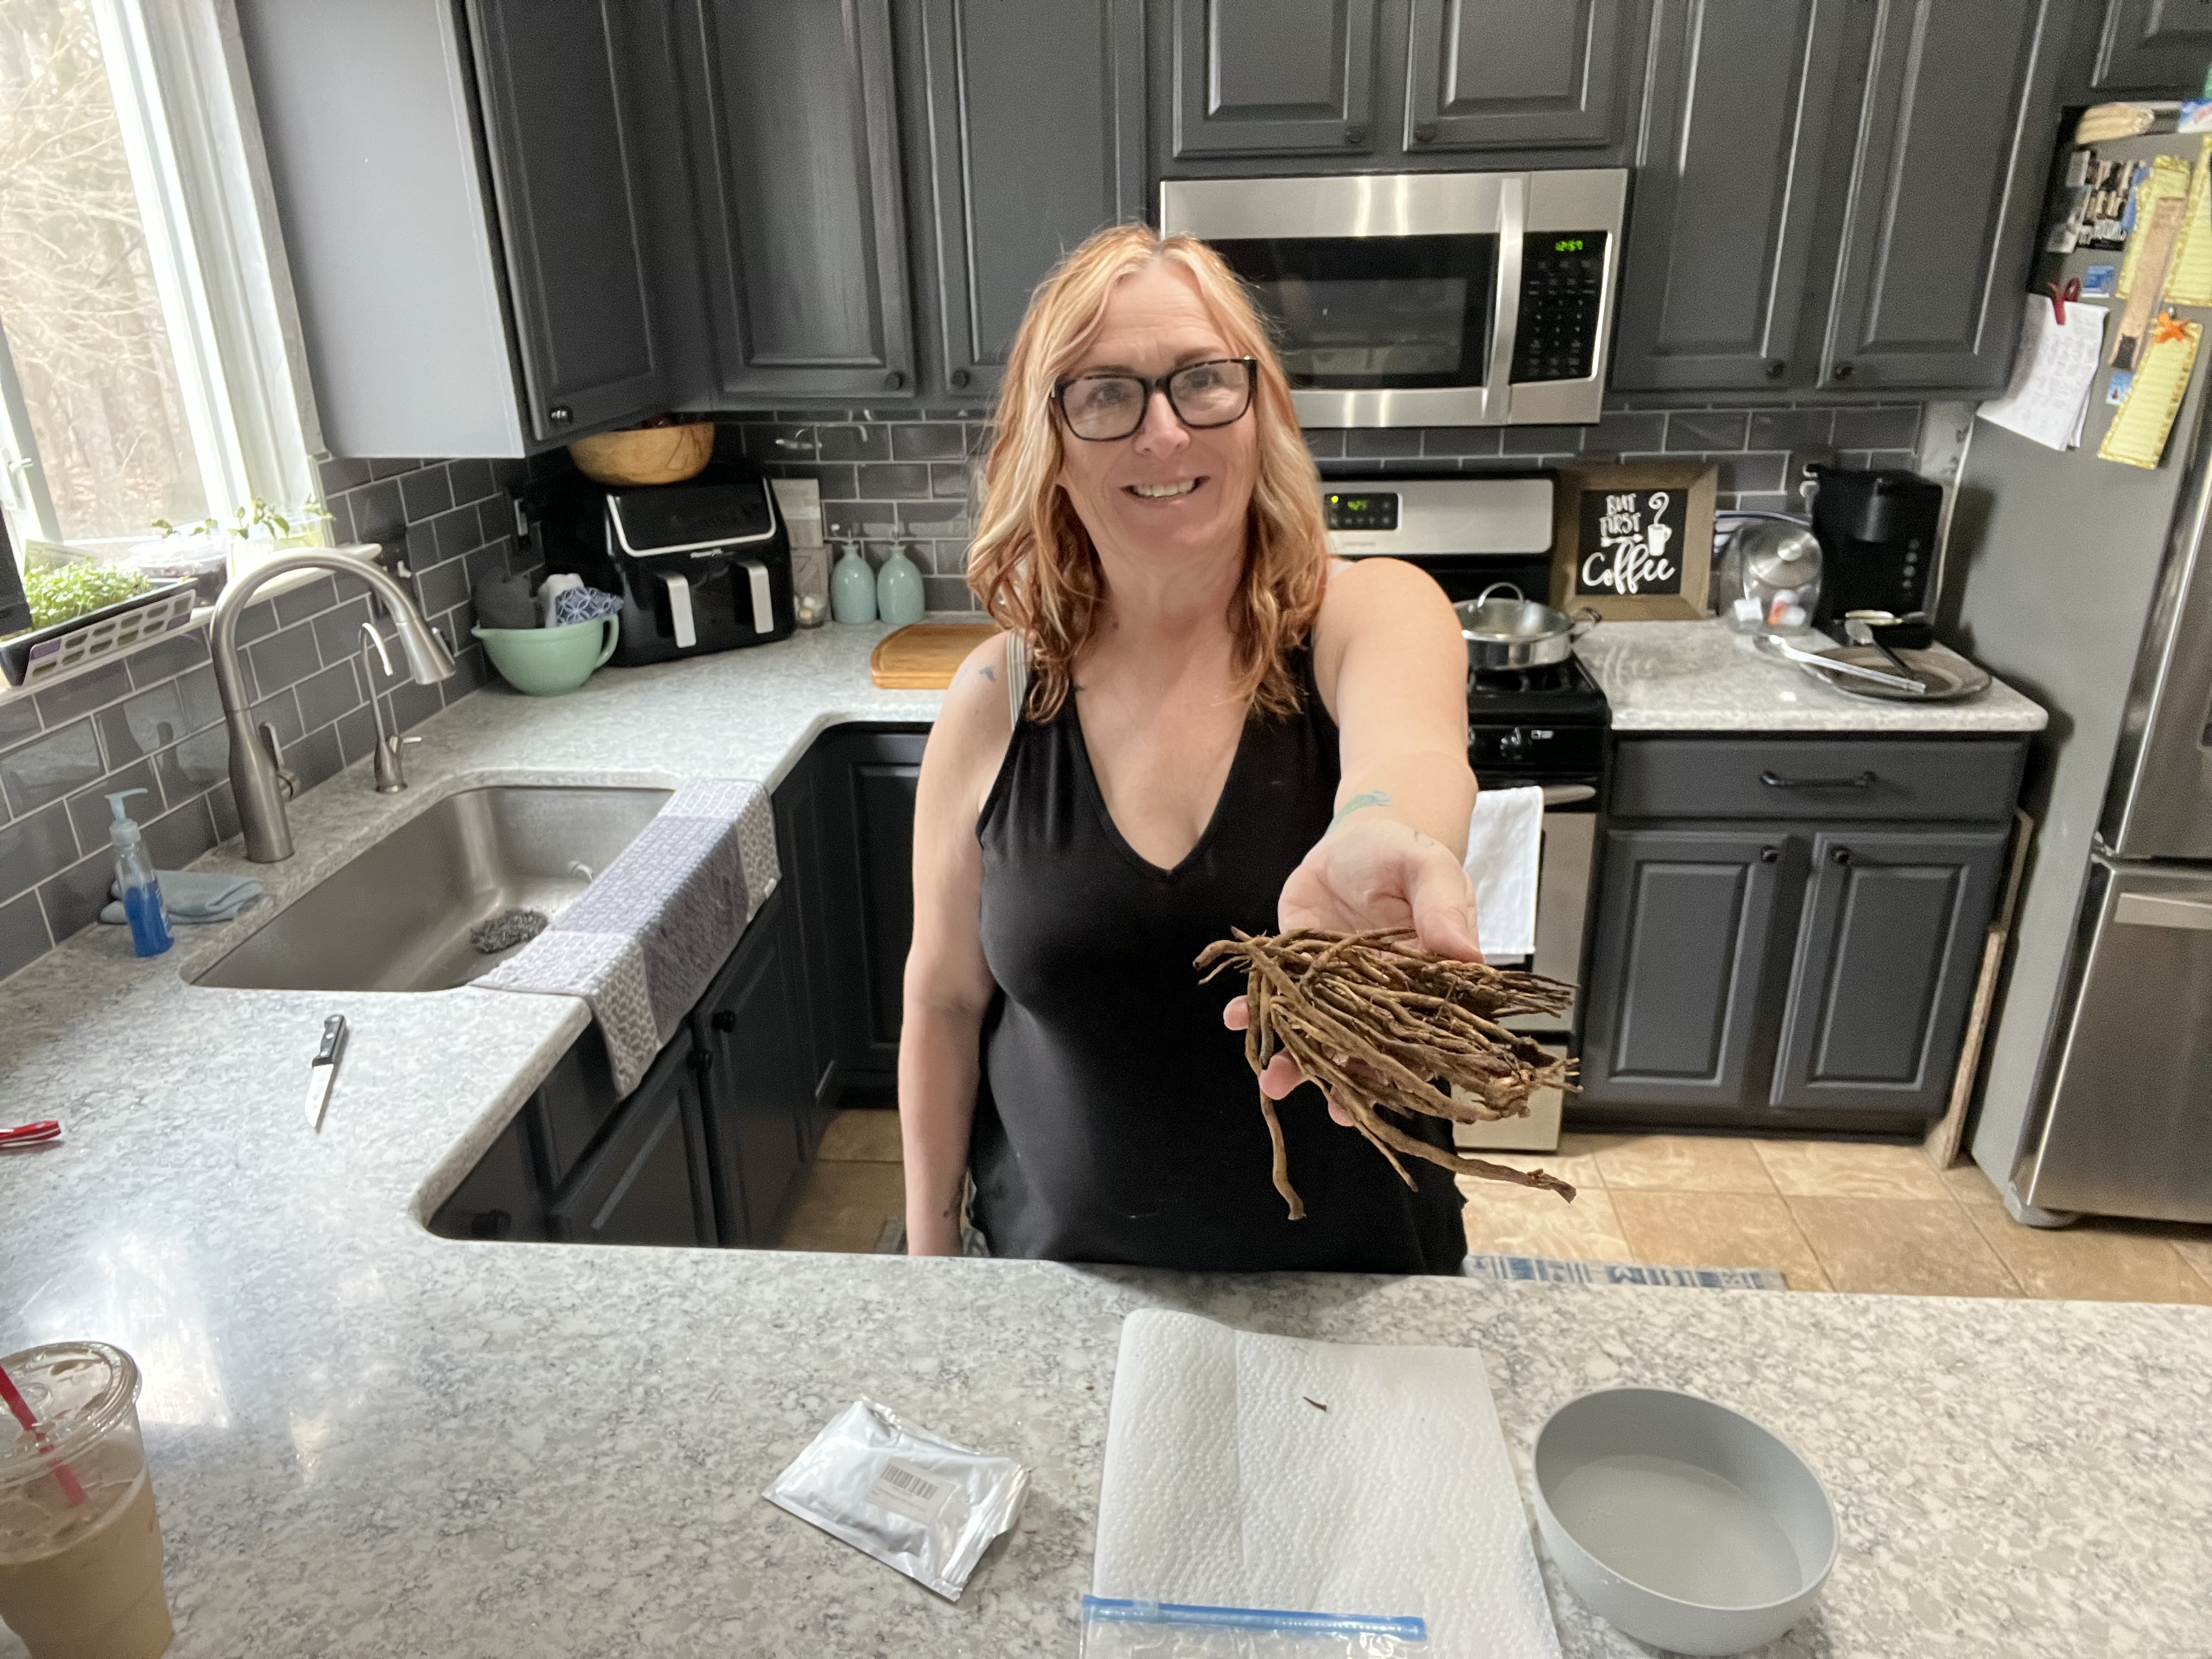
Asparagus is one of my favorite vegetables. It’s tall wispy stalks teasing to cut back and cook on a grill slathered with thyme infused olive oil… oh yum. Spring’s bounty can’t come quickly enough!
As many of you follow me on Facebook and Instagram know, I just recently received my Purple Passion and Martha Washington asparagus crowns. Well, I certainly am not ready to plant these beauties, and I need to make sure they remain moist and viable for when I am ready to plant them.
Check out my video at my YouTube Channel!
Here’s my easy step by step on how to store your asparagus crowns!
Here is a super quick and easy tutorial on how to store your asparagus crowns if you receive them before you are ready to plant them. Be sure to check out my blog on How-to Plant and Care for Asparagus if you missed it!
Step 1: Carefully remove the asparagus crowns from packaging, making sure not to cut any of the roots when opening.
Step 2: Take 4 to 5 sheets of paper towel and stack together, then get them wet; wring out about 90 percent of the water.
Step 3: Place the wet paper towels on your counter or table; Carefully layer the asparagus crowns on the center of the sheets.
Step 4: Carefully fold the wet paper towels over the crowns like an envelope.
Step 5: Place the packaged asparagus crowns into a zip lock type storage bag; carefully press out most of the air being sure not to press on the crowns.
Step 6: Place the package in your vegetable crisper drawer or in the fridge in a location they won’t get crushed or banged around.
Be sure to let your family members know what they are and to be careful.
Check the package weekly to make sure the paper towels are still damp. If they begin to dry out, repeat the process being careful not to damage the crowns or roots.
Once you are ready to plant your asparagus crowns, remove them from the packaging and follow my planting instructions found at my blog post!
“It is a good idea to be alone in a garden at dawn or dark so that all its shy presences may haunt you and possess you in a reverie of suspended thought.” James Douglas
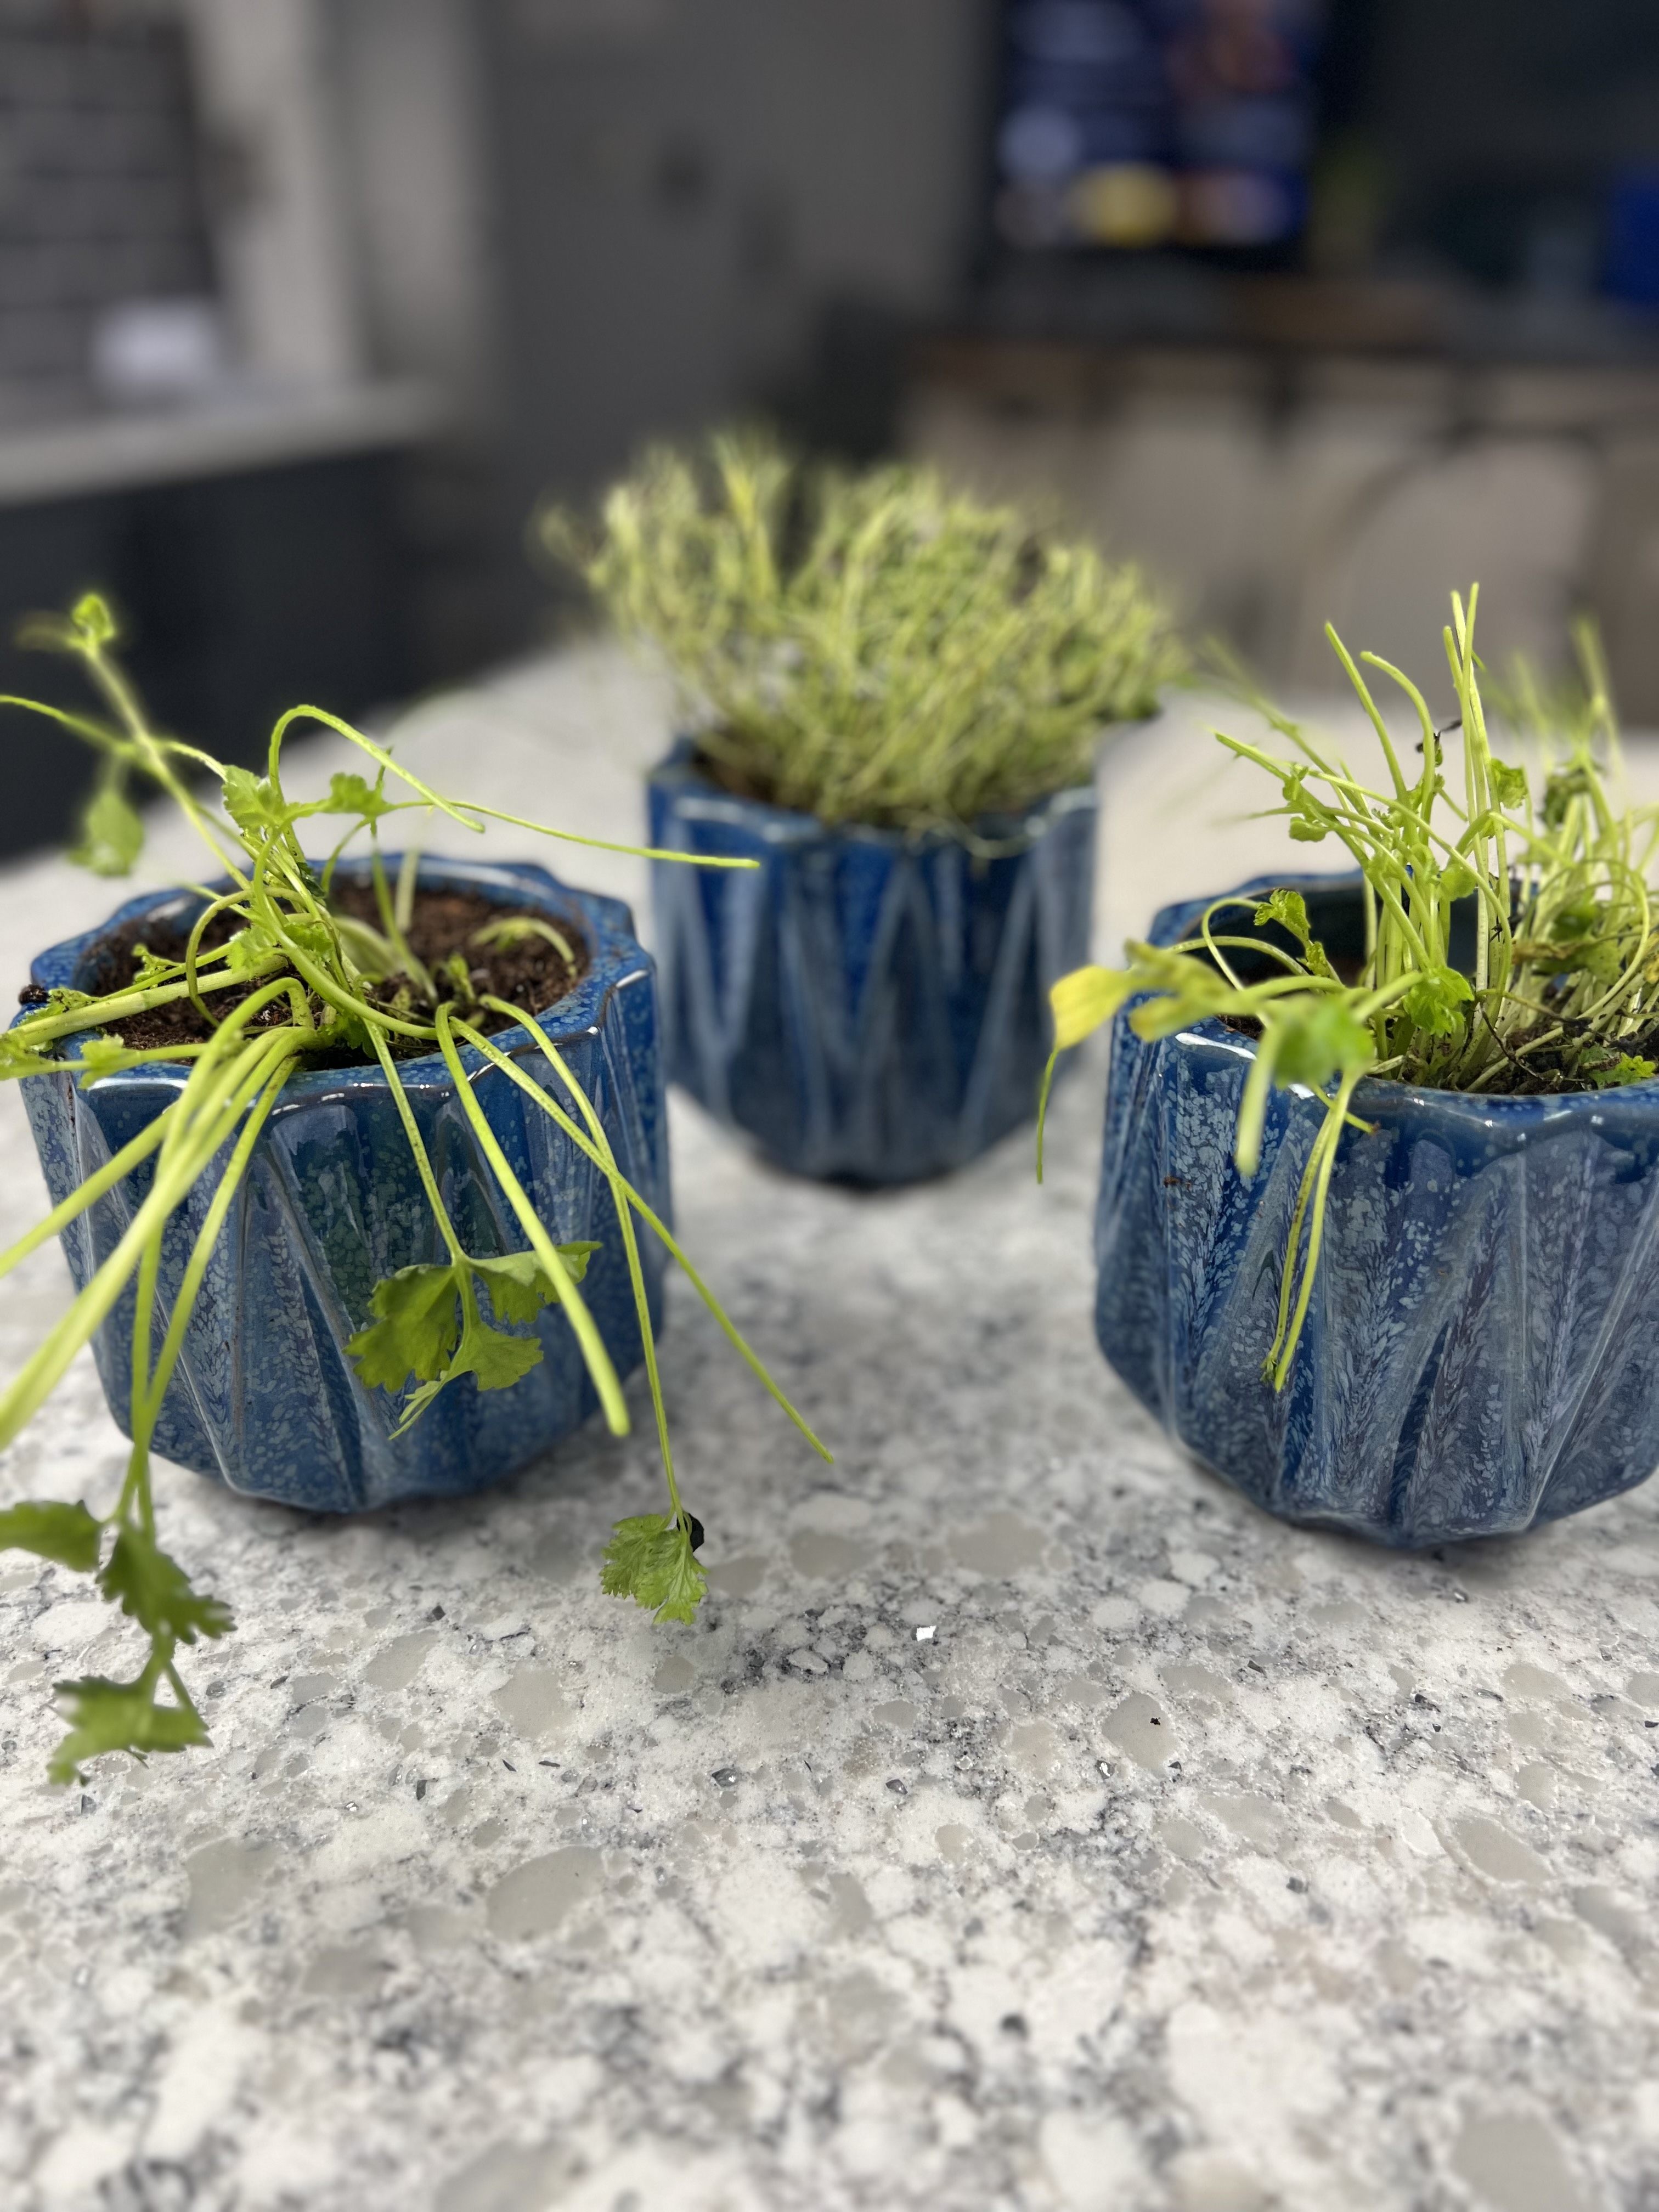
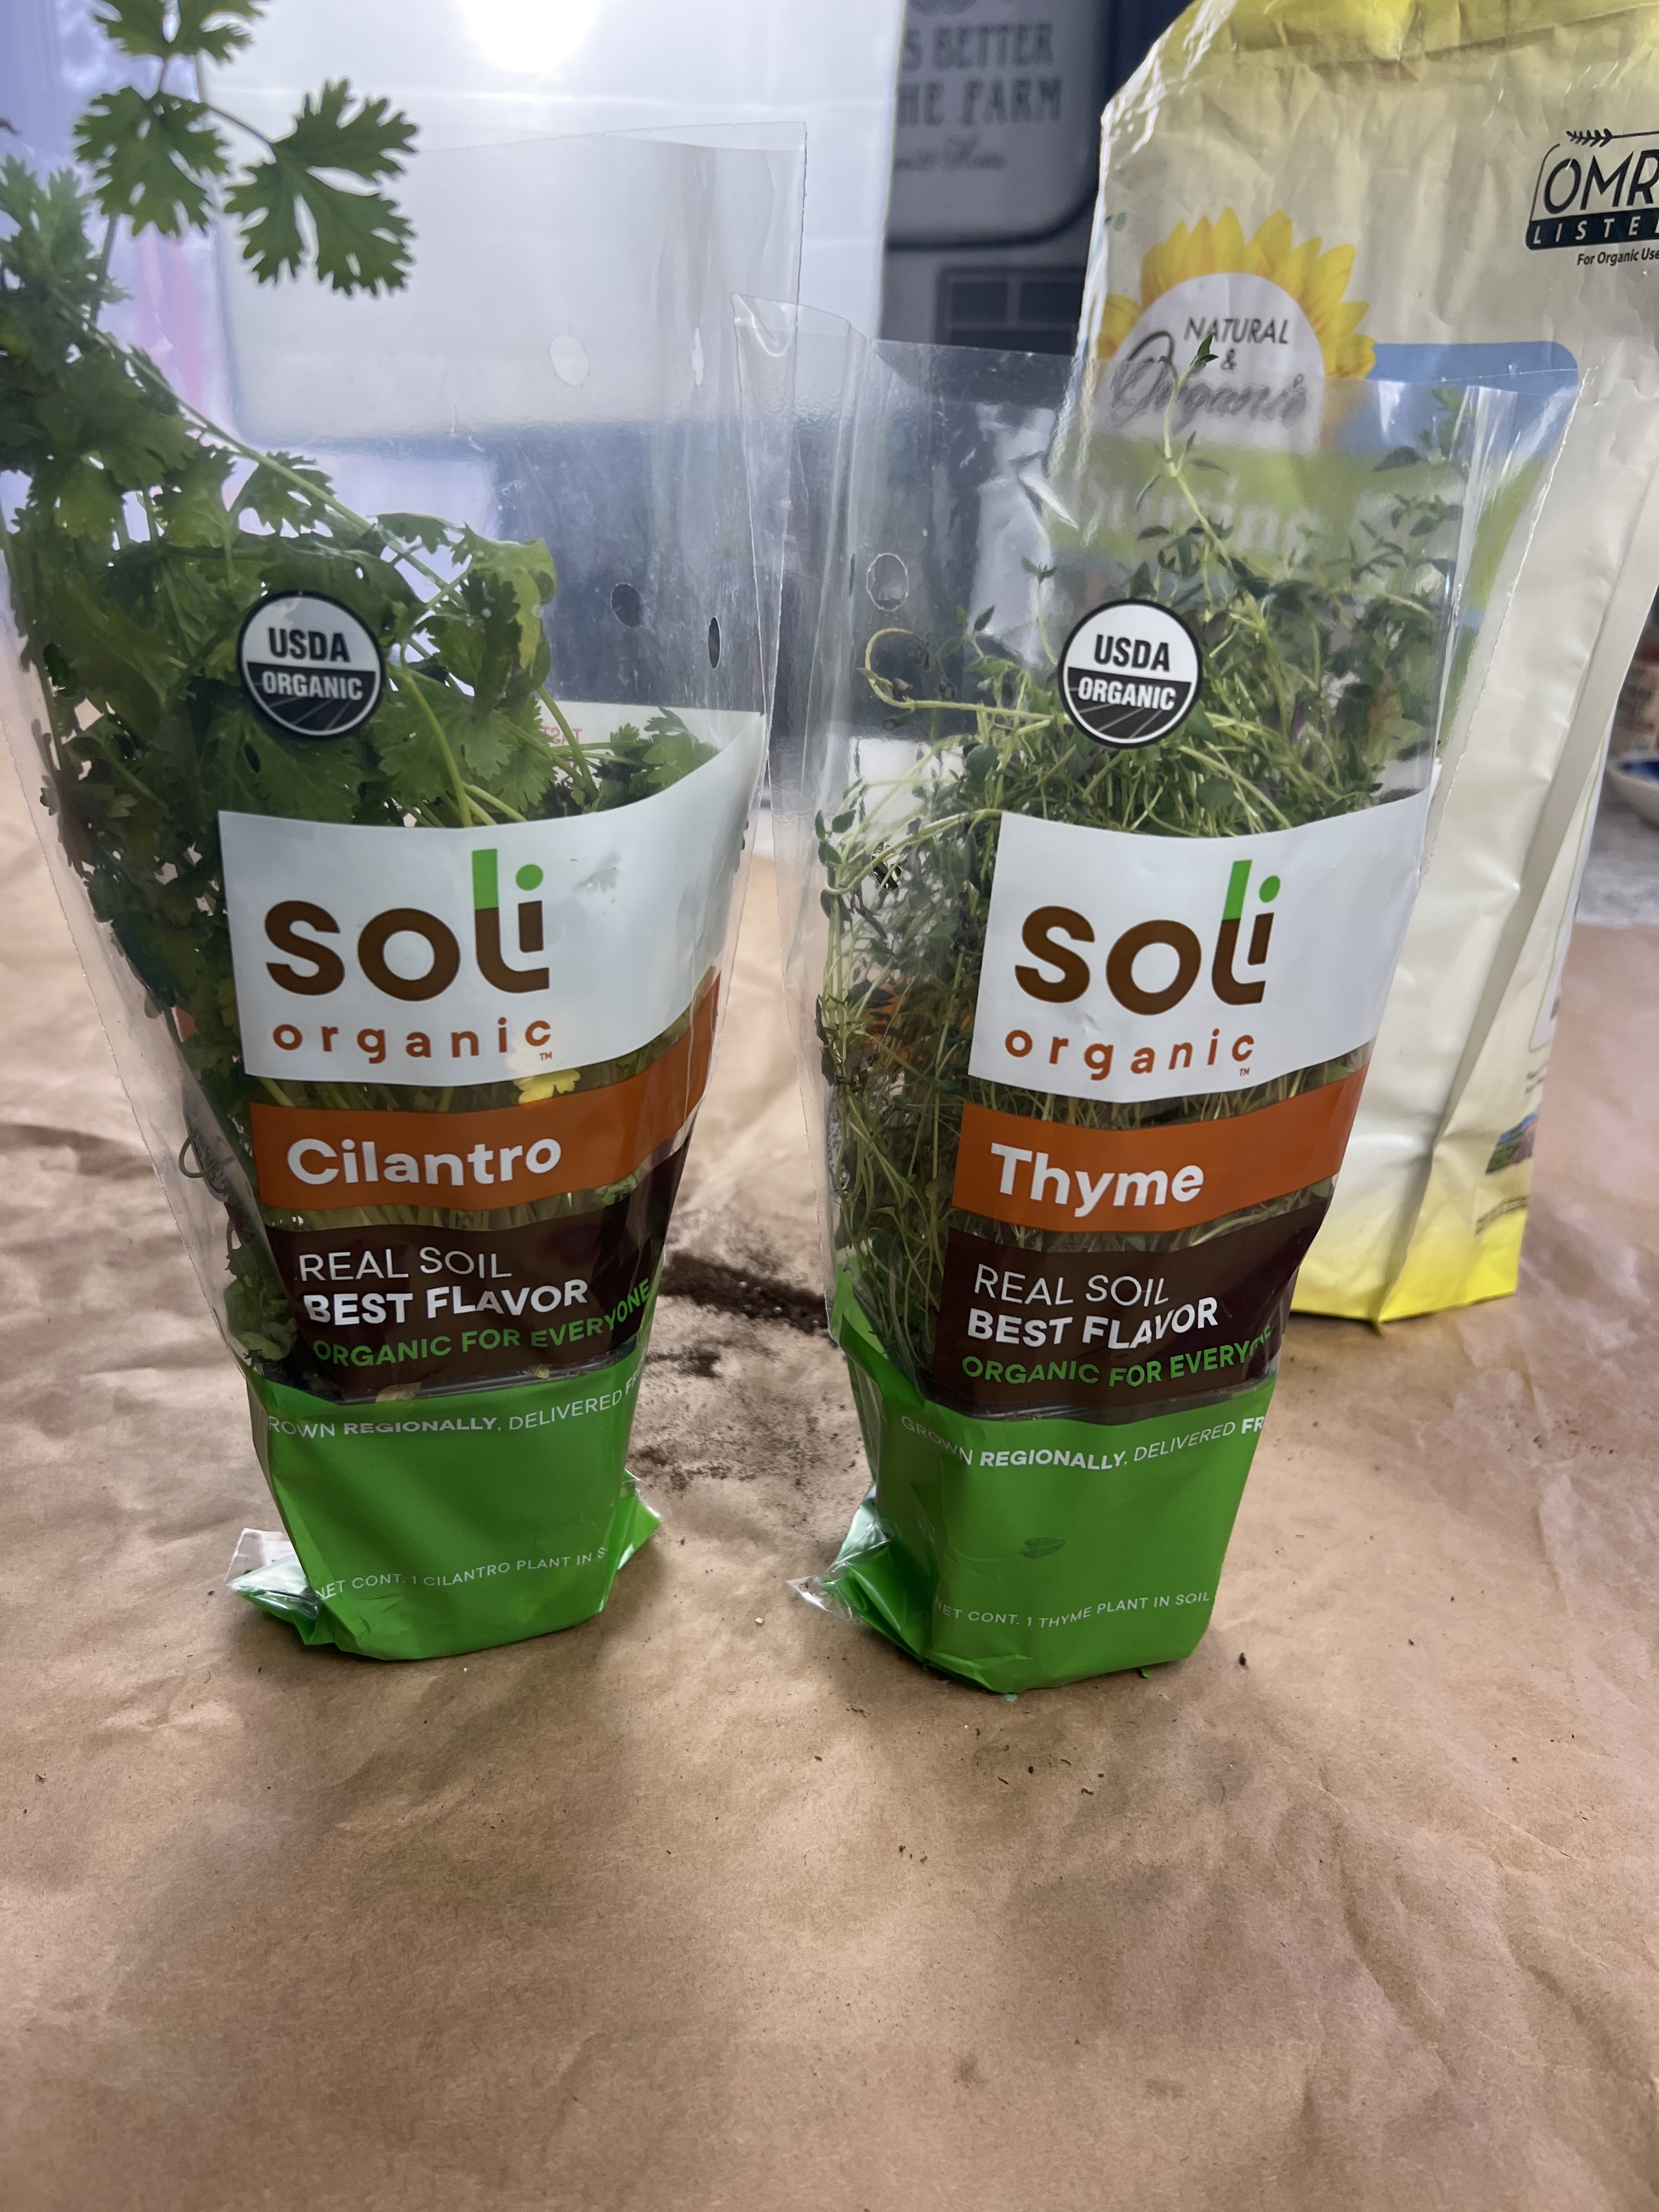
You all know how much I love my herbs, so taking care of them and ensuring they continue to grow & thrive is essential to a bountiful harvest. Dividing them helps to keep them from getting too crowded, which can lead to poor growth and disease.
In this guide, I’ll be taking you through the benefits of dividing overgrown herbs, signs that your herbs need dividing, the best time to divide overgrown herbs, tools needed for dividing herbs, steps for dividing overgrown herbs, tips for planting and caring for divided herbs, common mistakes to avoid when dividing herbs, and recommended herbs to divide. So now lets get rolling friends!
Dividing overgrown herbs is a great way to keep your herbs looking and tasting their best. When you divide your herbs, you’re essentially creating new plants from one plant. This means that the new plants will have fresh, healthy roots and plenty of space to grow. Dividing your herbs can also help to promote new growth and increase the yield of your herb garden. And that’s what we want right friends… more herbs!
What are some of the signs that my herbs need dividing?
So, how do you know when it’s time to divide your herbs? There are a few signs to look out for. If your herbs are looking crowded or are starting to wilt, it’s probably time to divide them. You may also notice that your herbs are not growing as well as they used to, or that they are producing fewer leaves or flowers.
When is the best time to divide my overgrown herbs?
The best time to divide overgrown herbs is in the early spring or fall. This is when the plants are not actively growing, which makes it easier to divide them without causing too much stress. It’s also important to divide your herbs when the soil is moist, as this will help to minimize shock to the plants. If the soil is dry, I advise watering the soil and letting it set for about an hour before you divide.
Some of the tools you’ll need to divide your herbs!
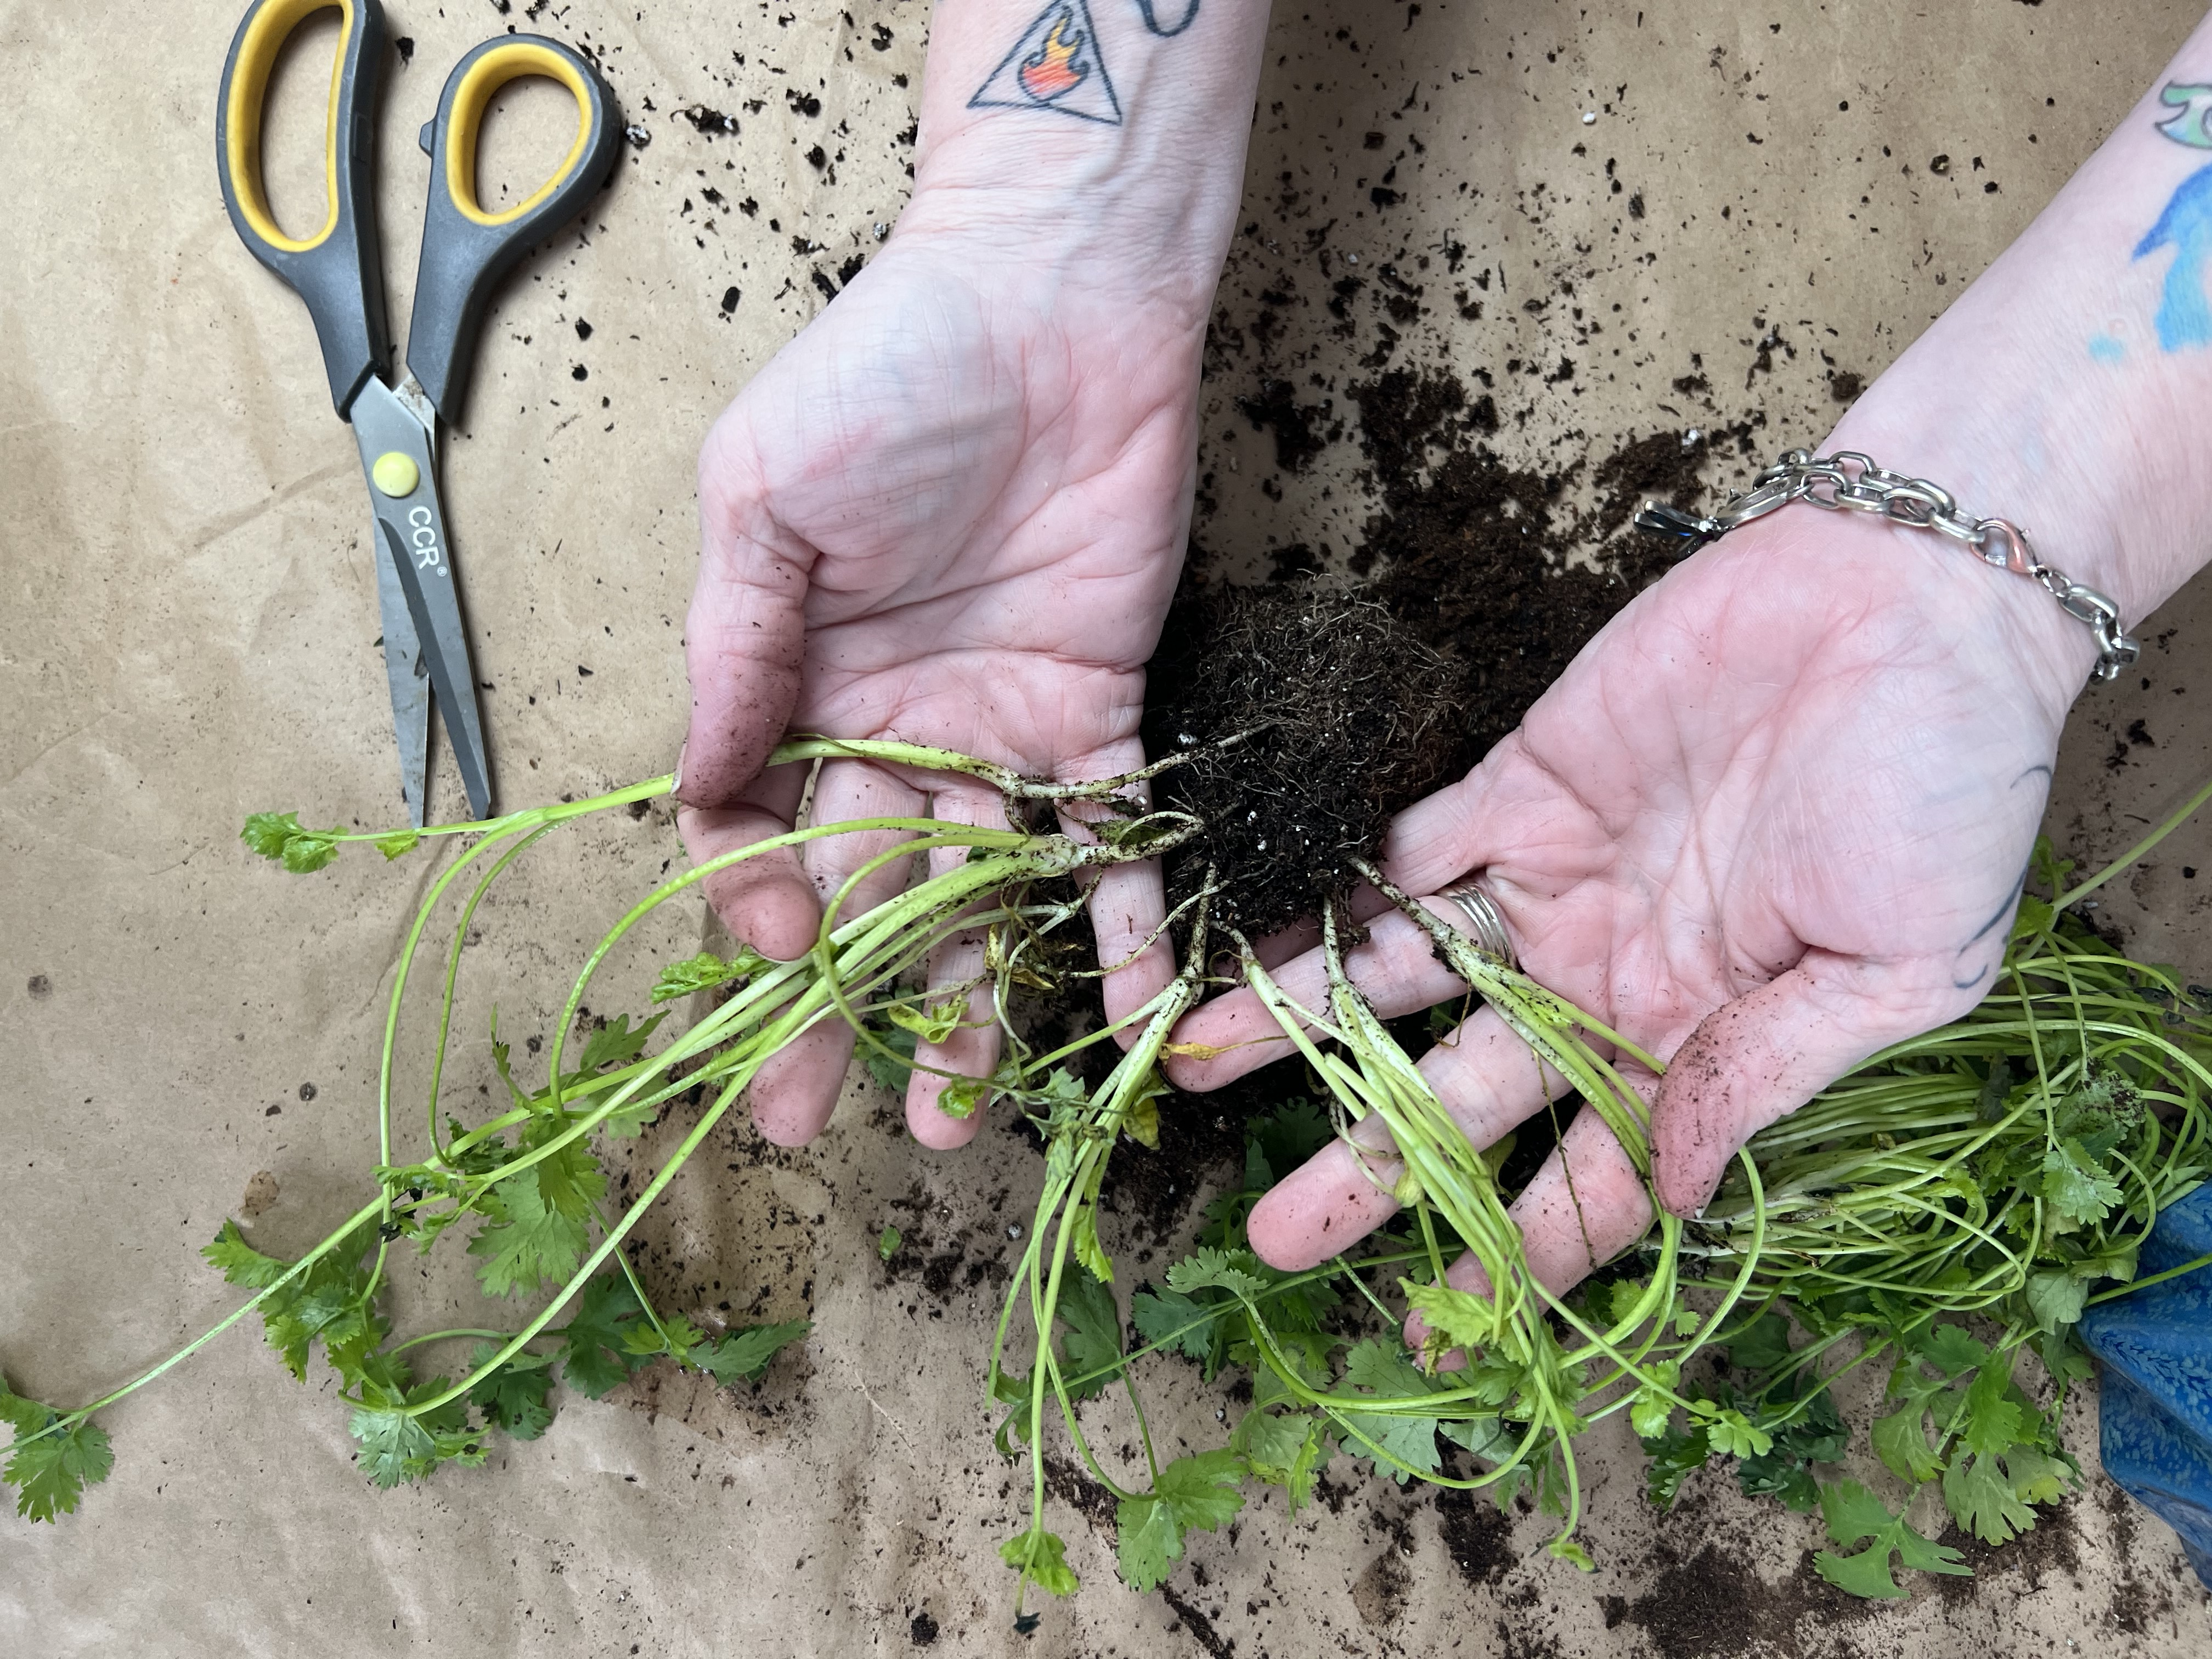
To divide your herbs, you’ll need a few tools. These include a sharp pair of pruning shears or scissors, a garden fork or spade, and a container or pot for your new plants. You may also want to have some compost or fertilizer on hand to give your new plants a boost. If you are dividing herbs you purchased from a garden center still in its original planter, then you’ll need to carefully remove the plant and separate. See my video.
Here are the herbs I recommend that divide easily!
Not all herbs need to be divided, but some do better when they are divided regularly. Here are a few herbs that are great candidates for dividing:
Mint
Oregano
Thyme
Chives
Sage
5 Easy Steps to Dividing Your Overgrown Herbs!
Now that you have all of your tools ready, it’s time to start dividing your overgrown herbs. Follow these steps if you are dividing plants you already have planted or if you are dividing plants still in their original container:
Start by gently digging up the entire plant using your garden fork or spade. Be careful not to damage the roots. If you have a new plant in it’s original container, simply slide the whole plant out of the container.
Once the plant is out of the ground or container, gently shake off any excess soil. You can gently pull apart roots if they are root bound in the container.
Use your pruning shears or scissors to cut the plant into smaller sections. Make sure that each section has a healthy root system and a few leaves or stems.
Replant each section in a new container or pot, making sure to space them out evenly.
Water your new plants well and add some compost or fertilizer to give them a good start.
Here are a few tips & tricks for planting & caring for your newly divided herbs~
After dividing your herbs, it’s important to give them the proper care to ensure that they thrive. Here are a few tips to help you out:
Water your new plants regularly, but be careful not to over-water them. Herbs prefer well-drained soil, so make sure that your containers have drainage holes.
Place your new plants in a sunny spot. Most herbs prefer at least 6 hours of sunlight a day.
Pinch back any flowers or buds that appear during the first few weeks after dividing. This will help your plants to focus on growing healthy roots and leaves.
Fertilize your new plants every 2-3 weeks with a balanced, all-purpose fertilizer.
Harvest your herbs regularly to encourage new growth.
Avoid these common mistakes when you divide your herbs!
Dividing overgrown herbs is a relatively simple process, but there are a few common mistakes that you’ll want to avoid. These include:
Dividing your herbs too often. Most herbs only need to be divided every 2-3 years.
Don’t divide your herbs in the middle of the growing season. This can stress the plants and make it harder for them to recover.
Not giving your new plants enough space. Make sure that each new plant has enough room to grow and develop a healthy root system.
Over-watering your new plants. Herbs prefer well-drained soil, so make sure that your containers have drainage holes.
Dividing overgrown herbs is an important task for any herb gardener. By dividing your herbs, you’ll be able to keep them healthy and productive year after year. Remember to divide your herbs in the early spring or fall, and be sure to give them the proper care and attention they need to thrive. With a little bit of effort, you’ll be rewarded with a bountiful harvest of fresh, flavorful herbs that you can use in all of your favorite recipes.
If you enjoyed this blog, please LIKE, Follow, Share & leave me a comment! I love your feedback!
If you aren’t following me on Facebook & Instagram go on over & give a LIKE & Follow me for daily tips & tricks for your home & garden!