“Cooking with kids is not just about ingredients, recipes, and cooking. It’s about harnessing imagination, empowerment, and creativity.” – Guy Fieri
As you all know I love cooking with my boys! It’s generally a family affair and we have lots of fun. In addition to having taco nights, we also do a nacho & pizza night. You can see those blog posts here. Having the kids help in preparing the meals makes it a lot more fun, & they feel like they get a say in the matter as well.
If you have picky eaters or you just want to create a fun family dinner night, check out our Taco Bar options!
This is also a great dish to serve at a party!
To watch Aaron & I create our taco bar, check it out at my YouTube Channel below!
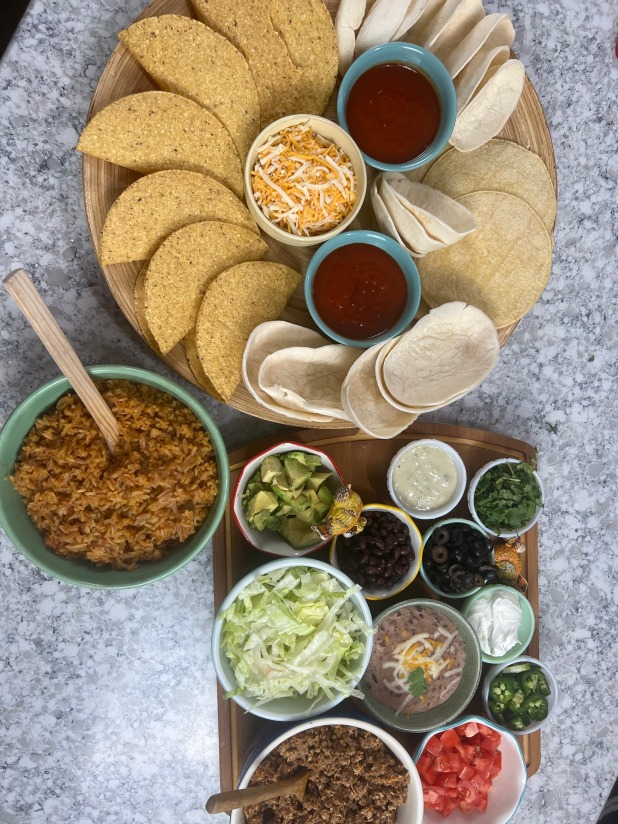
Here’s the easy how to with pics!
Our Favorite Recipes
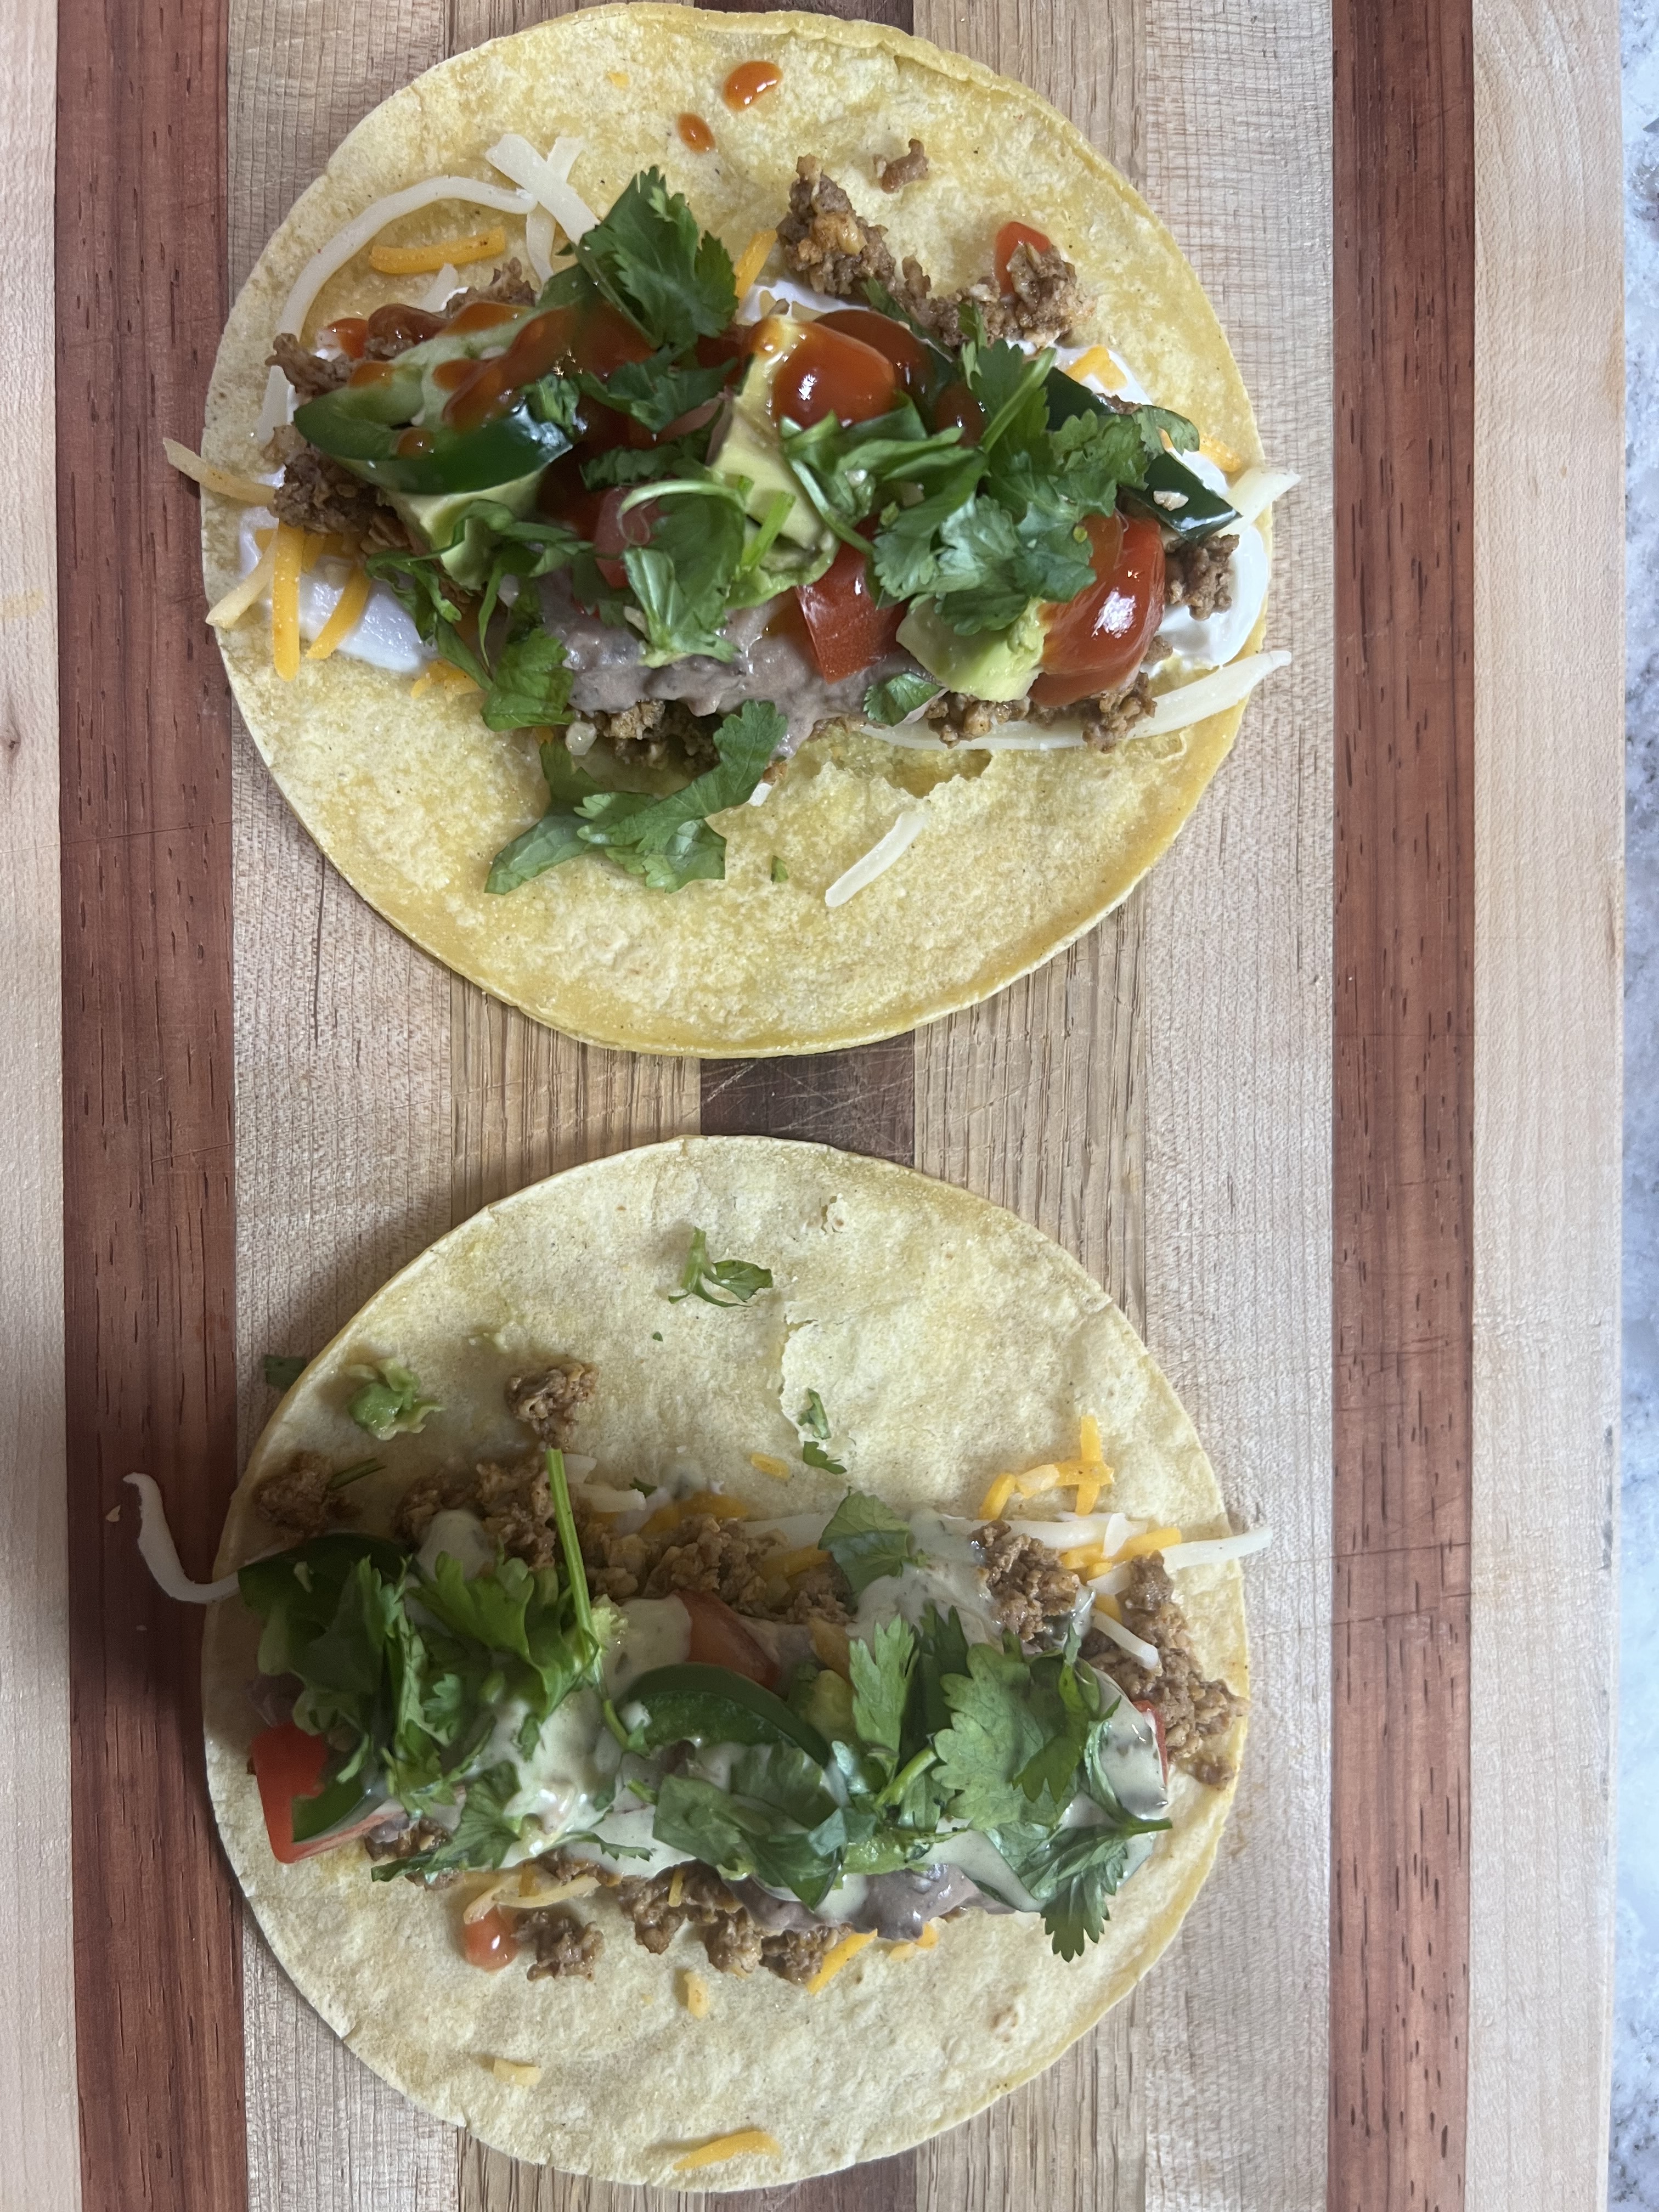
Ingredients: Yields 8 cups of taco meat. I recommend using about ¼ to ½ cup per shell depending on size
Variety of taco shells~ We use hard & soft tortilla shells & boats, as well as corn tortillas for a street food flare!
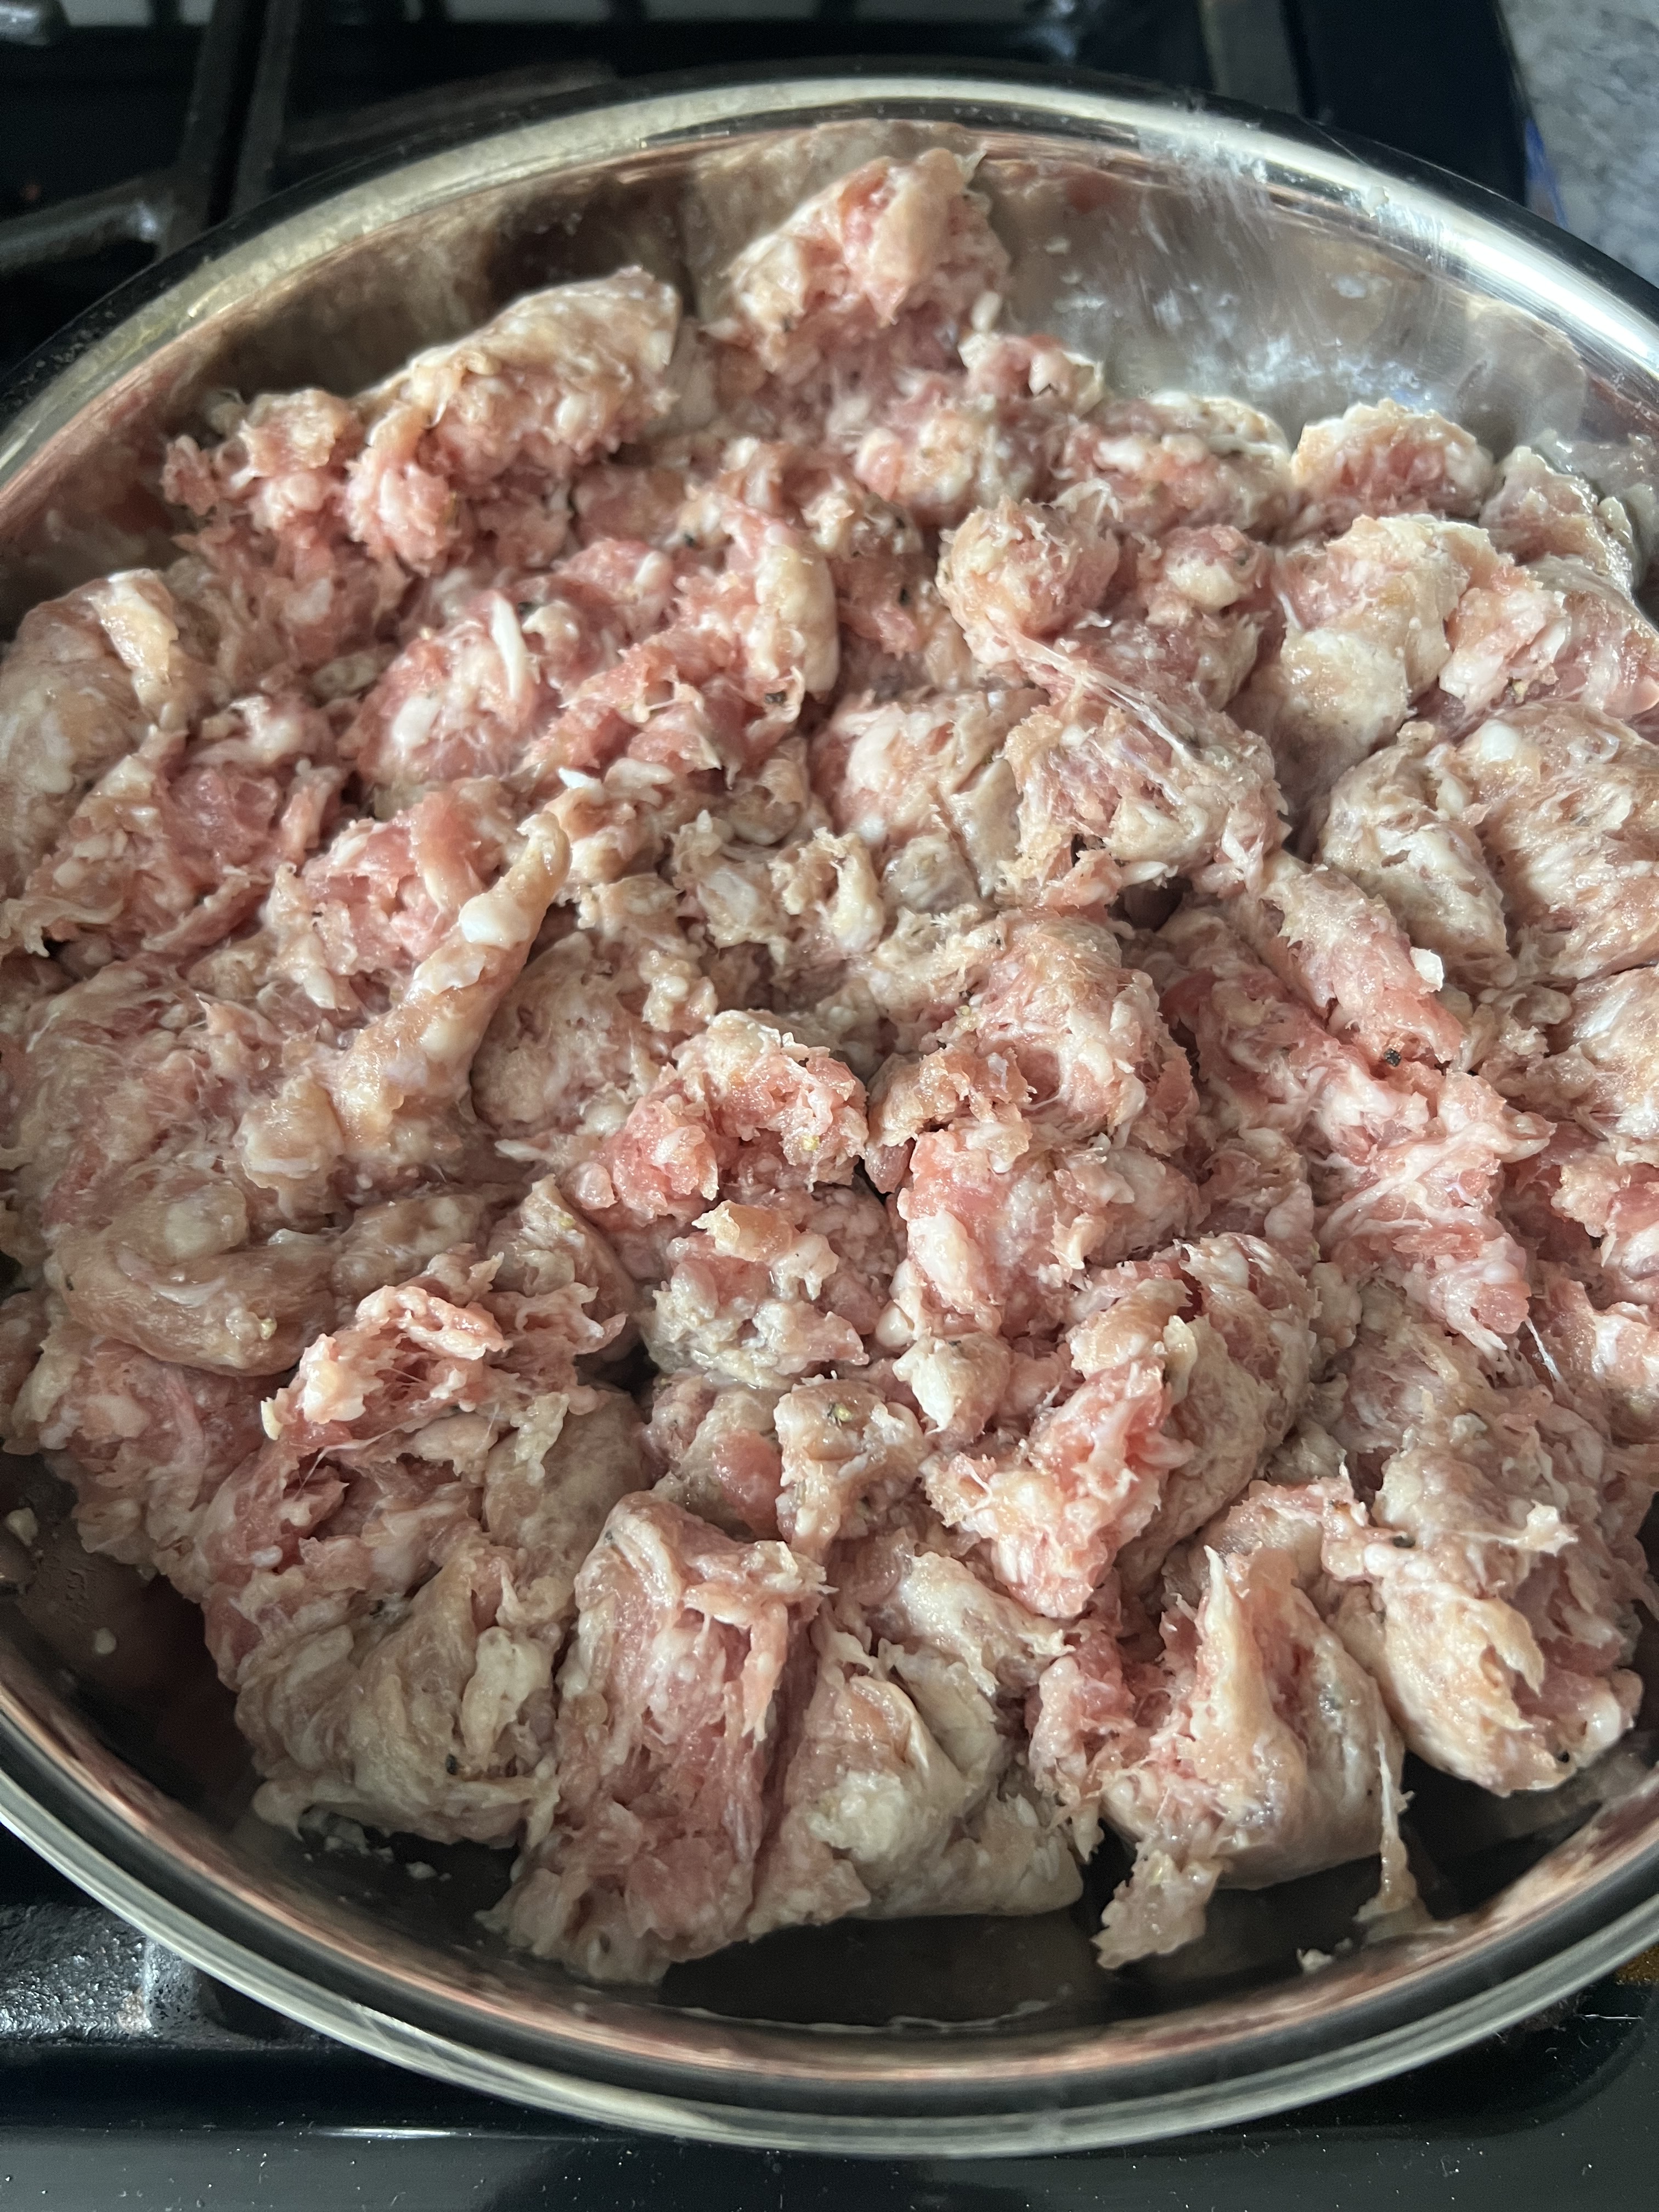
1 pound ground beef
1 pound plain ground pork
1 TBSP olive oil
2 fresh cloves of garlic minced or 2 tsp jarred
2 packages of taco seasoning or switch it up and use chorizo seasoning packets
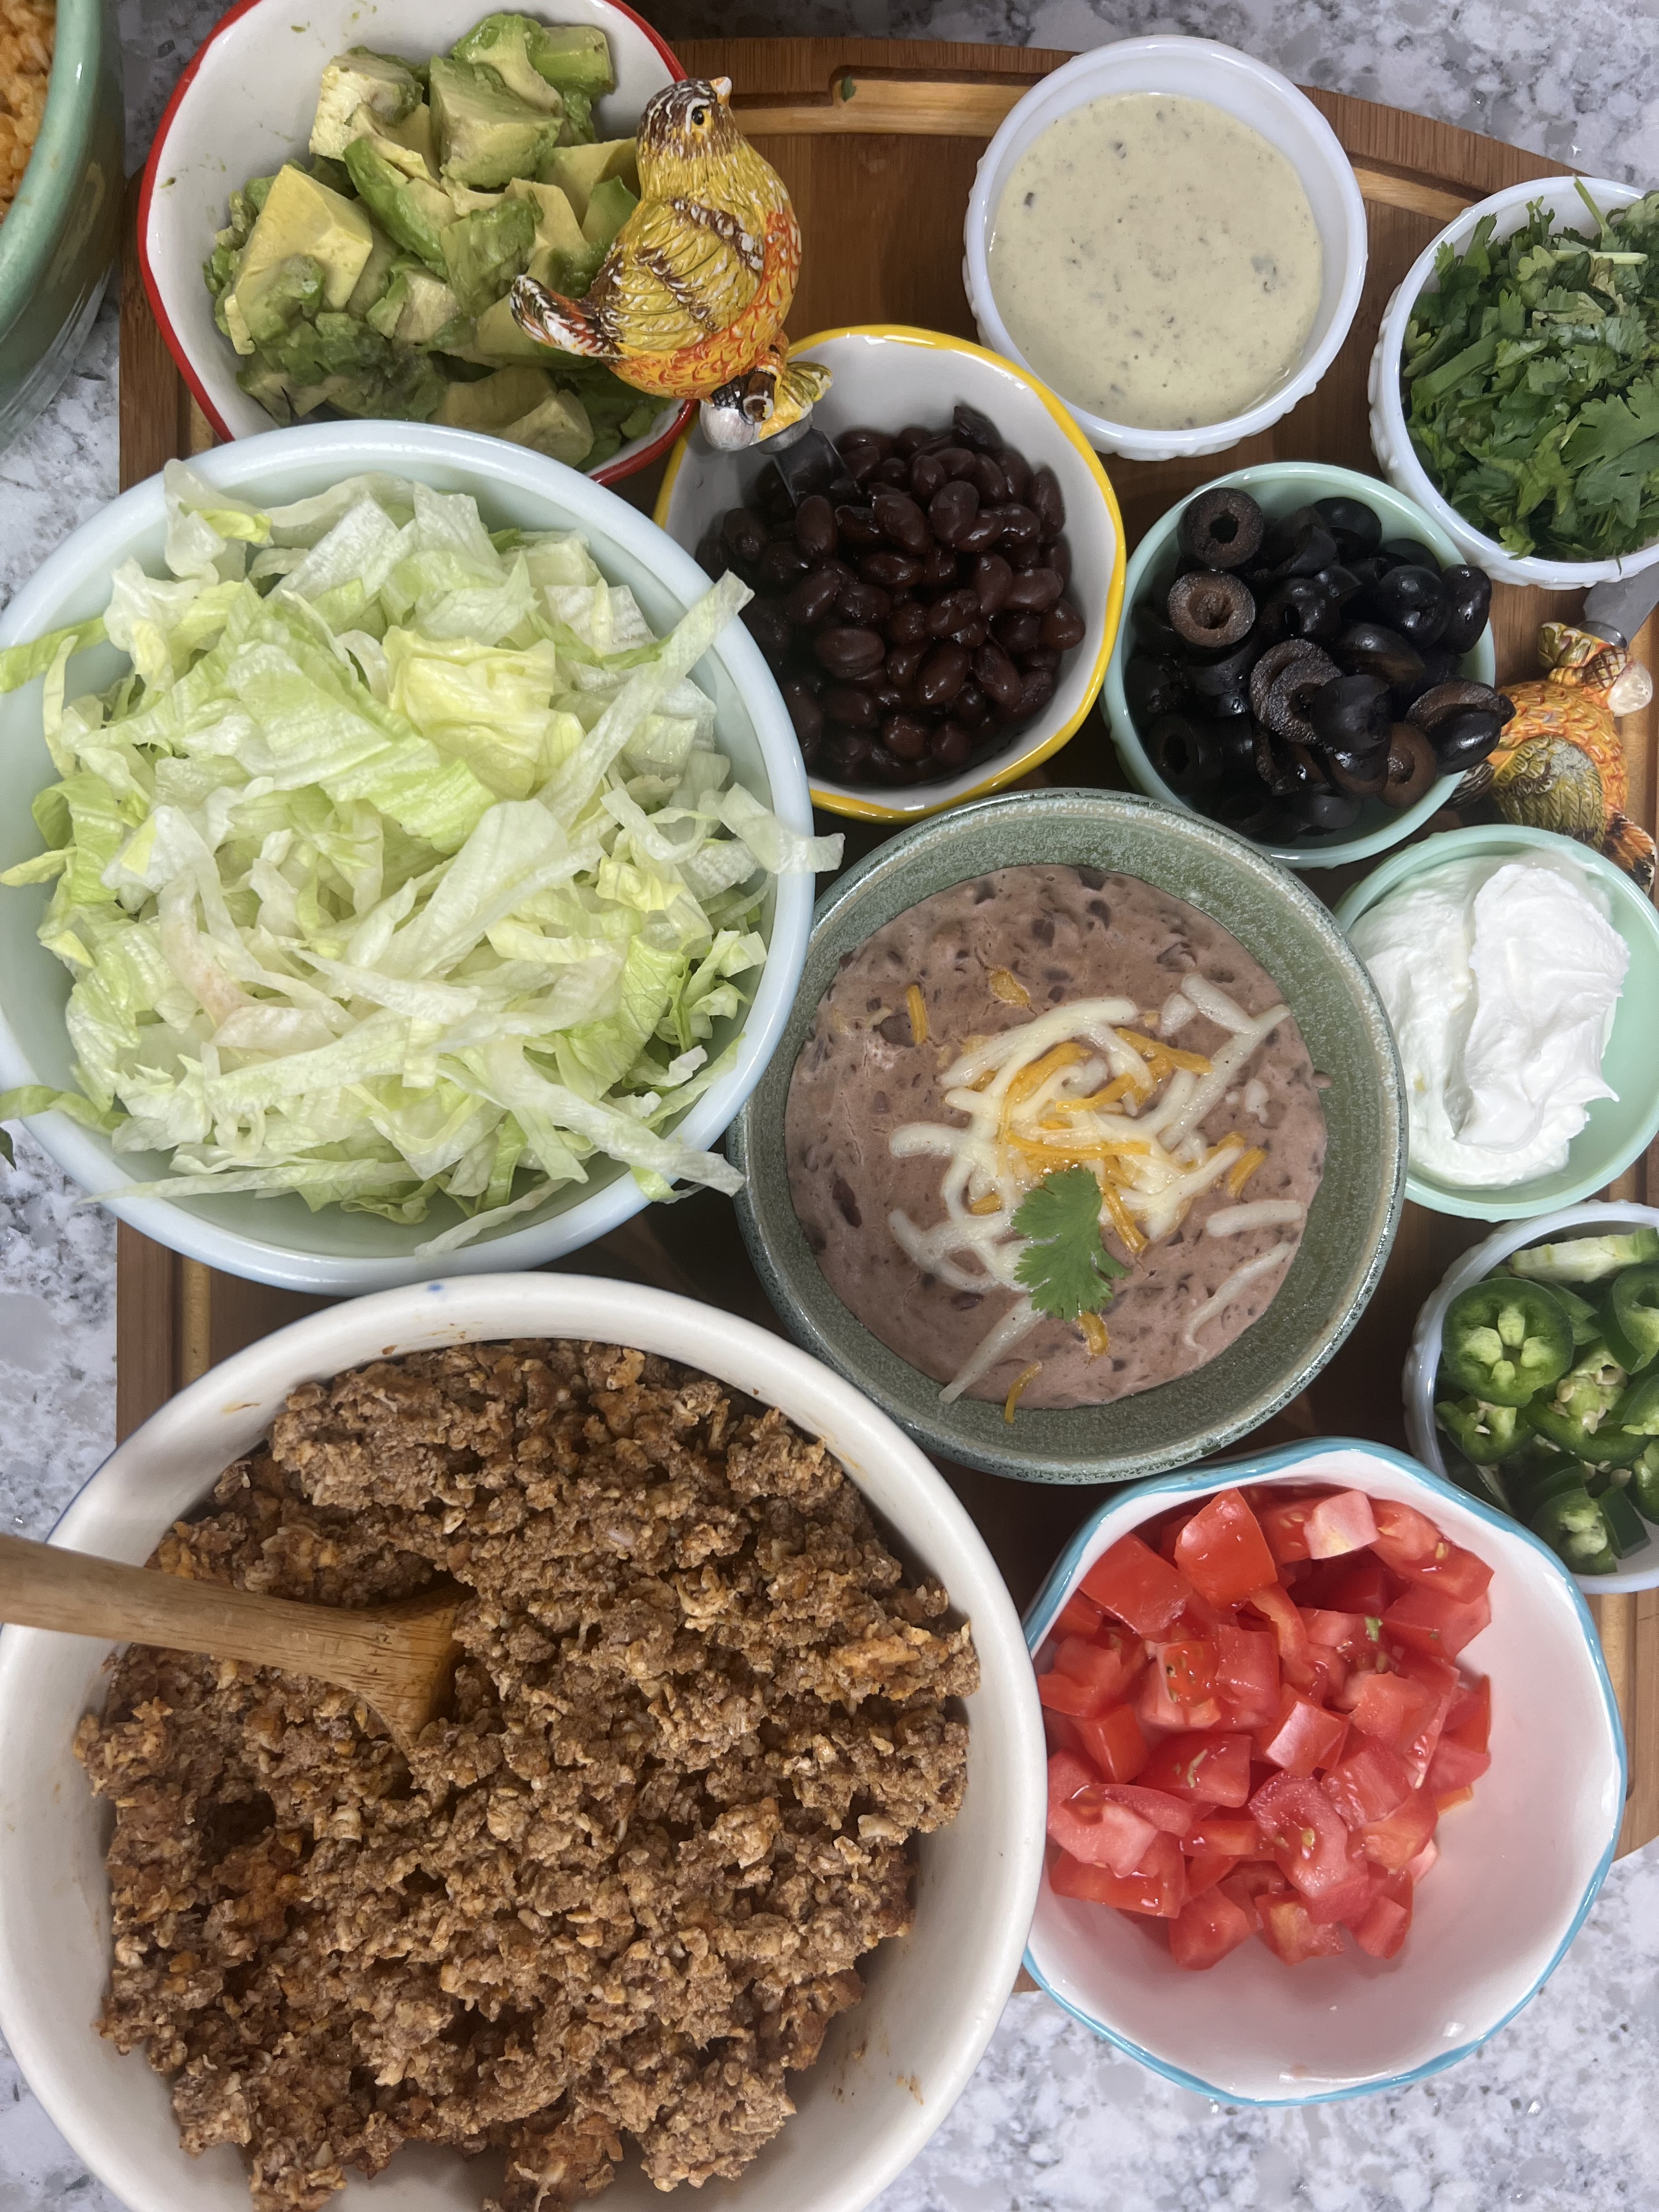
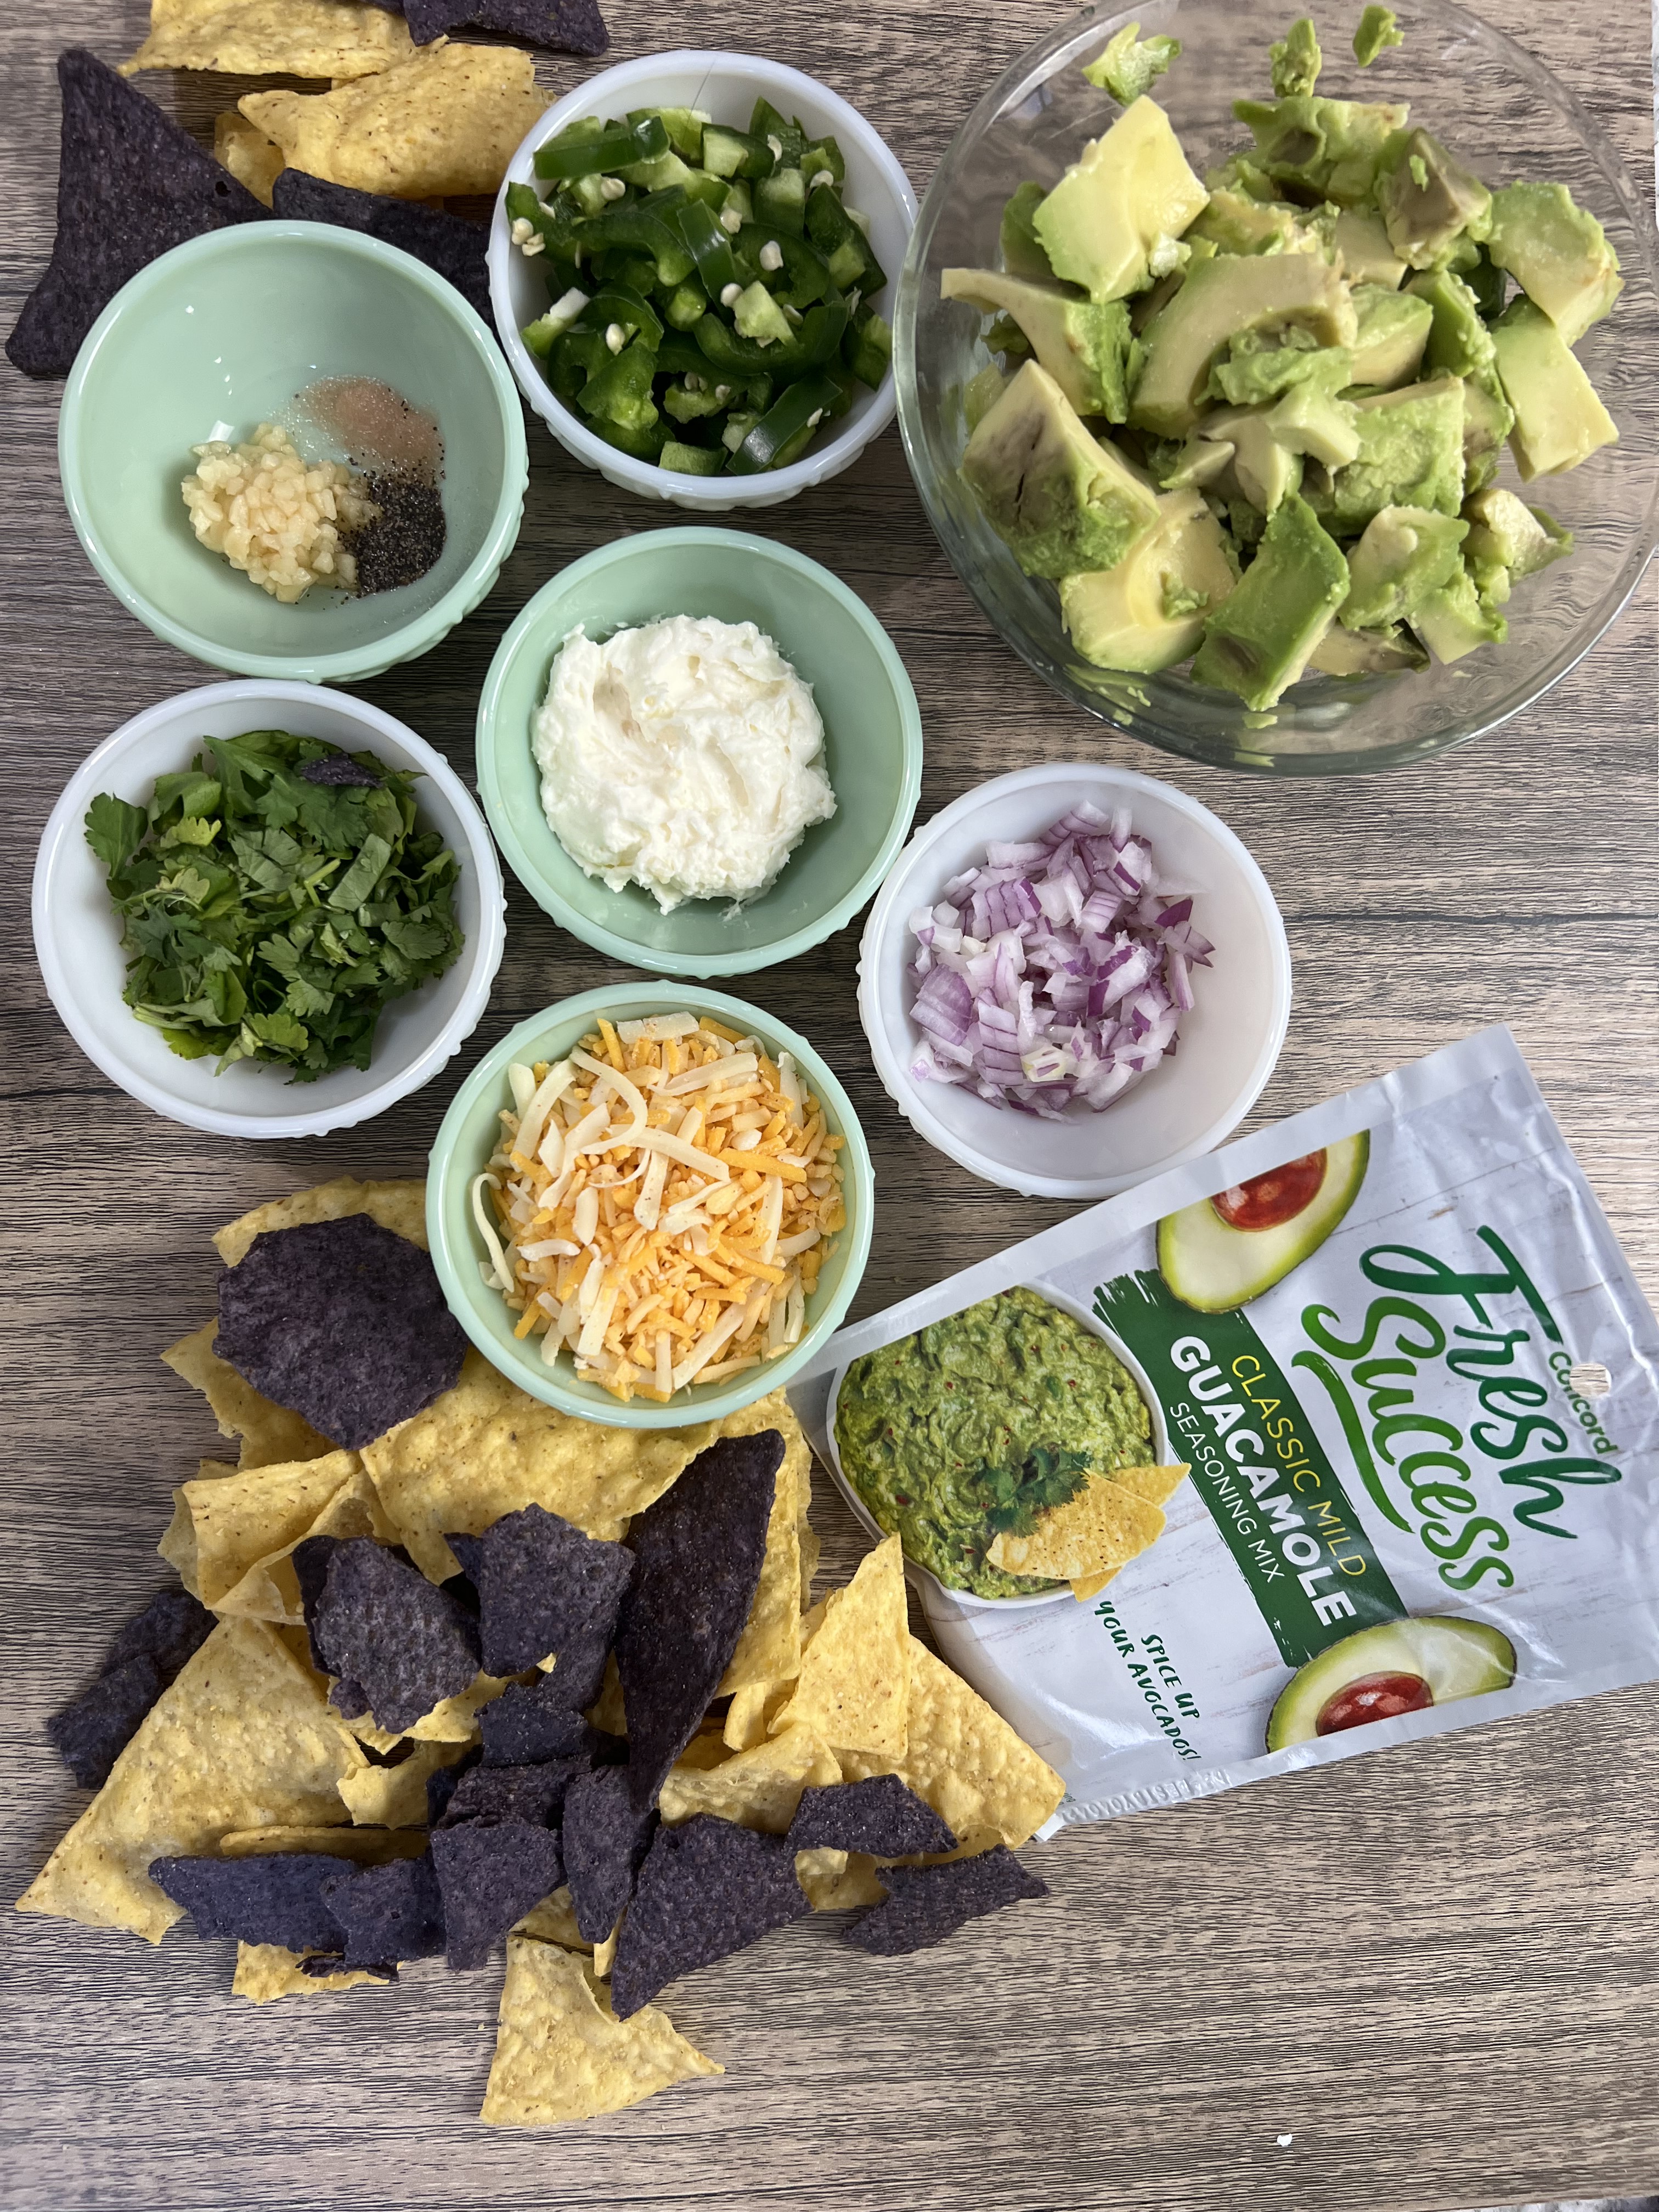
Toppings we use, but you can add anything your family enjoys:
Head lettuce, cut and diced Onion Black and green olives Fresh cilantro Jalapeno peppers Roma tomatoes Sour cream Taco sauce Avocado or Guacamole~ check out my easy recipe! Shredded taco blend cheese
Recipe for Homemade Refried Beans!
Watch my super easy how-to make homemade refried Beans!
1. In a skillet fry your ground meat in olive oil until about half done; add garlic and both packages of taco seasoning; blend well and cook until done & crumbled; drain off any excess grease as necessary.
While your meat is frying, cut all veggies as desired and get all other toppings in bowls for easy access.
We love Guacamole on our nachos, taco’s, and in a dip!
Remember to eat fresh, shop local, & have a happy day! Jean
Copyright Policy
All text and images on this site are copyright of For Dragonflies And Me. Unless otherwise noted, you may not use this content without written permission.
“Cooking is all about people. Food is maybe the only universal thing that really has the power to bring everyone together. No matter what culture, everywhere around the world, people get together to eat.” – Guy Fieri
Mexican dishes are always a well received dish here in our home, that is for sure. Whether it’s fajitas, tacos, nachos, tamales, or enchiladas, my men smile!
This super easy and very filling meal is so easy to make. Of course there are a few variations you can find in my cookbook, but this one is a NEW spin on it.
What’s your favorite Mexican dish? Any tips & tricks you’d like to share with me and all my wonderful Dragonfly friends? If so, be sure to leave me a comment.. I love your feedback!
Check out my video for the step by step guide on how to put together this super easy & delish Mexican Fiesta Chip Dip!
Here is a simple and easy step by step!
Get new recipes delivered to your inbox.
Our Favorite Recipes
Ingredients: Yields 6 to 12 enchiladas depending on the size of the tortilla you use. I am using the extra large in this video, and I was able to make 6.
2 pounds ground pork- you can use beef or a mixture of both if you prefer
2~ 1 ounce package of Kinders brand Mexican seasoning or a chorizo blend
2 small shallots, diced finely
2 fresh cloves of garlic minced OR 2 tsp jarred
1 tsp extra virgin olive oil
6 extra large flour tortilla shells or 10-12 small
2 cups refried beans- see my recipe
1~ 16 ounce can your favorite enchilada sauce, red or green
Variety of shredded cheeses~ I used a shredded taco blend & queso, along with a soft fresco cheese
Toppings:
Fresh snipped cilantro
Diced tomatoes
Olives green or black
Jalapeno peppers
Sour cream
Green onions
Salsa
Guacamole
Various taco sauces
Click this LINK for my super easy & yummy refried beans recipe!
1. In a skillet, heat olive oil; add meat, spice, garlic, and onions; sauté until golden brown; drain any excess grease and set aside.
2. In a 9x13x2 inch baking dish, pour about 1 cup of the enchilada sauce on the bottom of the dish.
3. Next, take your tortillas and shape them into a taco fashion and lay side by side folded upward in the dish. You can either go widthwise or lengthwise.
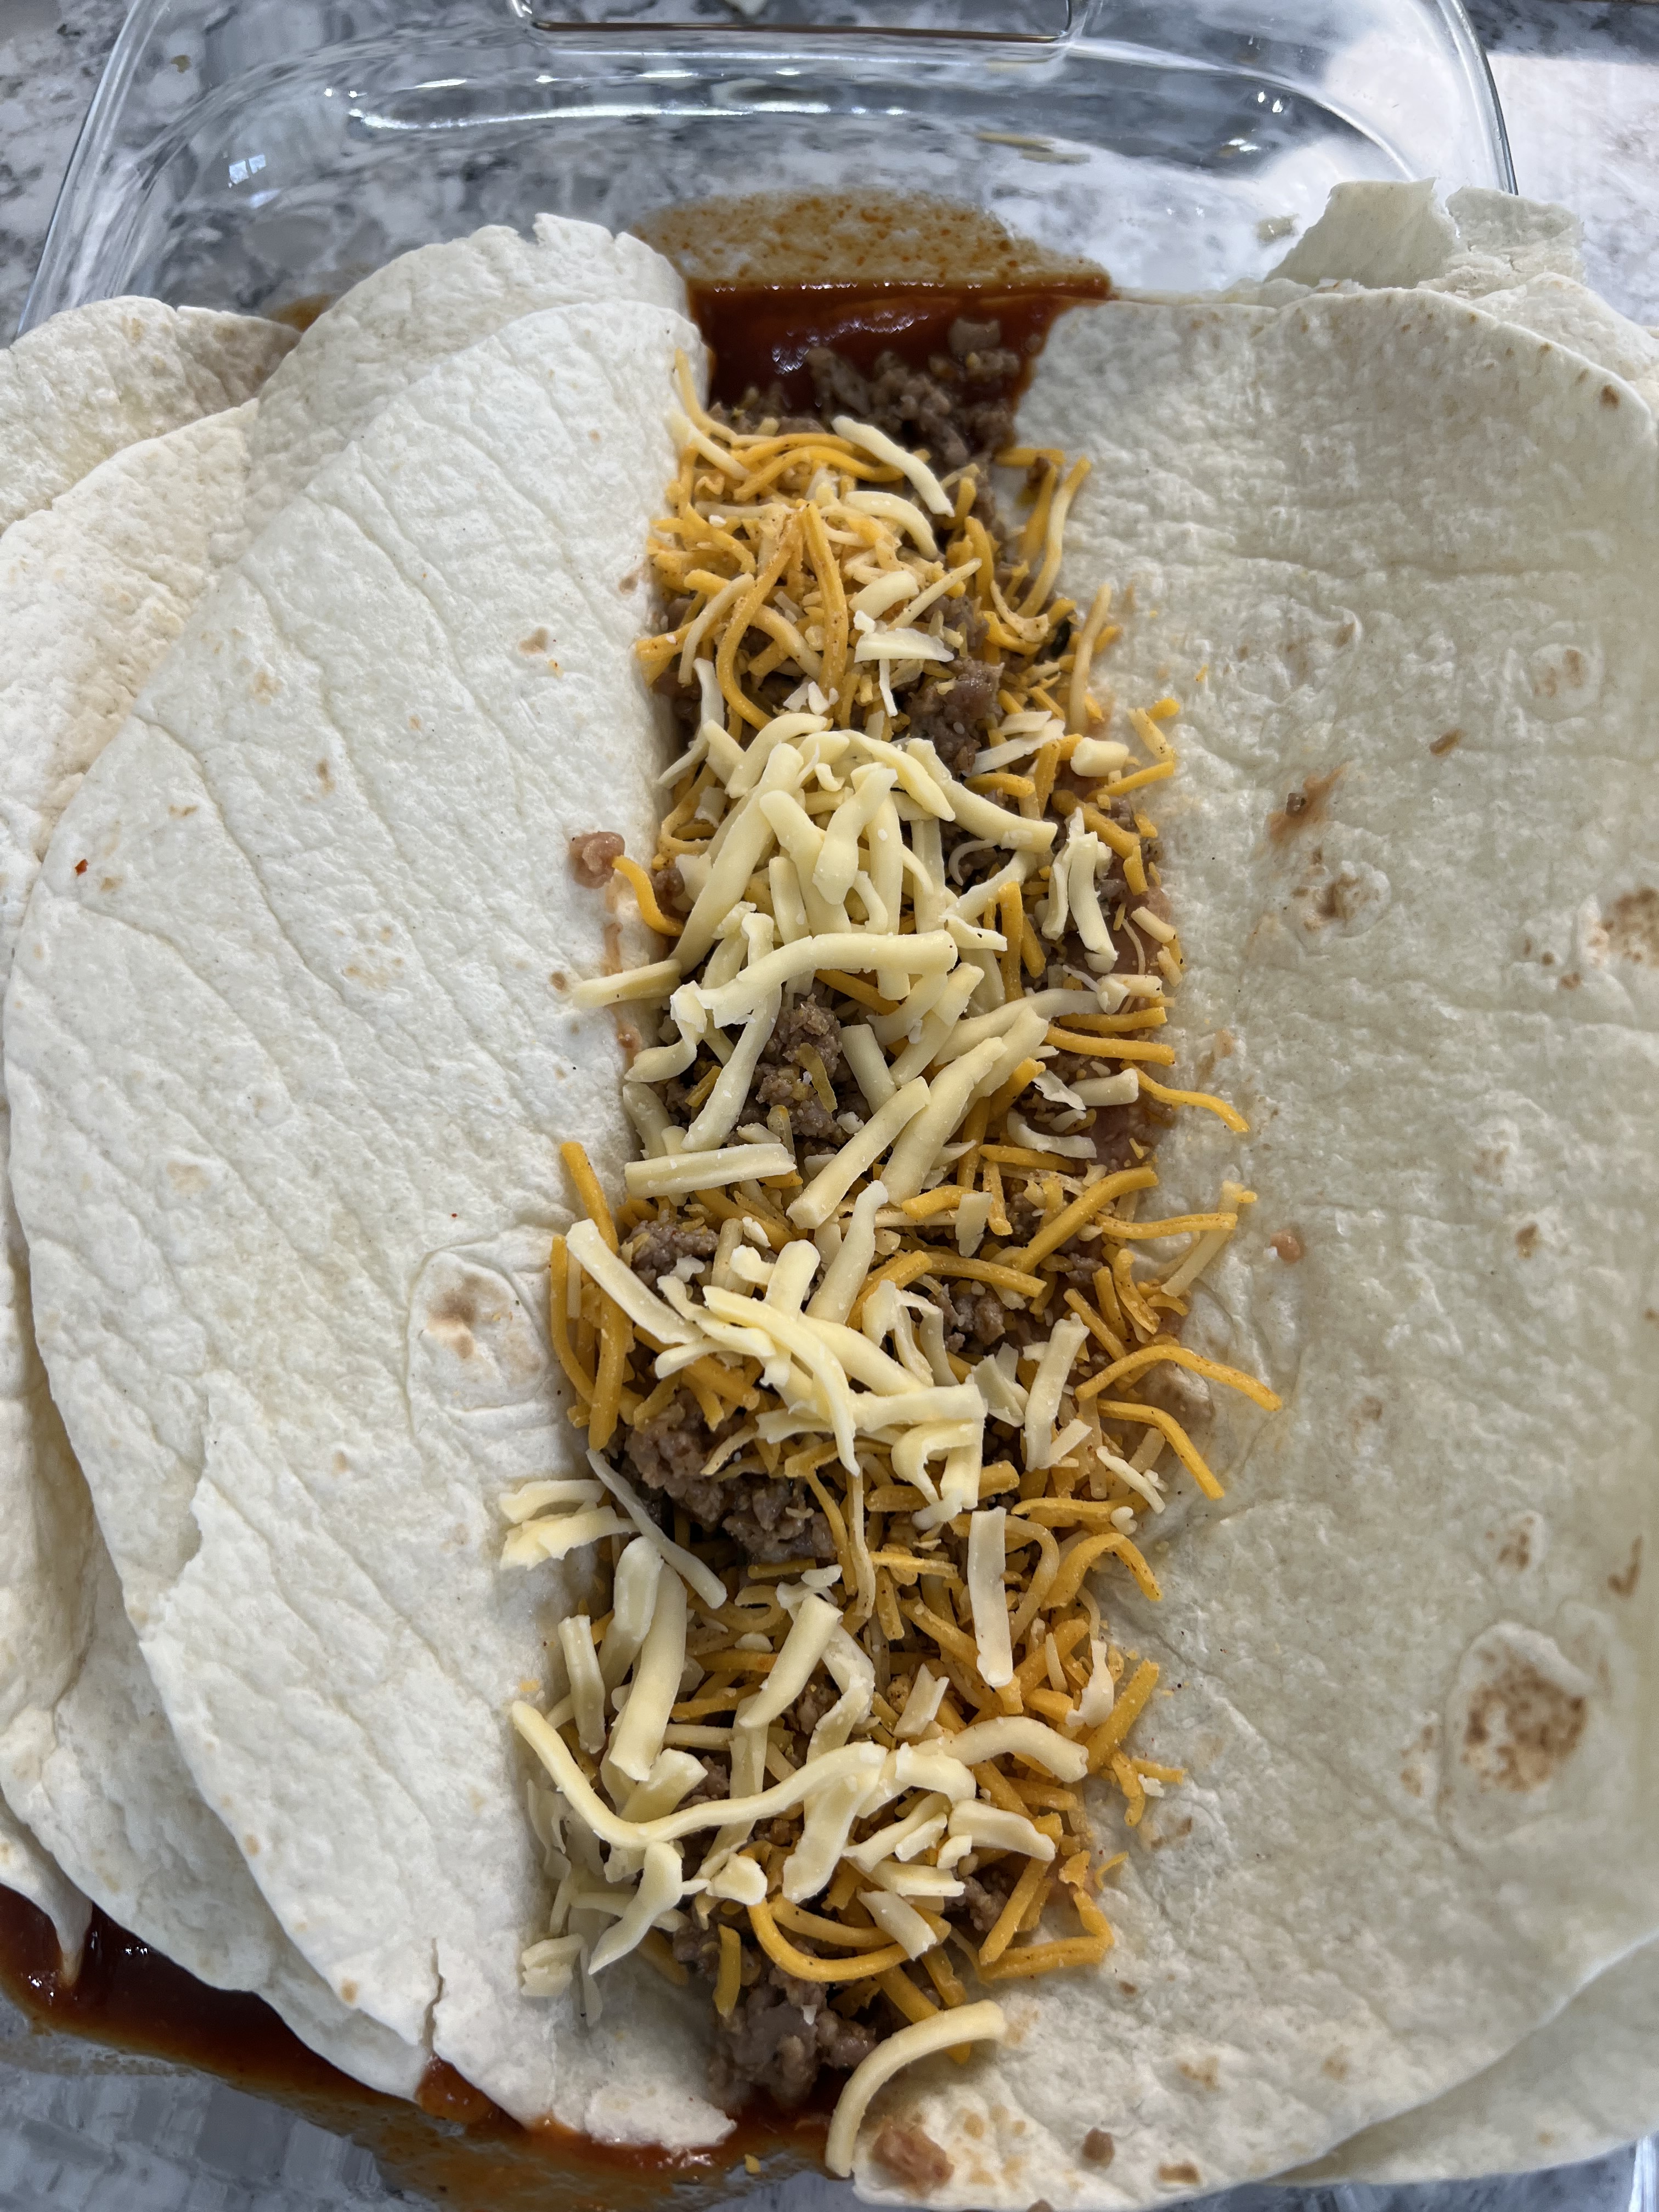
4. In this order layer the enchilada fillings:
First take about ¼ cup of the refried beans and spread on the inside center fold of the tortilla.
Next take about ½ cup or enough depending on the size of your tortilla; spread over the beans.
Take about ⅓ cup of the shredded taco & queso cheese combined and spread over the meat.
Take out 2 ¼ cup of the fresco cheese and put on top as the final layer.
Finally, pour about ¼ cup of the enchilada sauce over the cheese.
5. Next carefully fold the tortilla right side over, and then the left side over the right.
Repeat with each of the tortillas.
6. Pour the remaining enchilada sauce over the enchiladas, making sure to cover them.
7. Add an additional cup of mixed taco and Queso blend shredded cheese over the top.
8. Bake covered in a 350 degree oven for 45 minutes; remove the foil and bake for an additional 15 minutes.
Serve with any or all of the toppings listed above, or whatever you enjoy!
If you enjoyed this blog, please LIKE, Follow, Share & leave me a comment! I love your feedback!
If you aren’t following me on Facebook & Instagram go on over & give a LIKE & Follow me for daily tips & tricks for your home & garden!
“Cooking is all about people. Food is maybe the only universal thing that really has the power to bring everyone together. No matter what culture, everywhere around the world, people get together to eat.” – Guy Fieri
Dave, the boys & I just love Mexican food. It is definitely in our top 3 ethnic foods to enjoy. Recently Dave & I visited a local Mexican restaurant and with Dave’s dinner there was a tamale. Ok, so I’d never eaten one. That is a confession, LOL. I always get either cheese enchiladas or fajitas… it’s just what I like. But after trying it, I thought, ‘That is really good!” I looked at Dave and said, “We can make these!”… And make them we did!
Wow, they are fabulous & I am sure you will enjoy them. I must admit when I was looking for recipes, it was a bit intimidating. I really thought it was going to be a lot of work, but it really wasn’t bad. It’s not any harder than making cabbage rolls.
Don’t be dismayed if you don’t have a steamer. Dave & I figured a great way to improvise. All you’ll need is a large stock pot with a lid, a colander that will fit onto top of the pot resting in it but not submerged, and foil wrap!
I sure hope you’ll give them a try. We made them with Dave’s incredible carnitas’ but I’m going to include some variations including a vegetarian one! Enjoy friends!
Our Favorite Recipes
Ingredients: Yields approximately 25 to 30 Tamales
Shred carnitas and save the broth for the masa dough
For Tamales:
25 to 30 corn husks~ choose the largest ones you can from the bag
3 cups Masa Harina flour
2 ½ cups broth- Use as much of the broth as you can from the carnitas. Add water if not enough broth to equal the 2 ½ cups
If you are changing the protein up, then use the same broth as the protein you are using.
*Vegetarian alternative- use vegetable broth.
1 cup lard
1 tsp baking powder
1 tsp pink Himaylean salt
2 tsp chili powder
2 tsp cumin
2 tsp garlic salt
Variations:
Chicken: Take 4 large boneless, skinless chicken breasts and bake or boil until done; shred meat for filling
Beef: Roast a 4 to 5 pound chuck or rump roast; when done shred meat for filling
Vegetarian: Use vegetable shortening and vegetable broth
Alternatives include:
~Black beans, blackened whole kernel corn, chili’s, & queso shredded cheese~ make a black bean paste using the cheese and some sour cream.
~Diced Roma tomatoes, green onion, whole kernel corn, Queso fresco cheese crumbled, turmeric paste, and cilantro
Of course there are many other options, let me know what you will use in the comments below.
To make the masa dough:
In a bowl beat on high for 5 minutes the broth and masa harina flour; set aside for 20 minutes
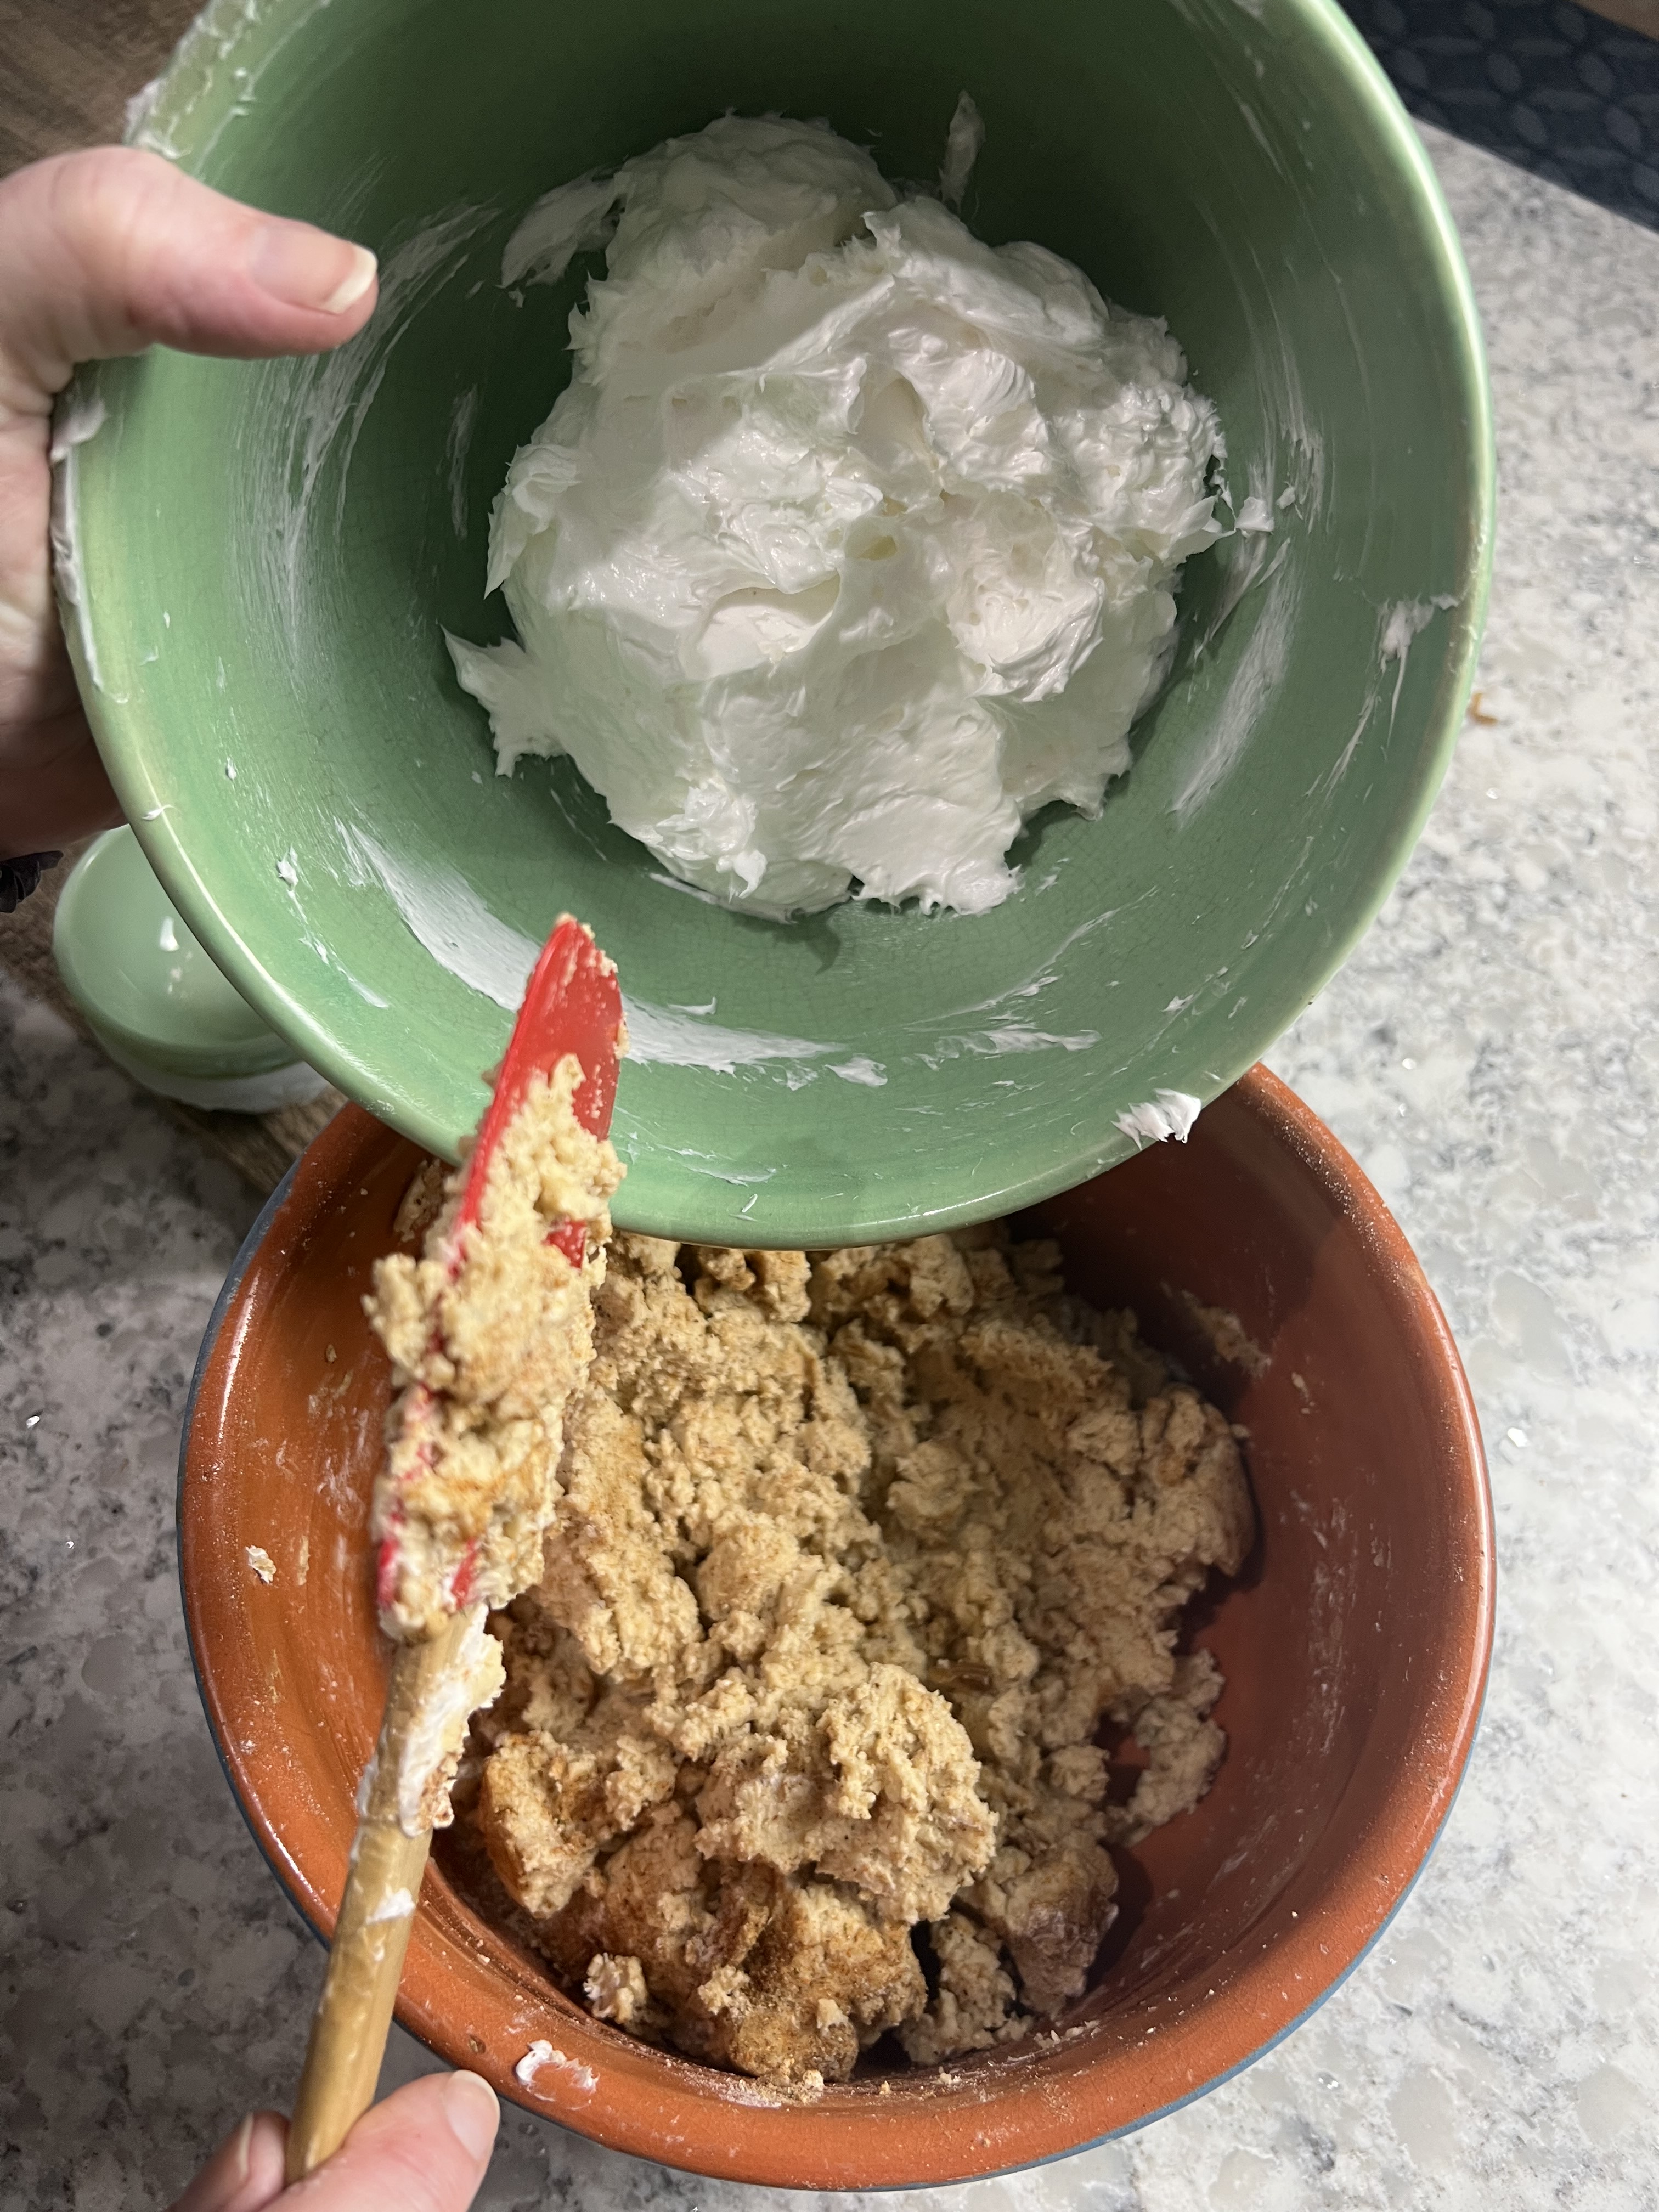
While masa dough is resting:
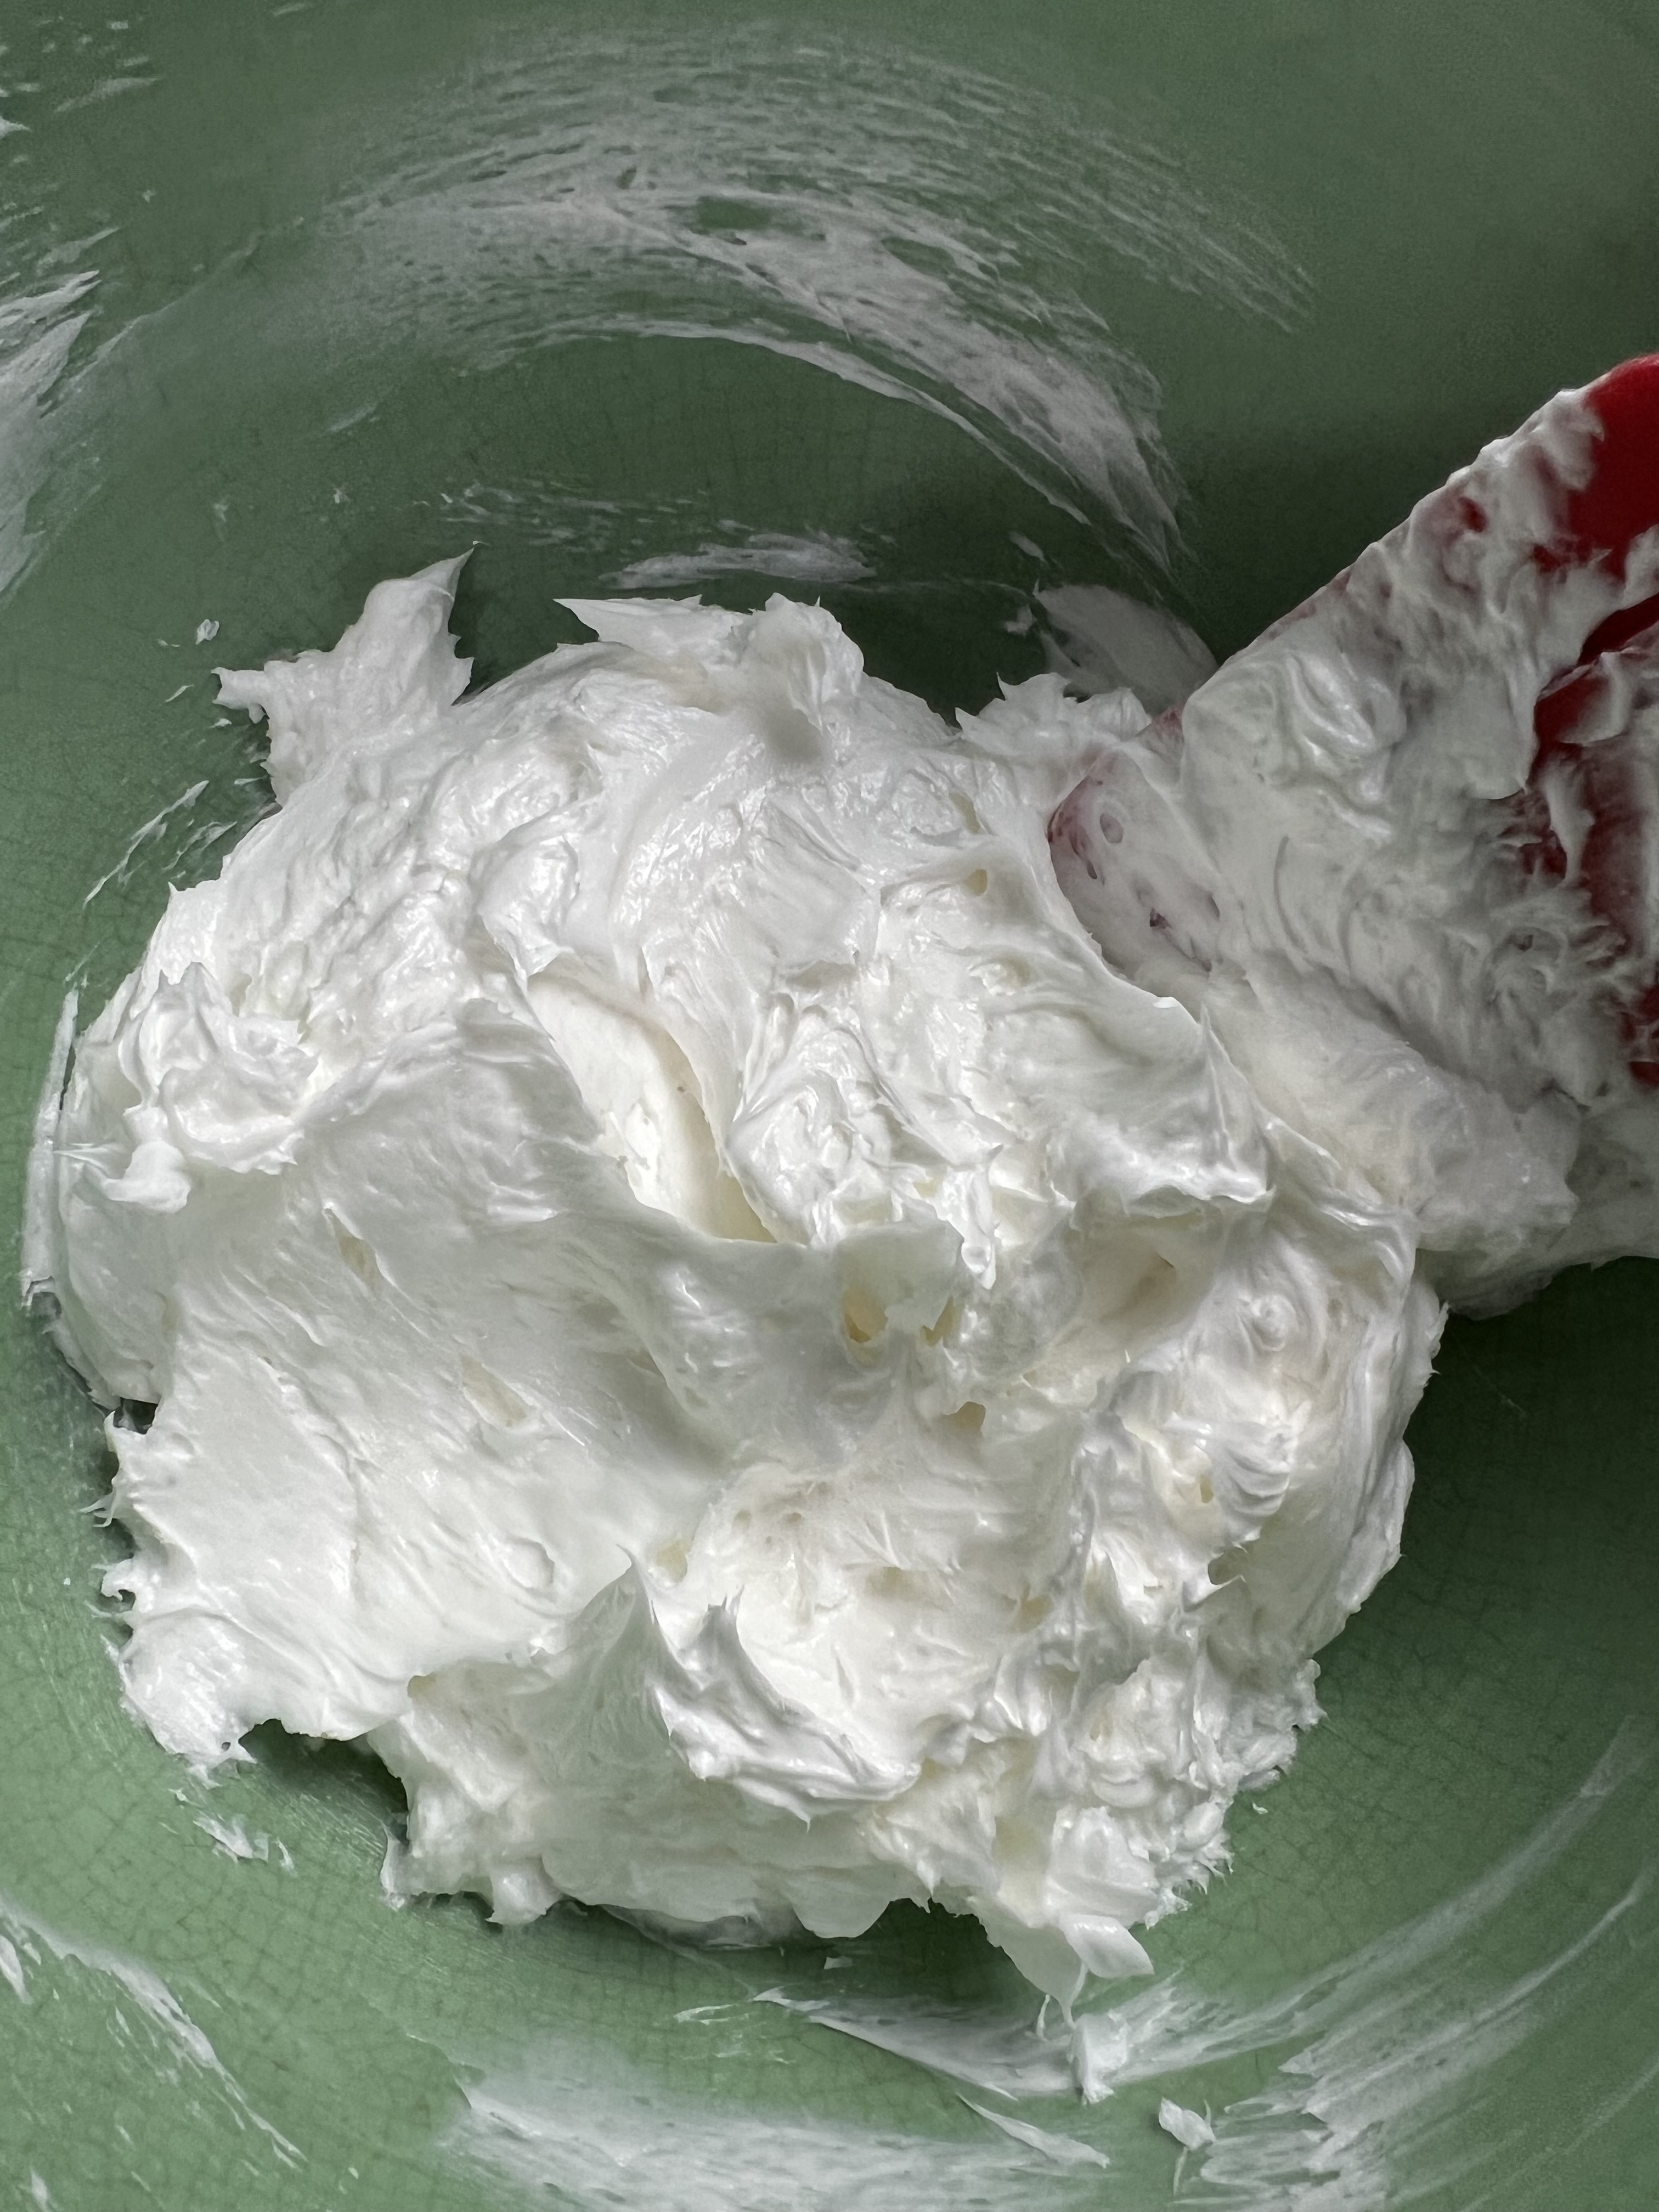
In another bowl whip lard for about 3 to 4 minutes until light and fluffy.
In another bowl while masa dough & lard are resting, soak the corn husks in warm water; rest a small plate on top of the husks so they remain submerged.
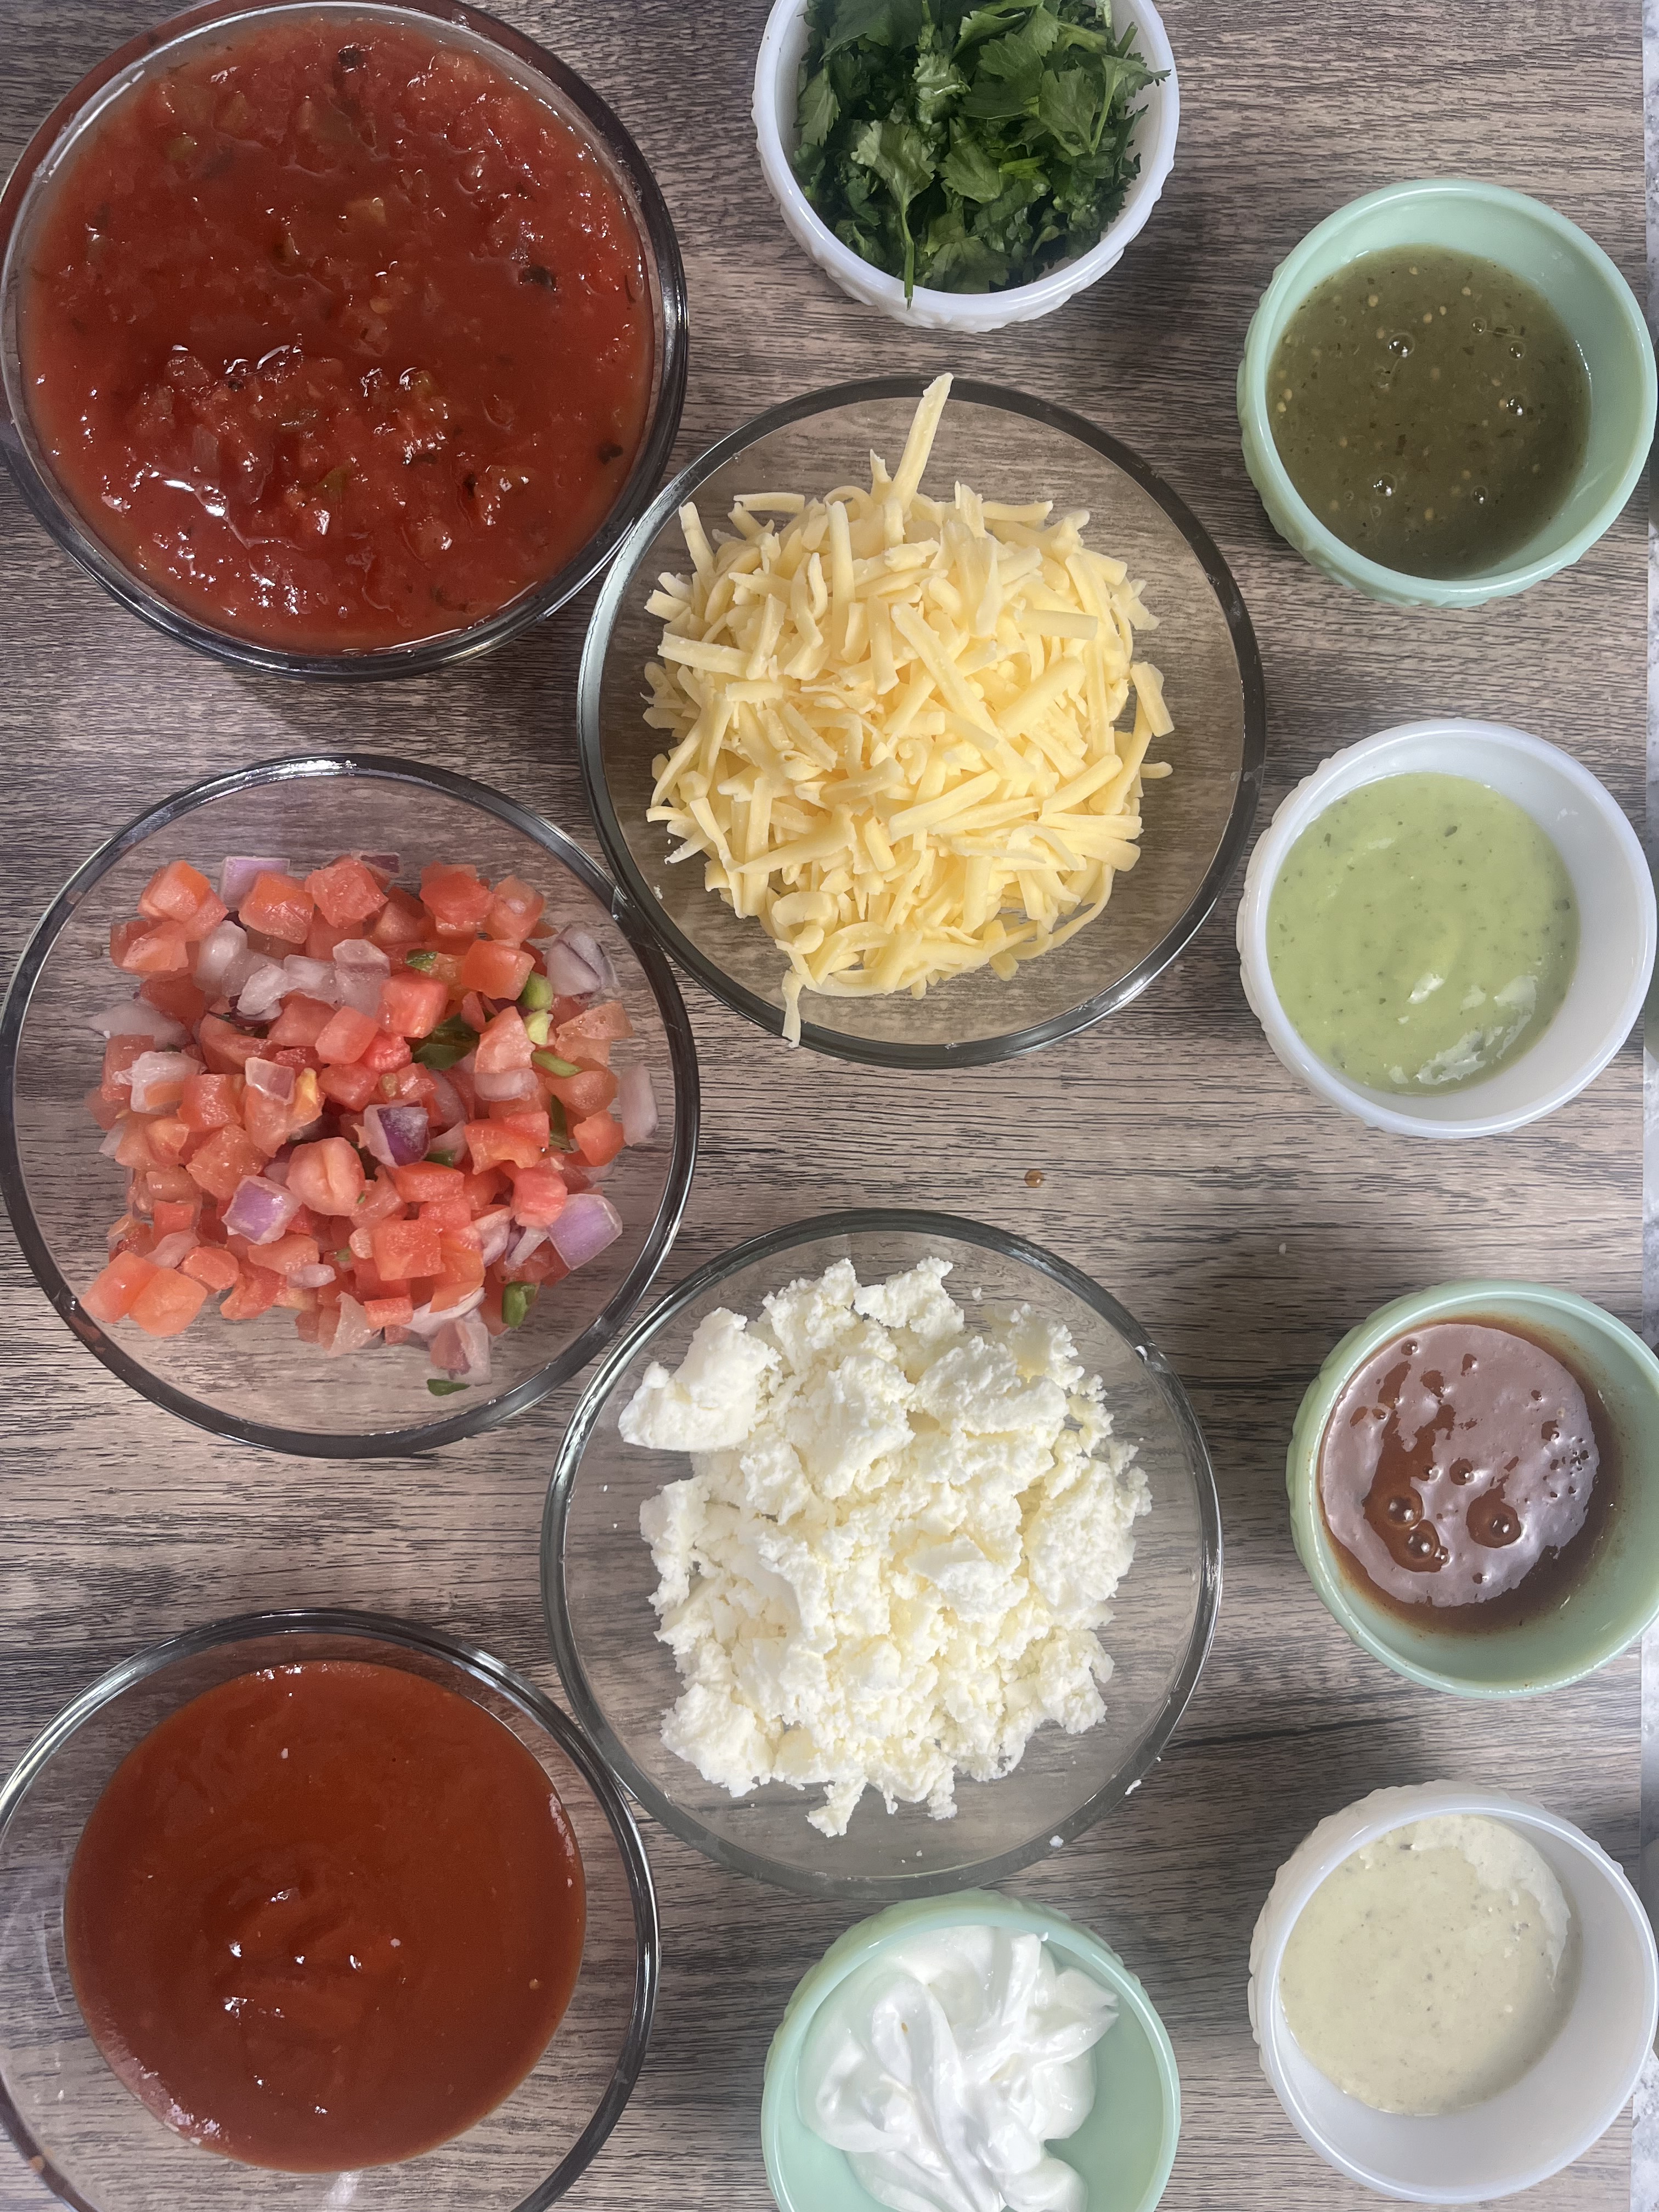
Here are all the toppings we used!
What toppings do you like? Let me know is the comments below!
After the 20 minutes are up, blend all the spices and the lard into the masa dough until evenly blended. The consistency should be similar to smooth peanut butter.
Drain the water from the corn husks and shake excess water off; remove to a plate and set aside.
In a large stock pot, fill ⅓ way full with hot water; bring it to a boil on high heat covered. This will heat up while you are making the tamales.
In an assembly line manner line the husks, masa dough, and meat.
Take a husk and place it in the palm of your hand with the pointed side facing up, and with the curved side up. It will almost seem like a bowl; take a spoonful, about a ¼ cup of the masa dough and spread over the bottom half of the husk evenly; take about the same amount of meat and place in the center of the husk half way up like the masa dough.
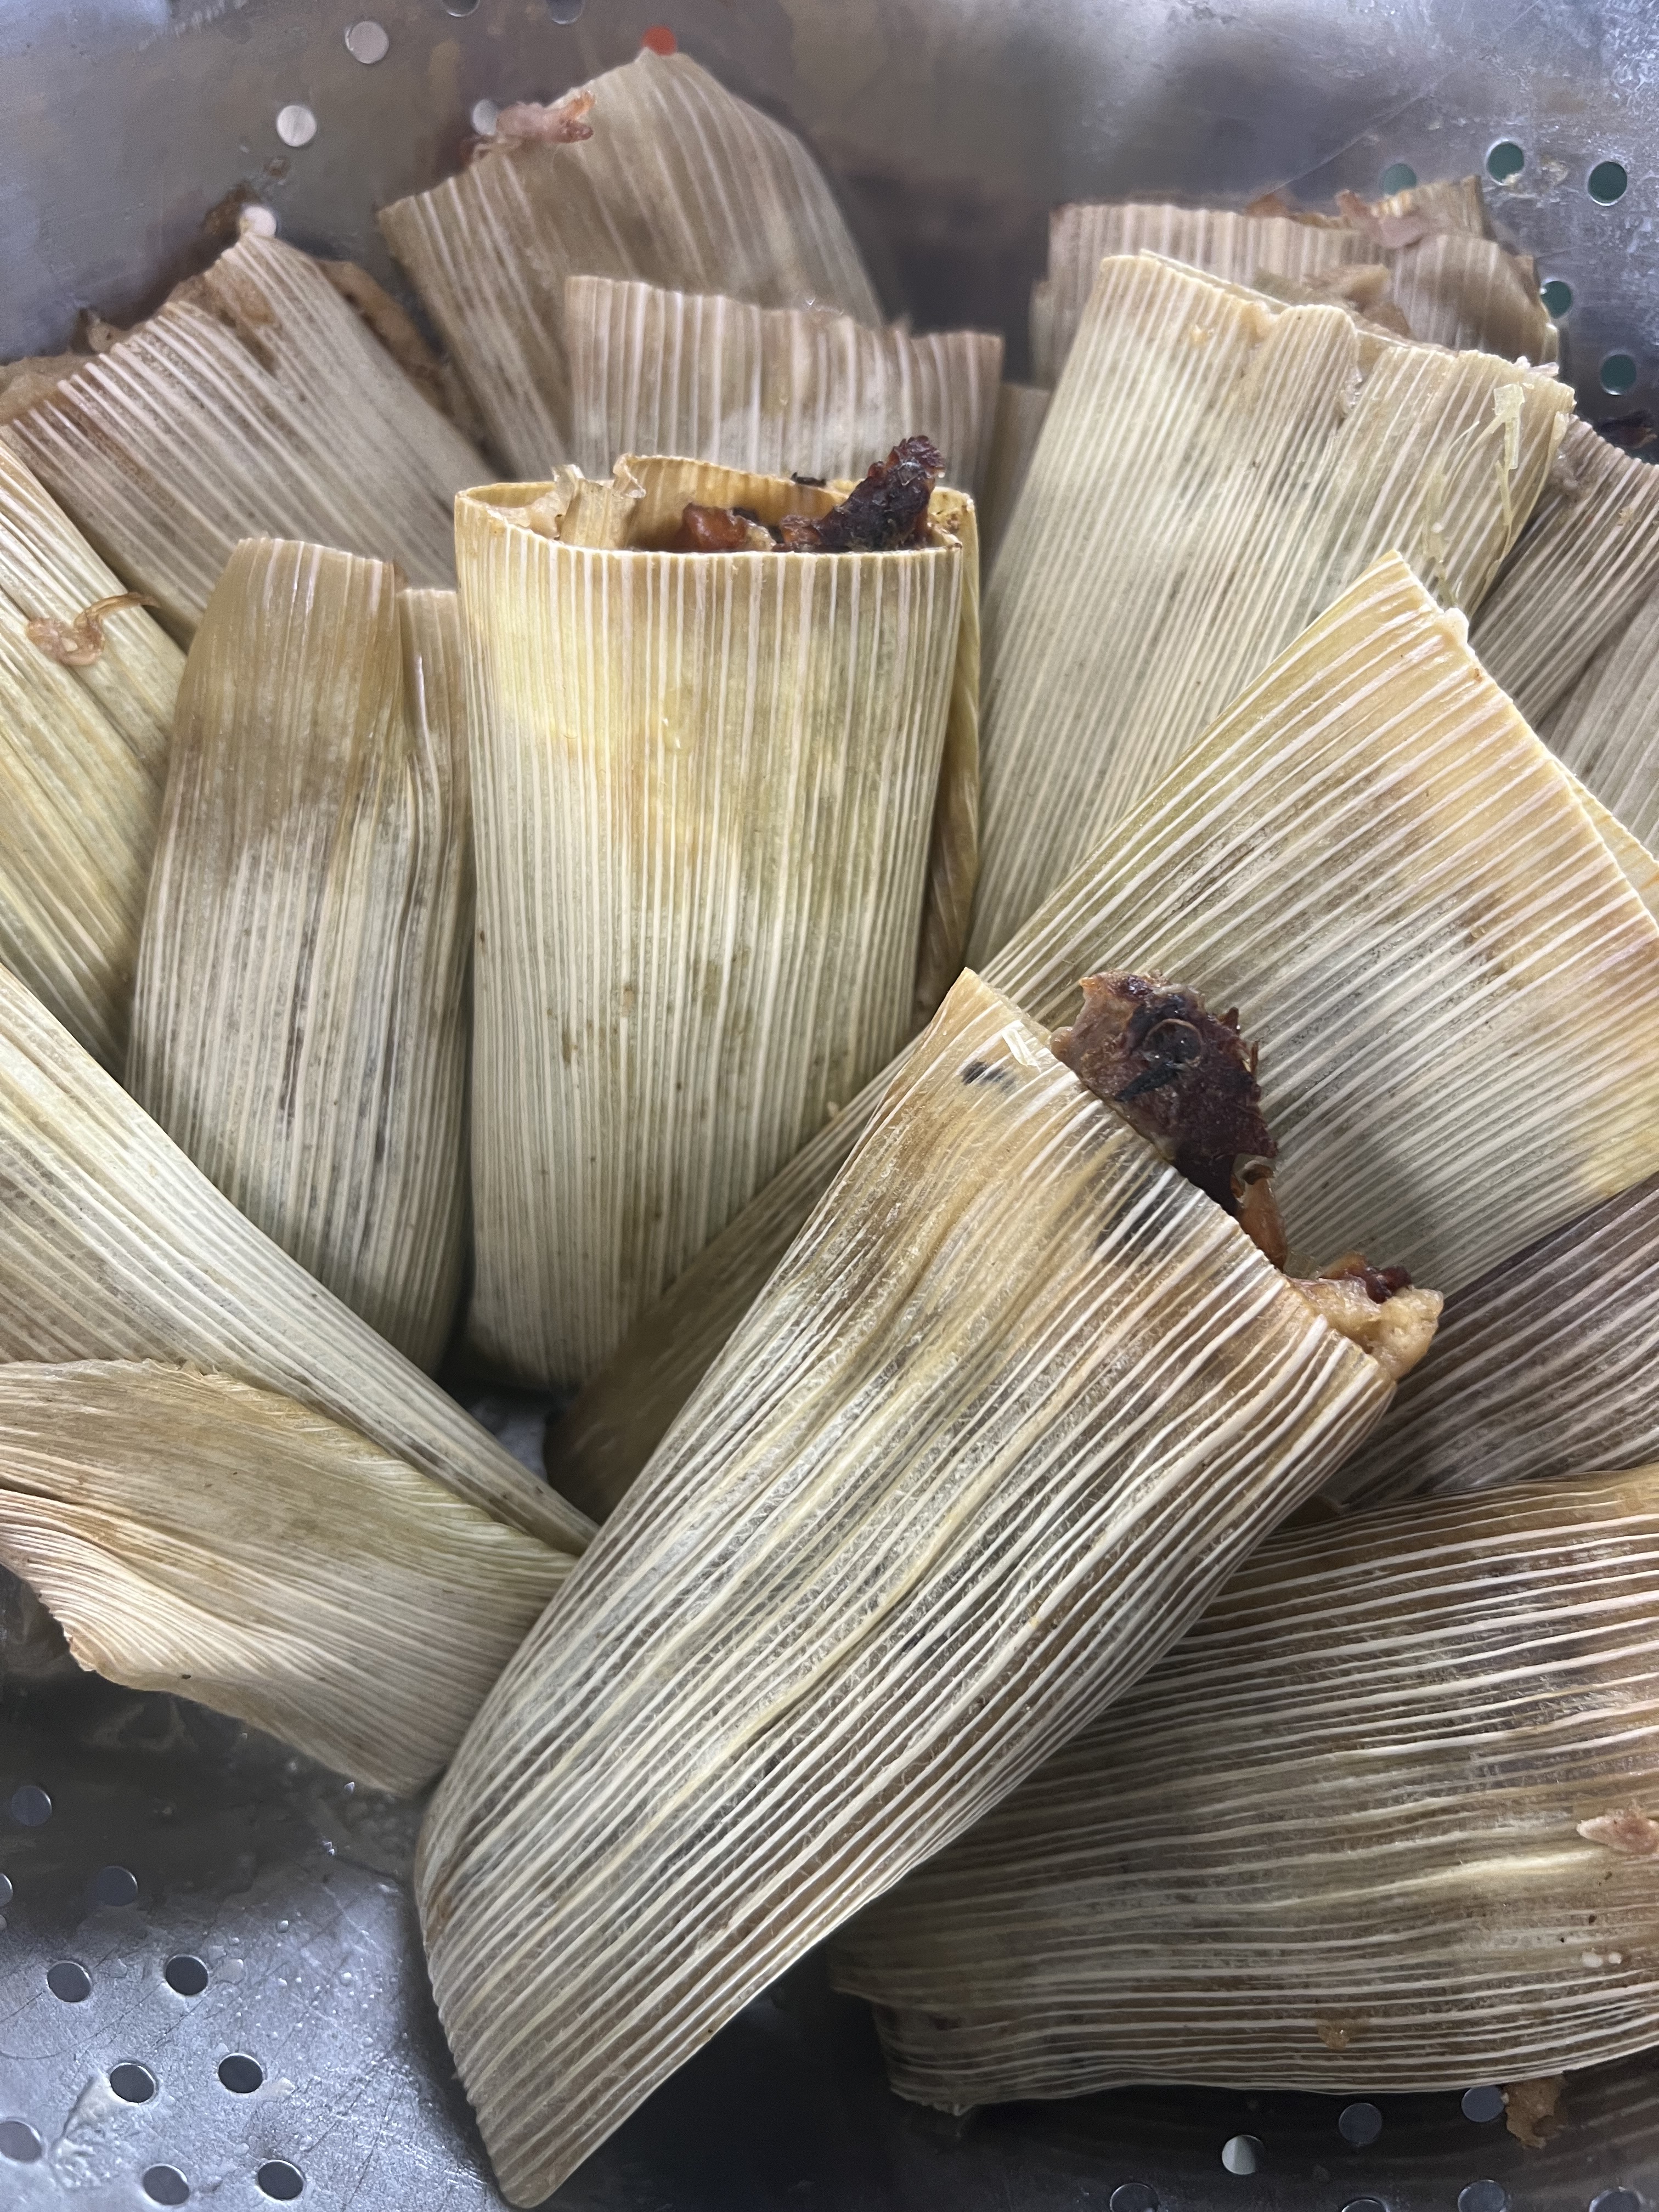
Now, take the right side of the husk and fold over towards the left, then fold the left side over the folded portion, then take the pointed end and fold down to make sort of an envelope; gently compress the mixture so it is evenly distributed in the husk; set aside fold side down in a colander. Repeat the process until all your husks are filled or the colander is full.
SEE VIDEO ABOVE!
The water in the stock pot should be boiling or close to it; turn the fire off now.
Place the colander snugly into the pot. It should not be touching the water.
Place the lid for the pot over the tamales in the colander.
Cover the colander with foil wrap down around the handles, being sure not to cover the pot handles. You don’t want the steam to escape as that is what will be cooking the tamales.
Turn the heat back on high and steam for 1 hour; check the water level every 20 minutes by carefully lifting the colander up out of the pot using pot holders. If more water is declining, add hot water as needed making sure the colander will not be setting in the water.
PRO TIP: I kept a second pot of water heating so when I needed to add water to the pot the tamales were cooking in, I could simply remove the colander and pour hot water in without skipping a beat!
When the tamales are done, remove the colander from the pot and place on a plate; remove the foil wrap; let set for about 15 to 20 minutes to further set up.
Check out some of the yummy sauces we used on our tamales!
Serve with refried beans and some Mexican dirty rice!
Get new recipes delivered to your inbox.
If you enjoyed this recipe blog, please LIKE, Follow, Share & leave me a comment! I love your feedback!
If you aren’t following me on Facebook & Instagram go on over & give a LIKE & Follow me for daily tips & tricks for your home & garden!
“Sharing food with another human being is an intimate act that should not be indulged in lightly.” – M. F. K. Fisher
My wonderful hubby Dave made this recipe for us early on in our relationship, & it has become one of our faves! This Carnitas recipe is so easy & has a plethora of variations for both the meat lover or the vegetarian! Let me know what your favorite toppings are in the comments below!
Keep posted for next weeks recipe blog for Homemade Mac & Cheese with Pulled Pork using your left over carnitas’. Be sure to put the leftover’s in a freezer bag & save it for next week Dragonfly Friends!
Our Favorite Recipes
Ingredients:
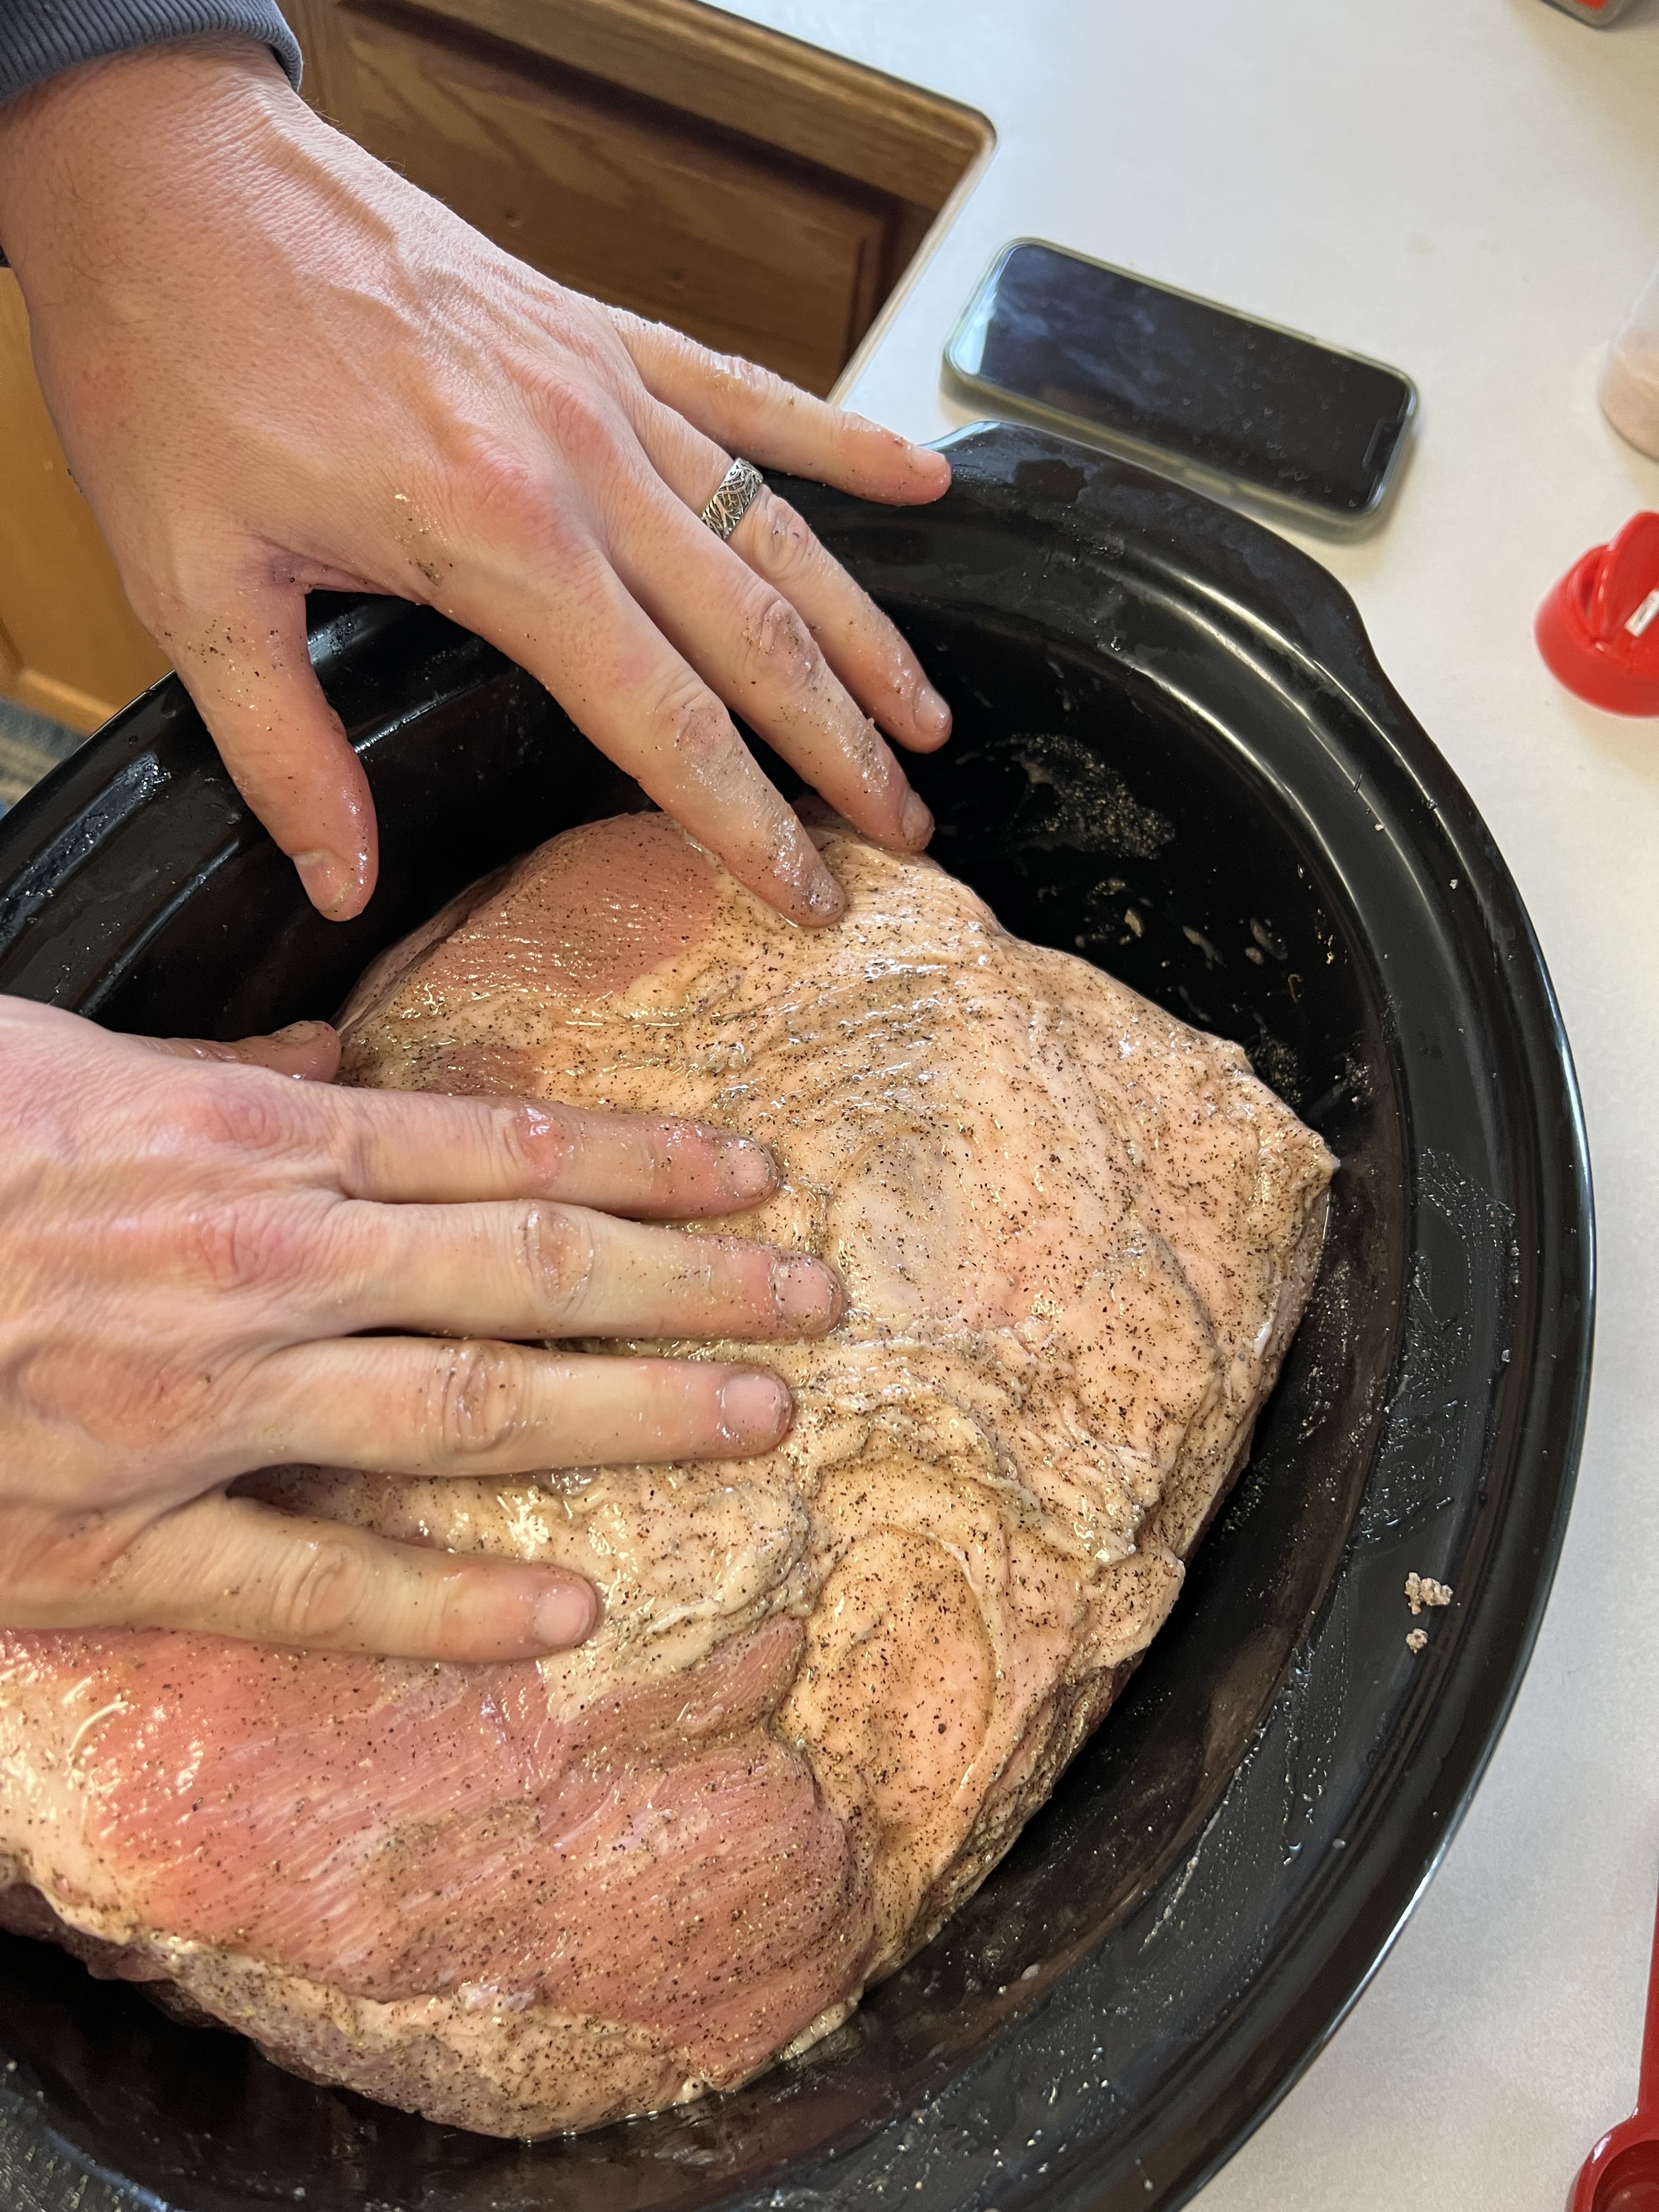
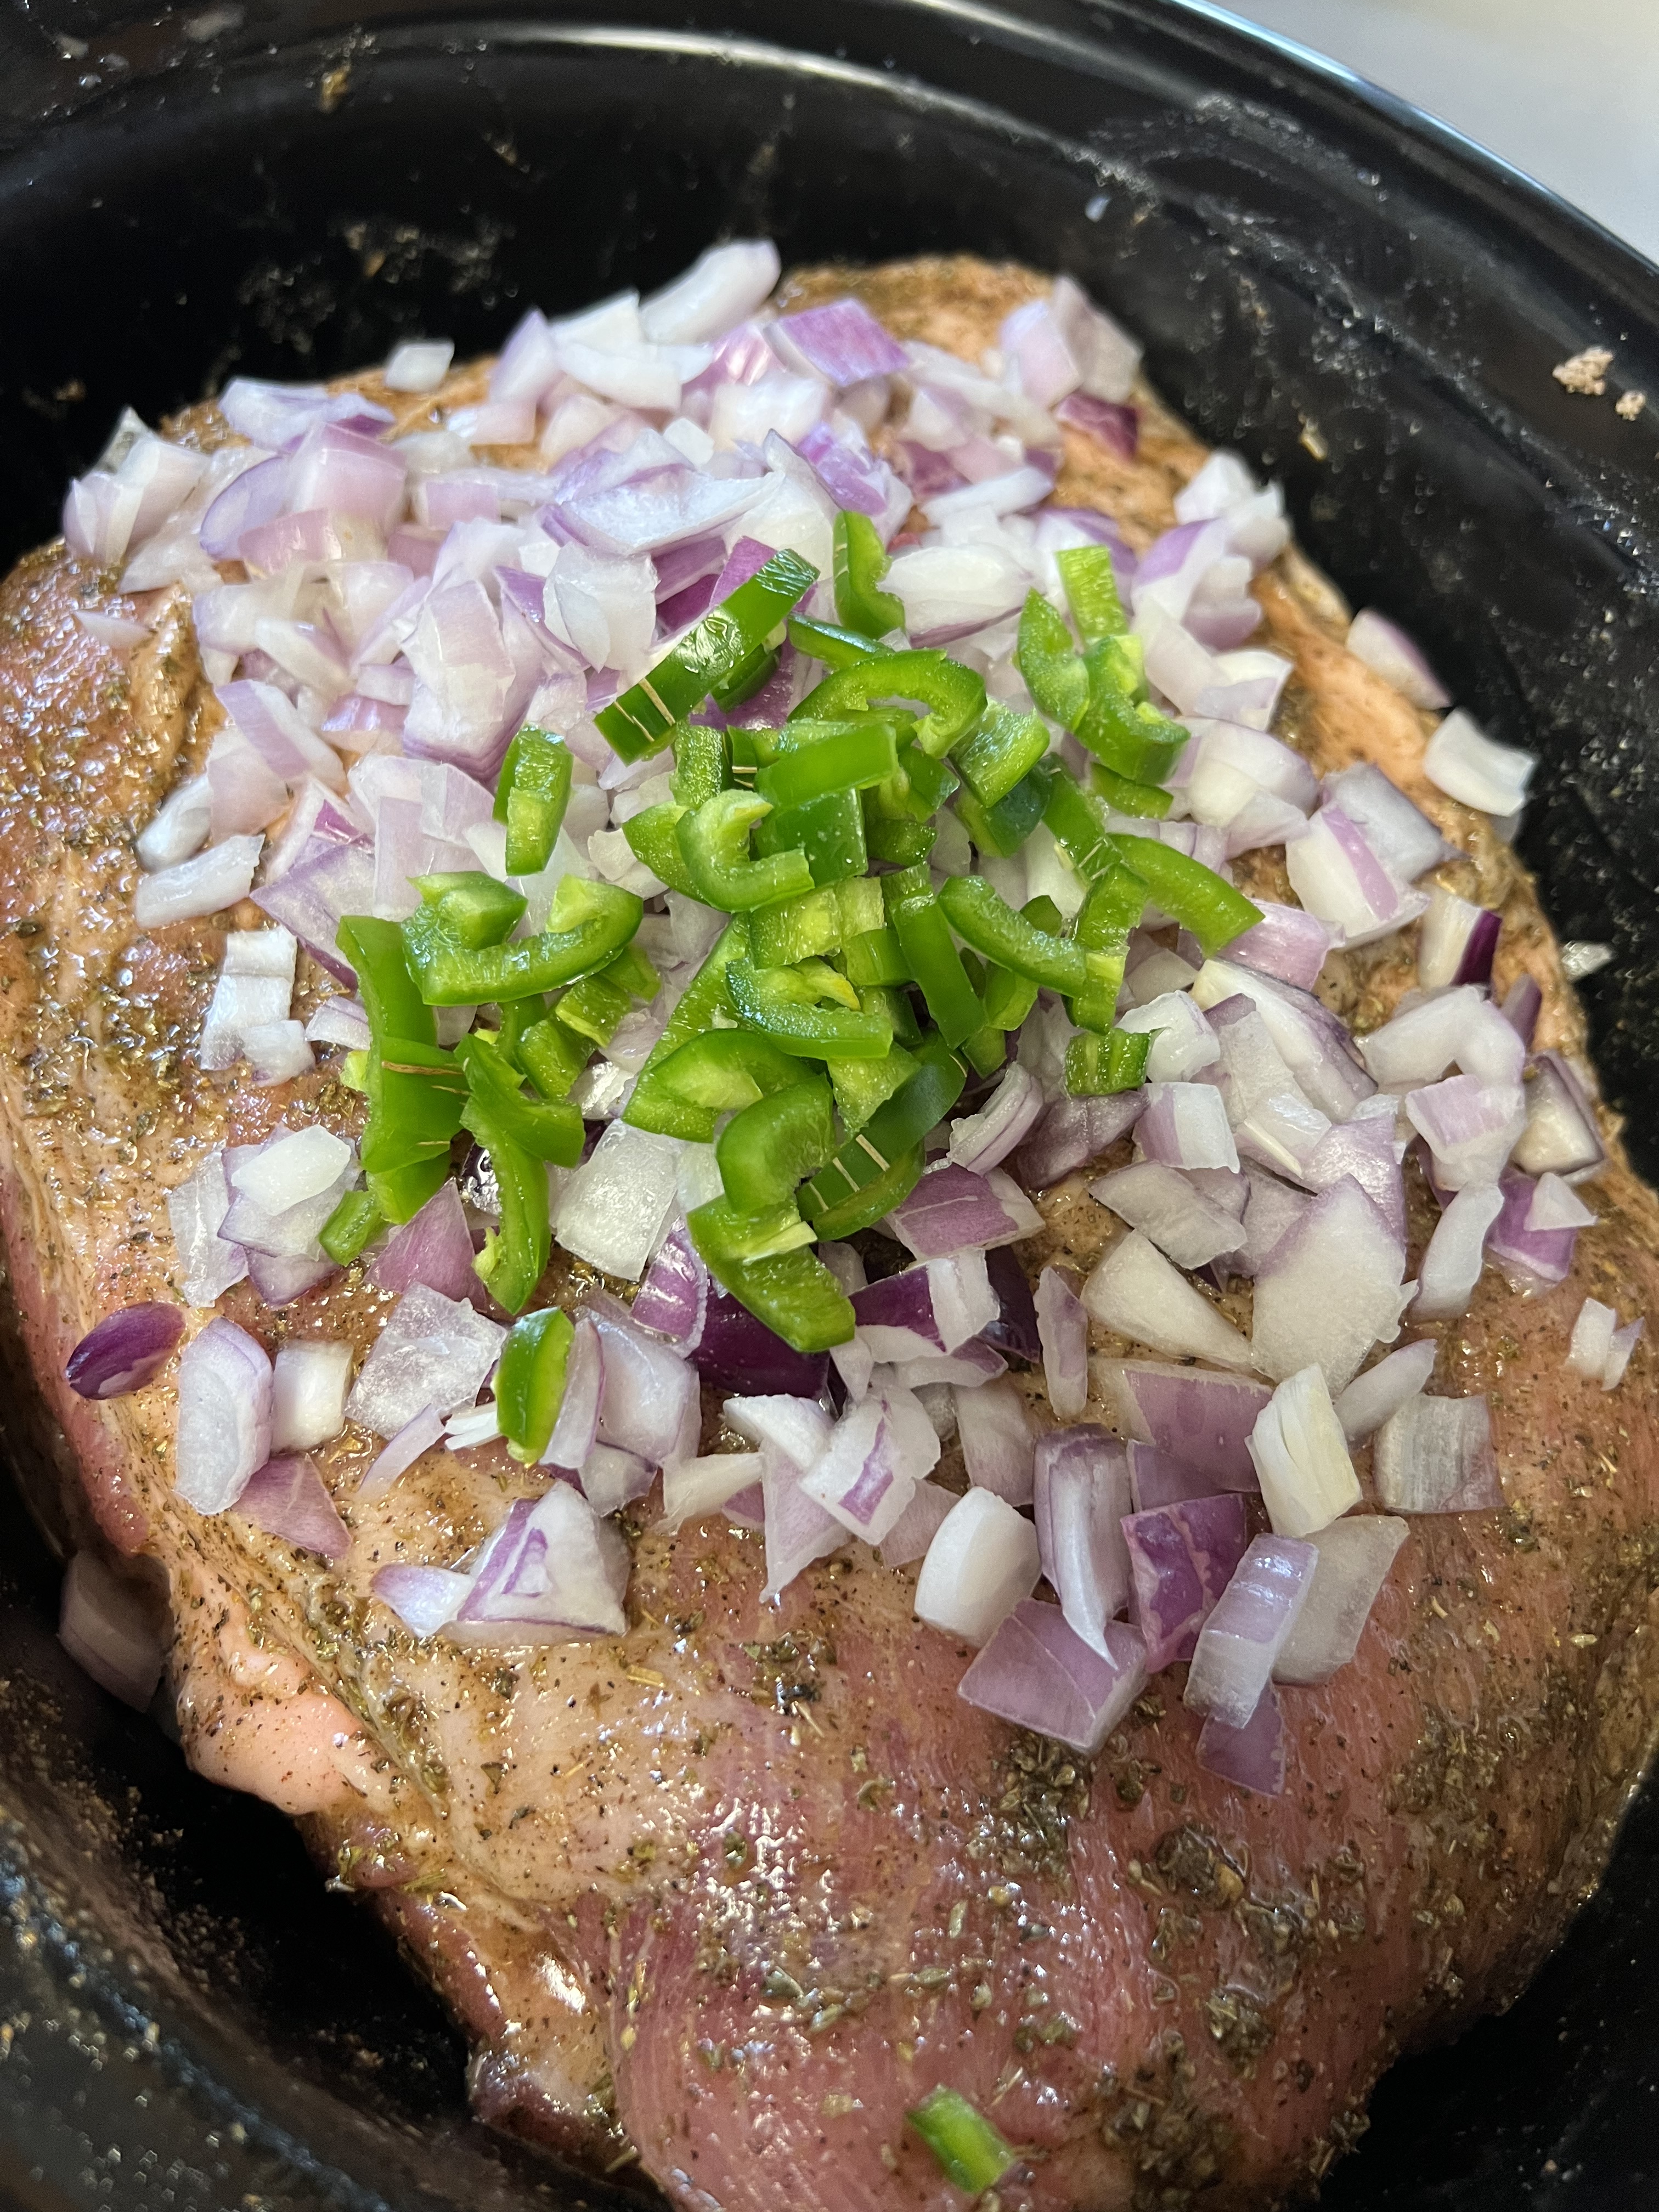
7 to 9 pound pork butt/ shoulder 1 cup orange juice 5 tsp salt 2 tsp pepper 5 tsp minced garlic 1 cup red onion, diced 1 large or 2 small jalapeno’s, diced & seeded
Rub: ¼ cup oregano 2 ½ TBSP cumin ¼ cup olive oil
Topping & Filling ideas: tomatoes, sour cream, onions, black or green olives, shredded cheese, refried beans, corn, black beans, jalapenos, lettuce, and even rice!
1. Wash meat; place in crockpot.
2. Combine salt & pepper and rub thoroughly all over roast.
3. Combine Rub ingredients & mix well; rub all over the roast until thoroughly covered.
Be sure to slather the rub over the entire roast so the flavors soak in!
4. Put the minced garlic, onions & peppers on top of roast.
5. Pour orange juice over top.
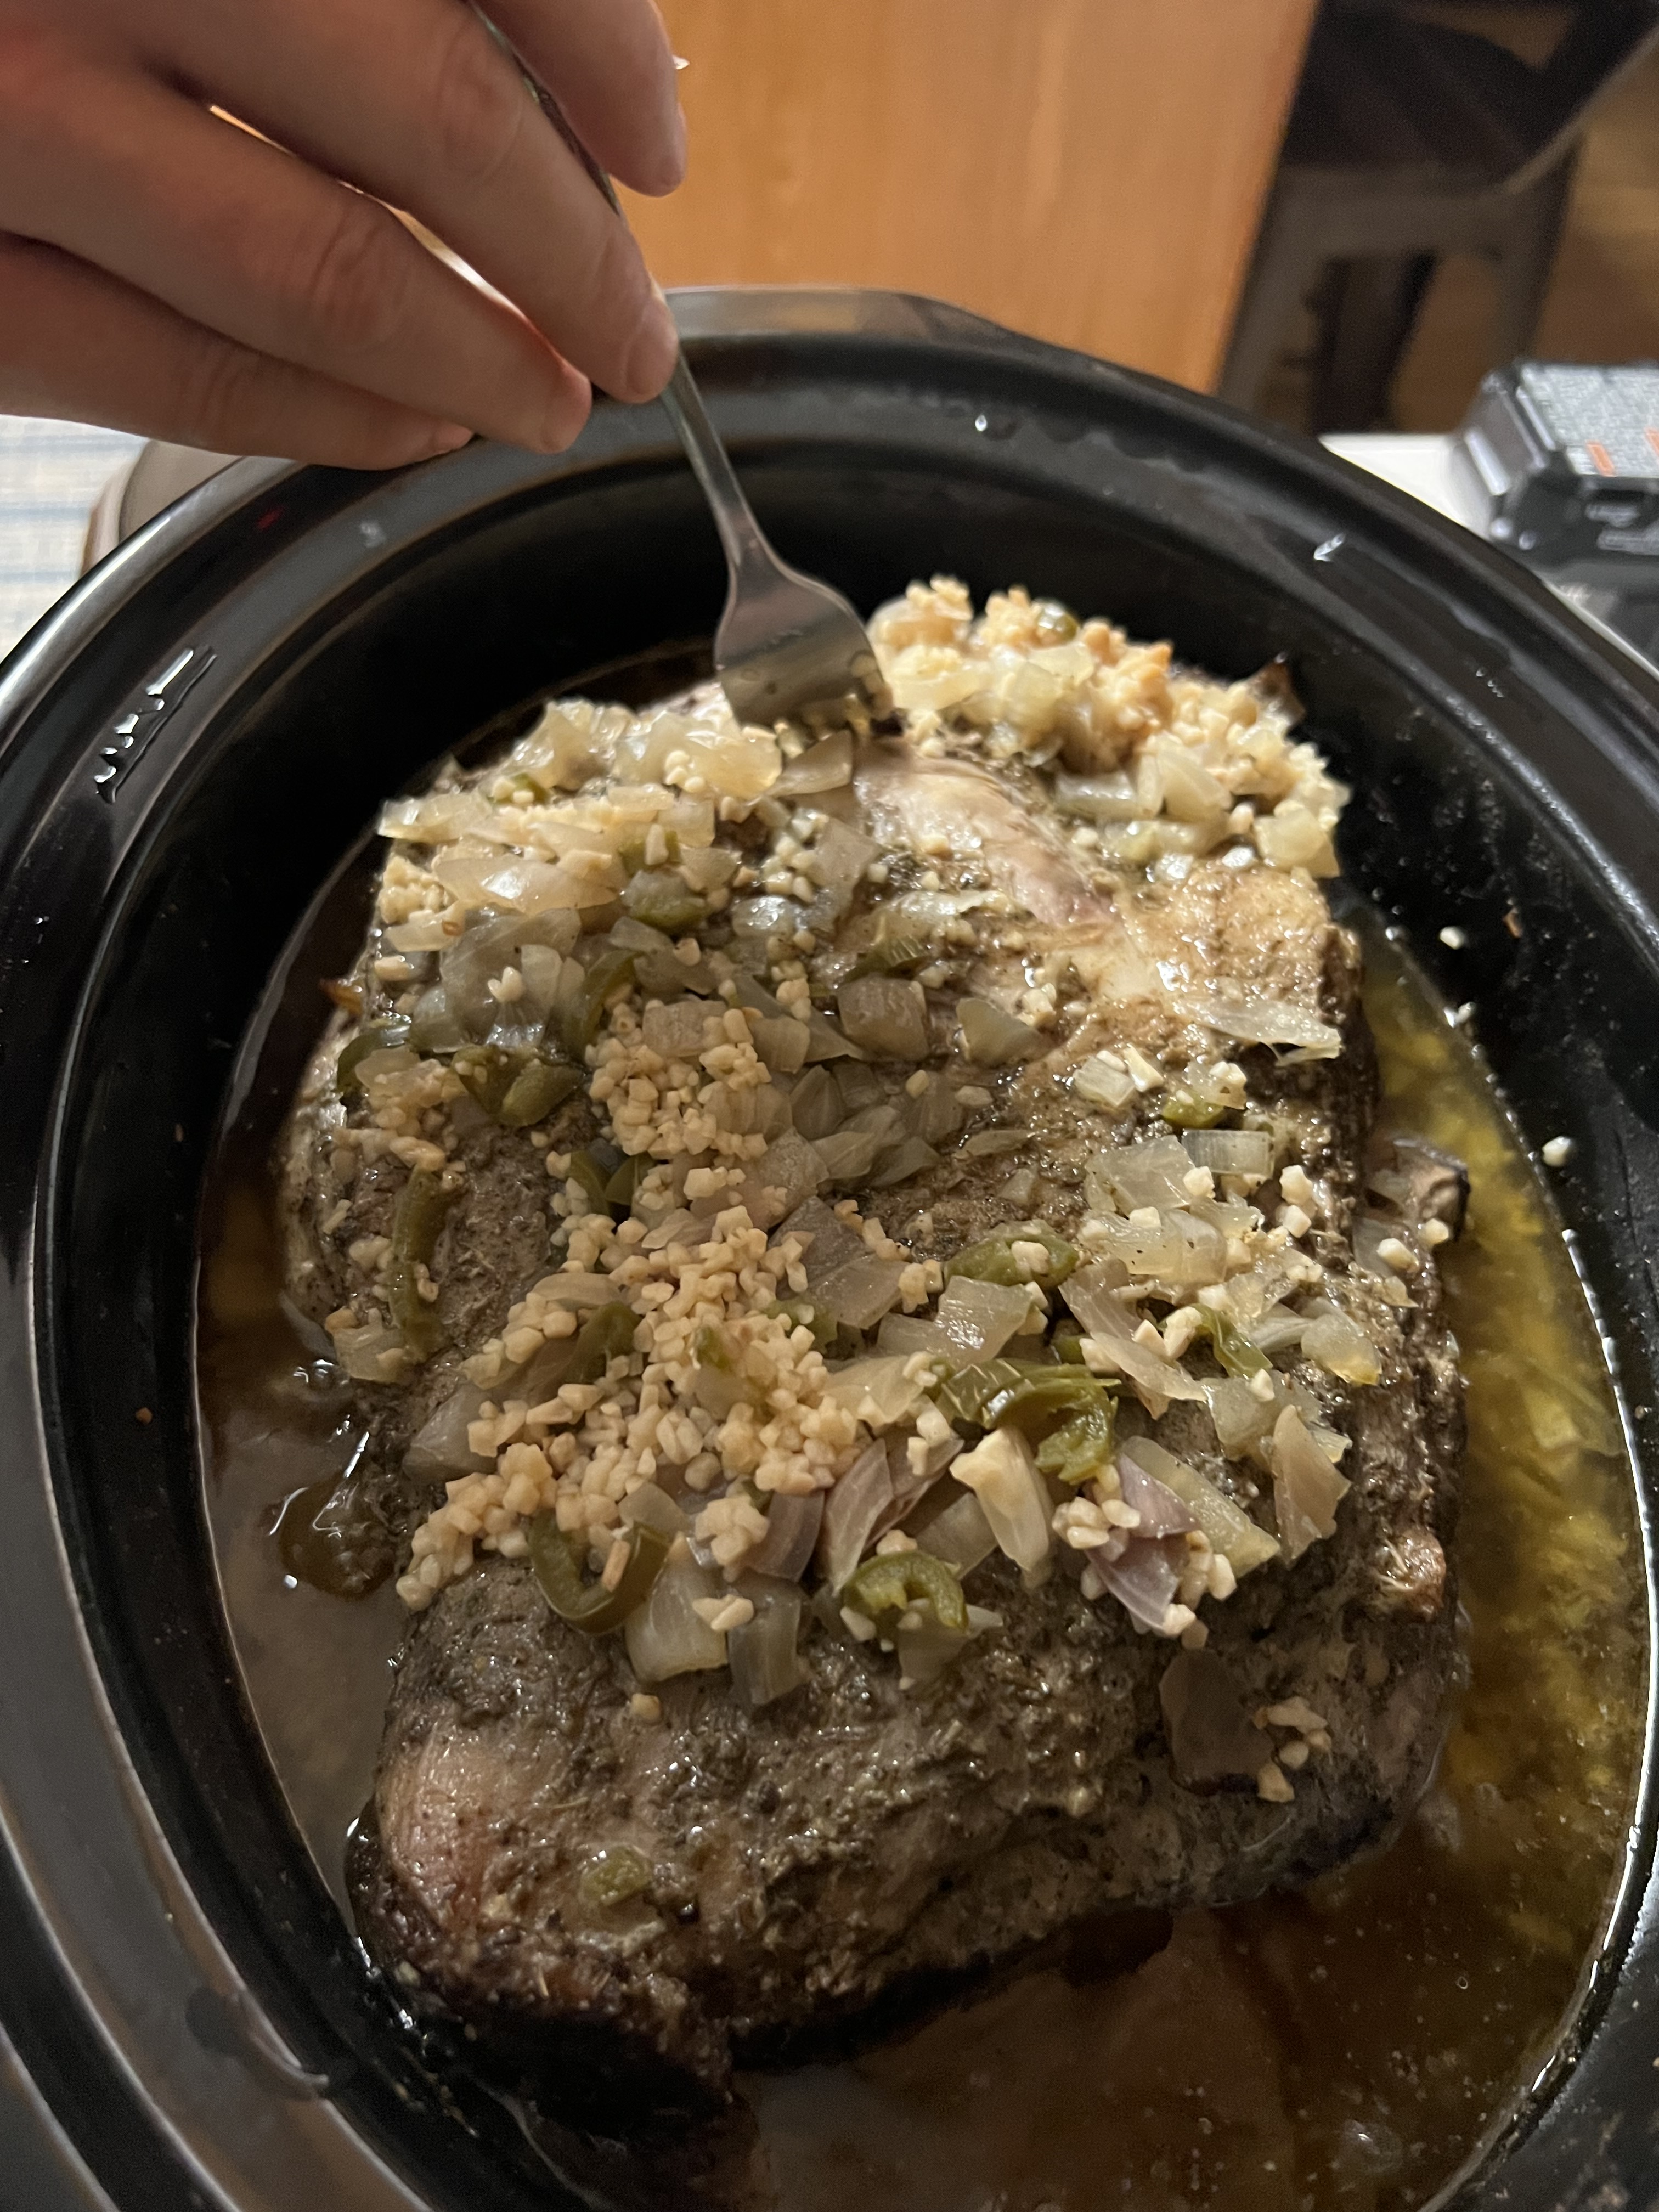
6. Cook in a crockpot for 7 hours on high.
Pro Tip: You will know the meat is thoroughly cooked when it falls apart easily when pulled on with a fork.
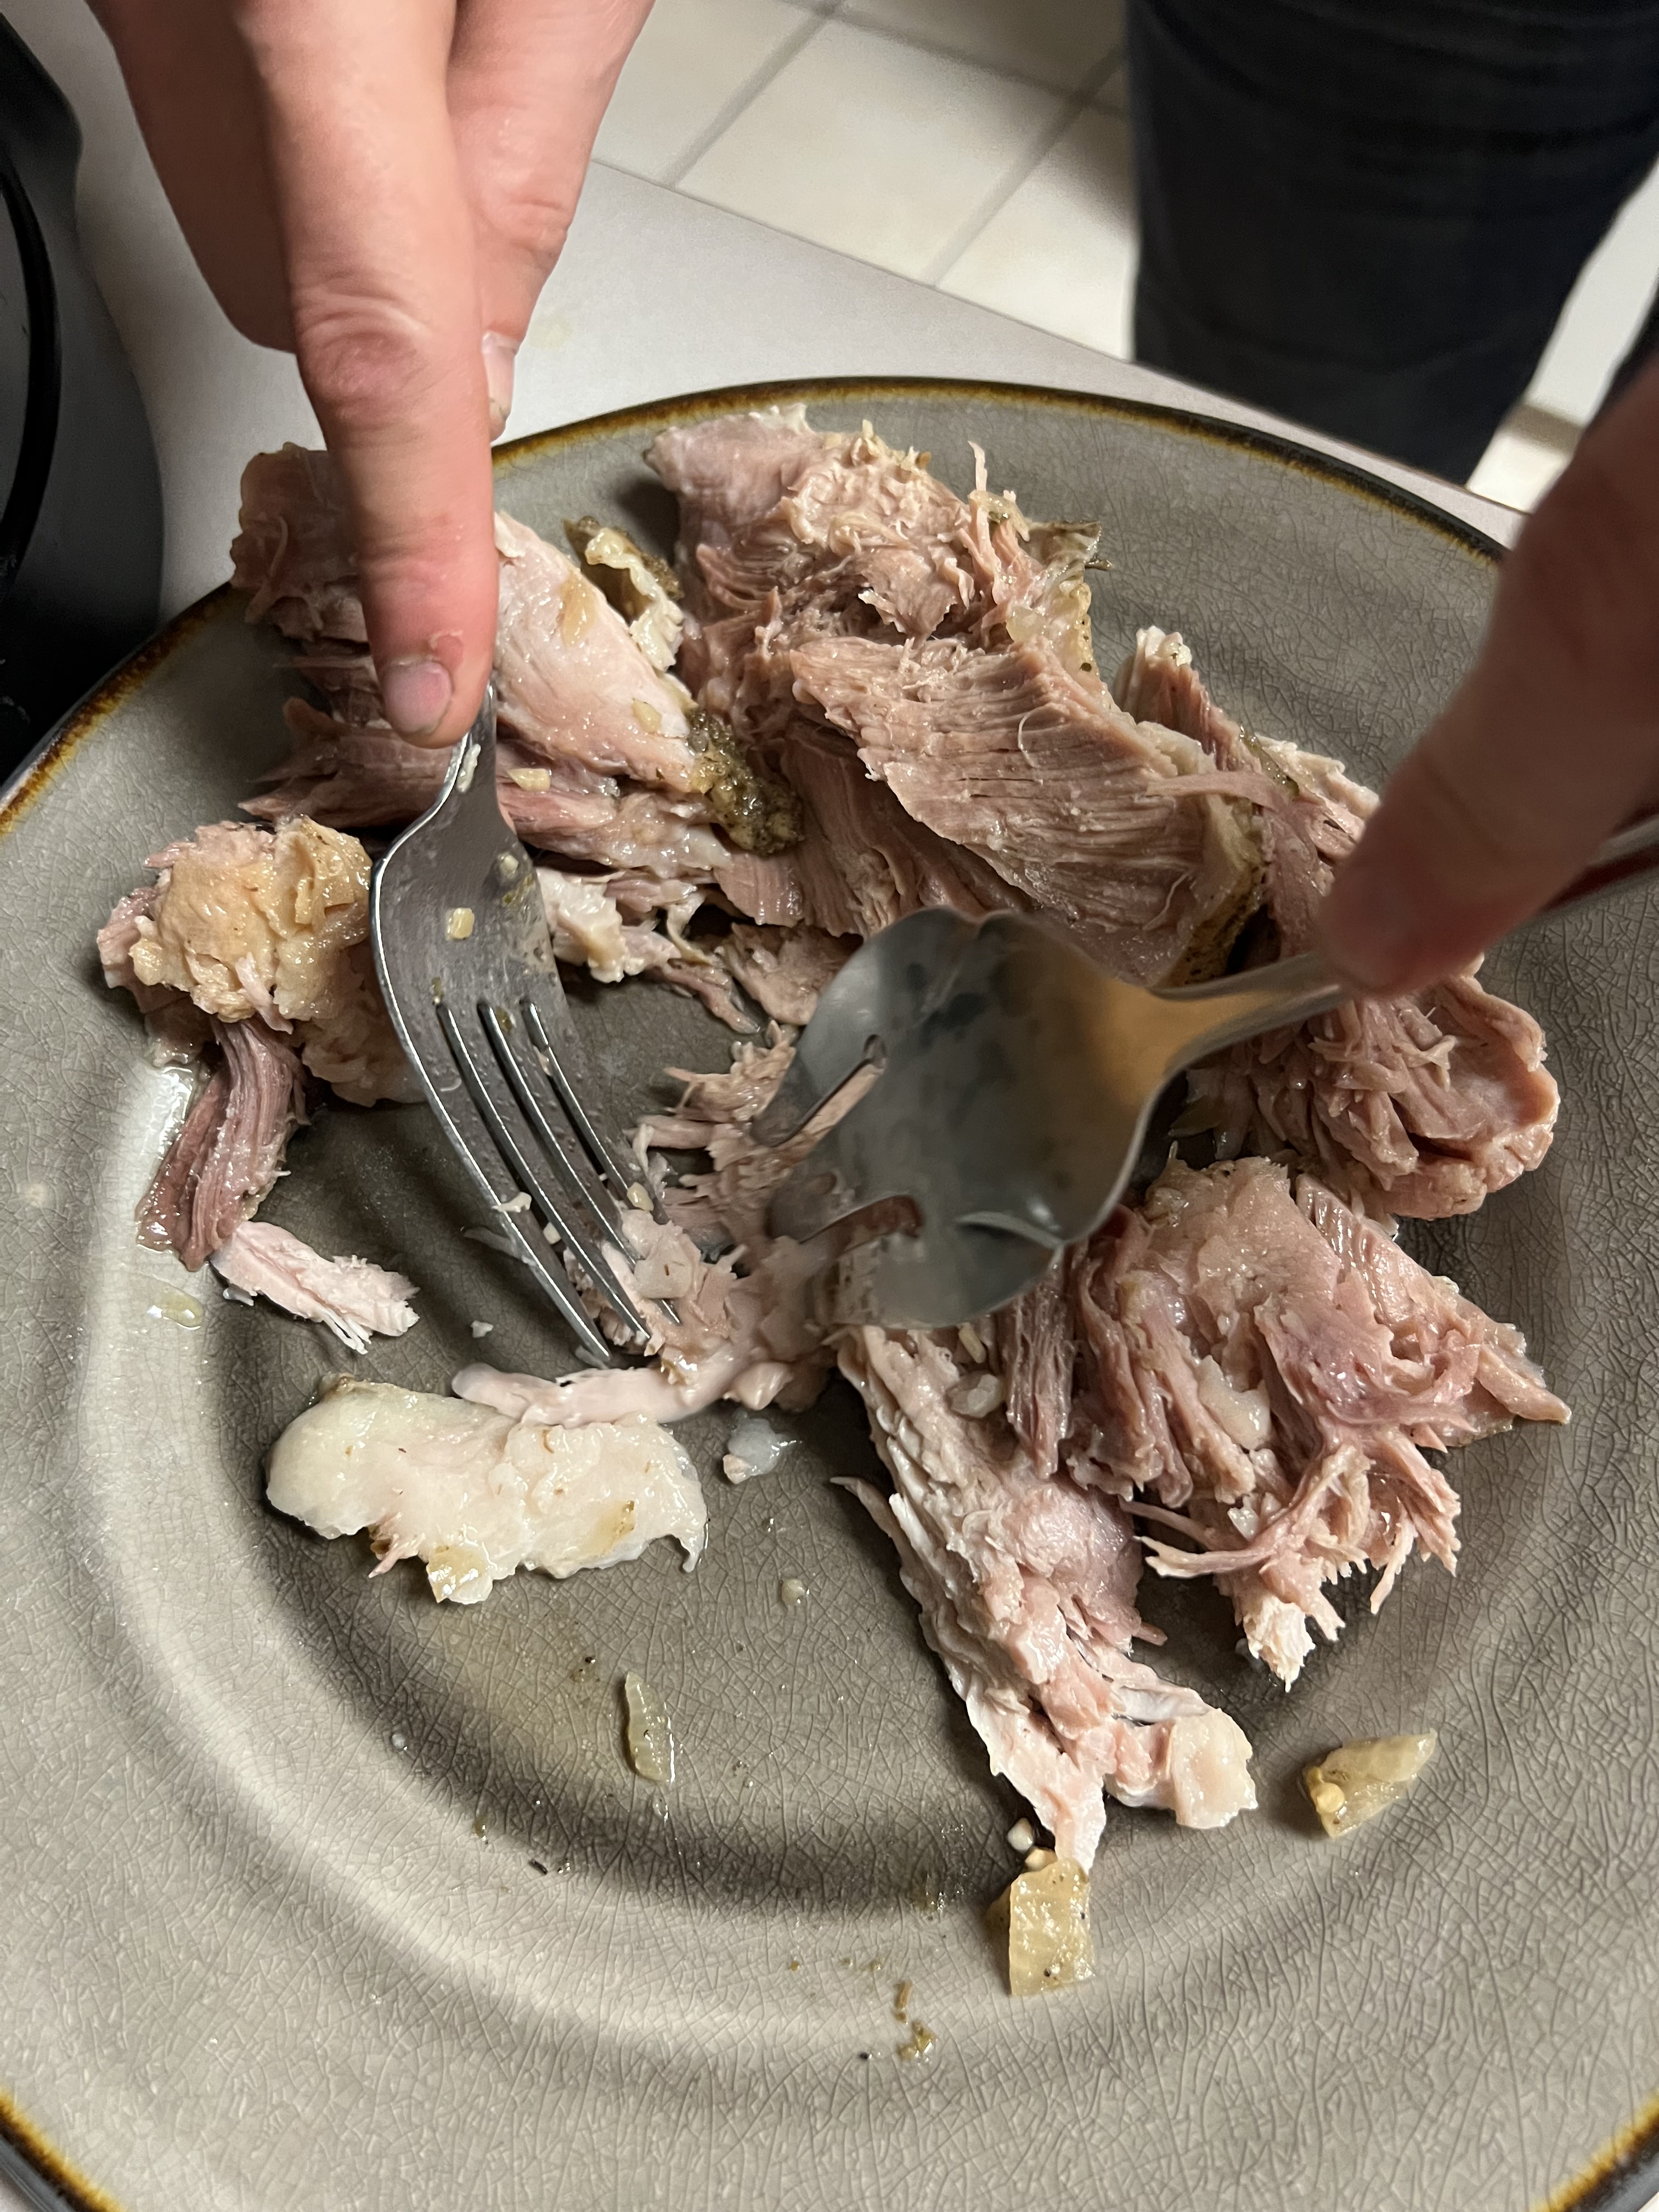
Preparing the Carnitas:
1. Once meat is cooked and falling apart with a fork, begin shredding the meat; discard any large pieces of fat and any bones. Set aside the broth.
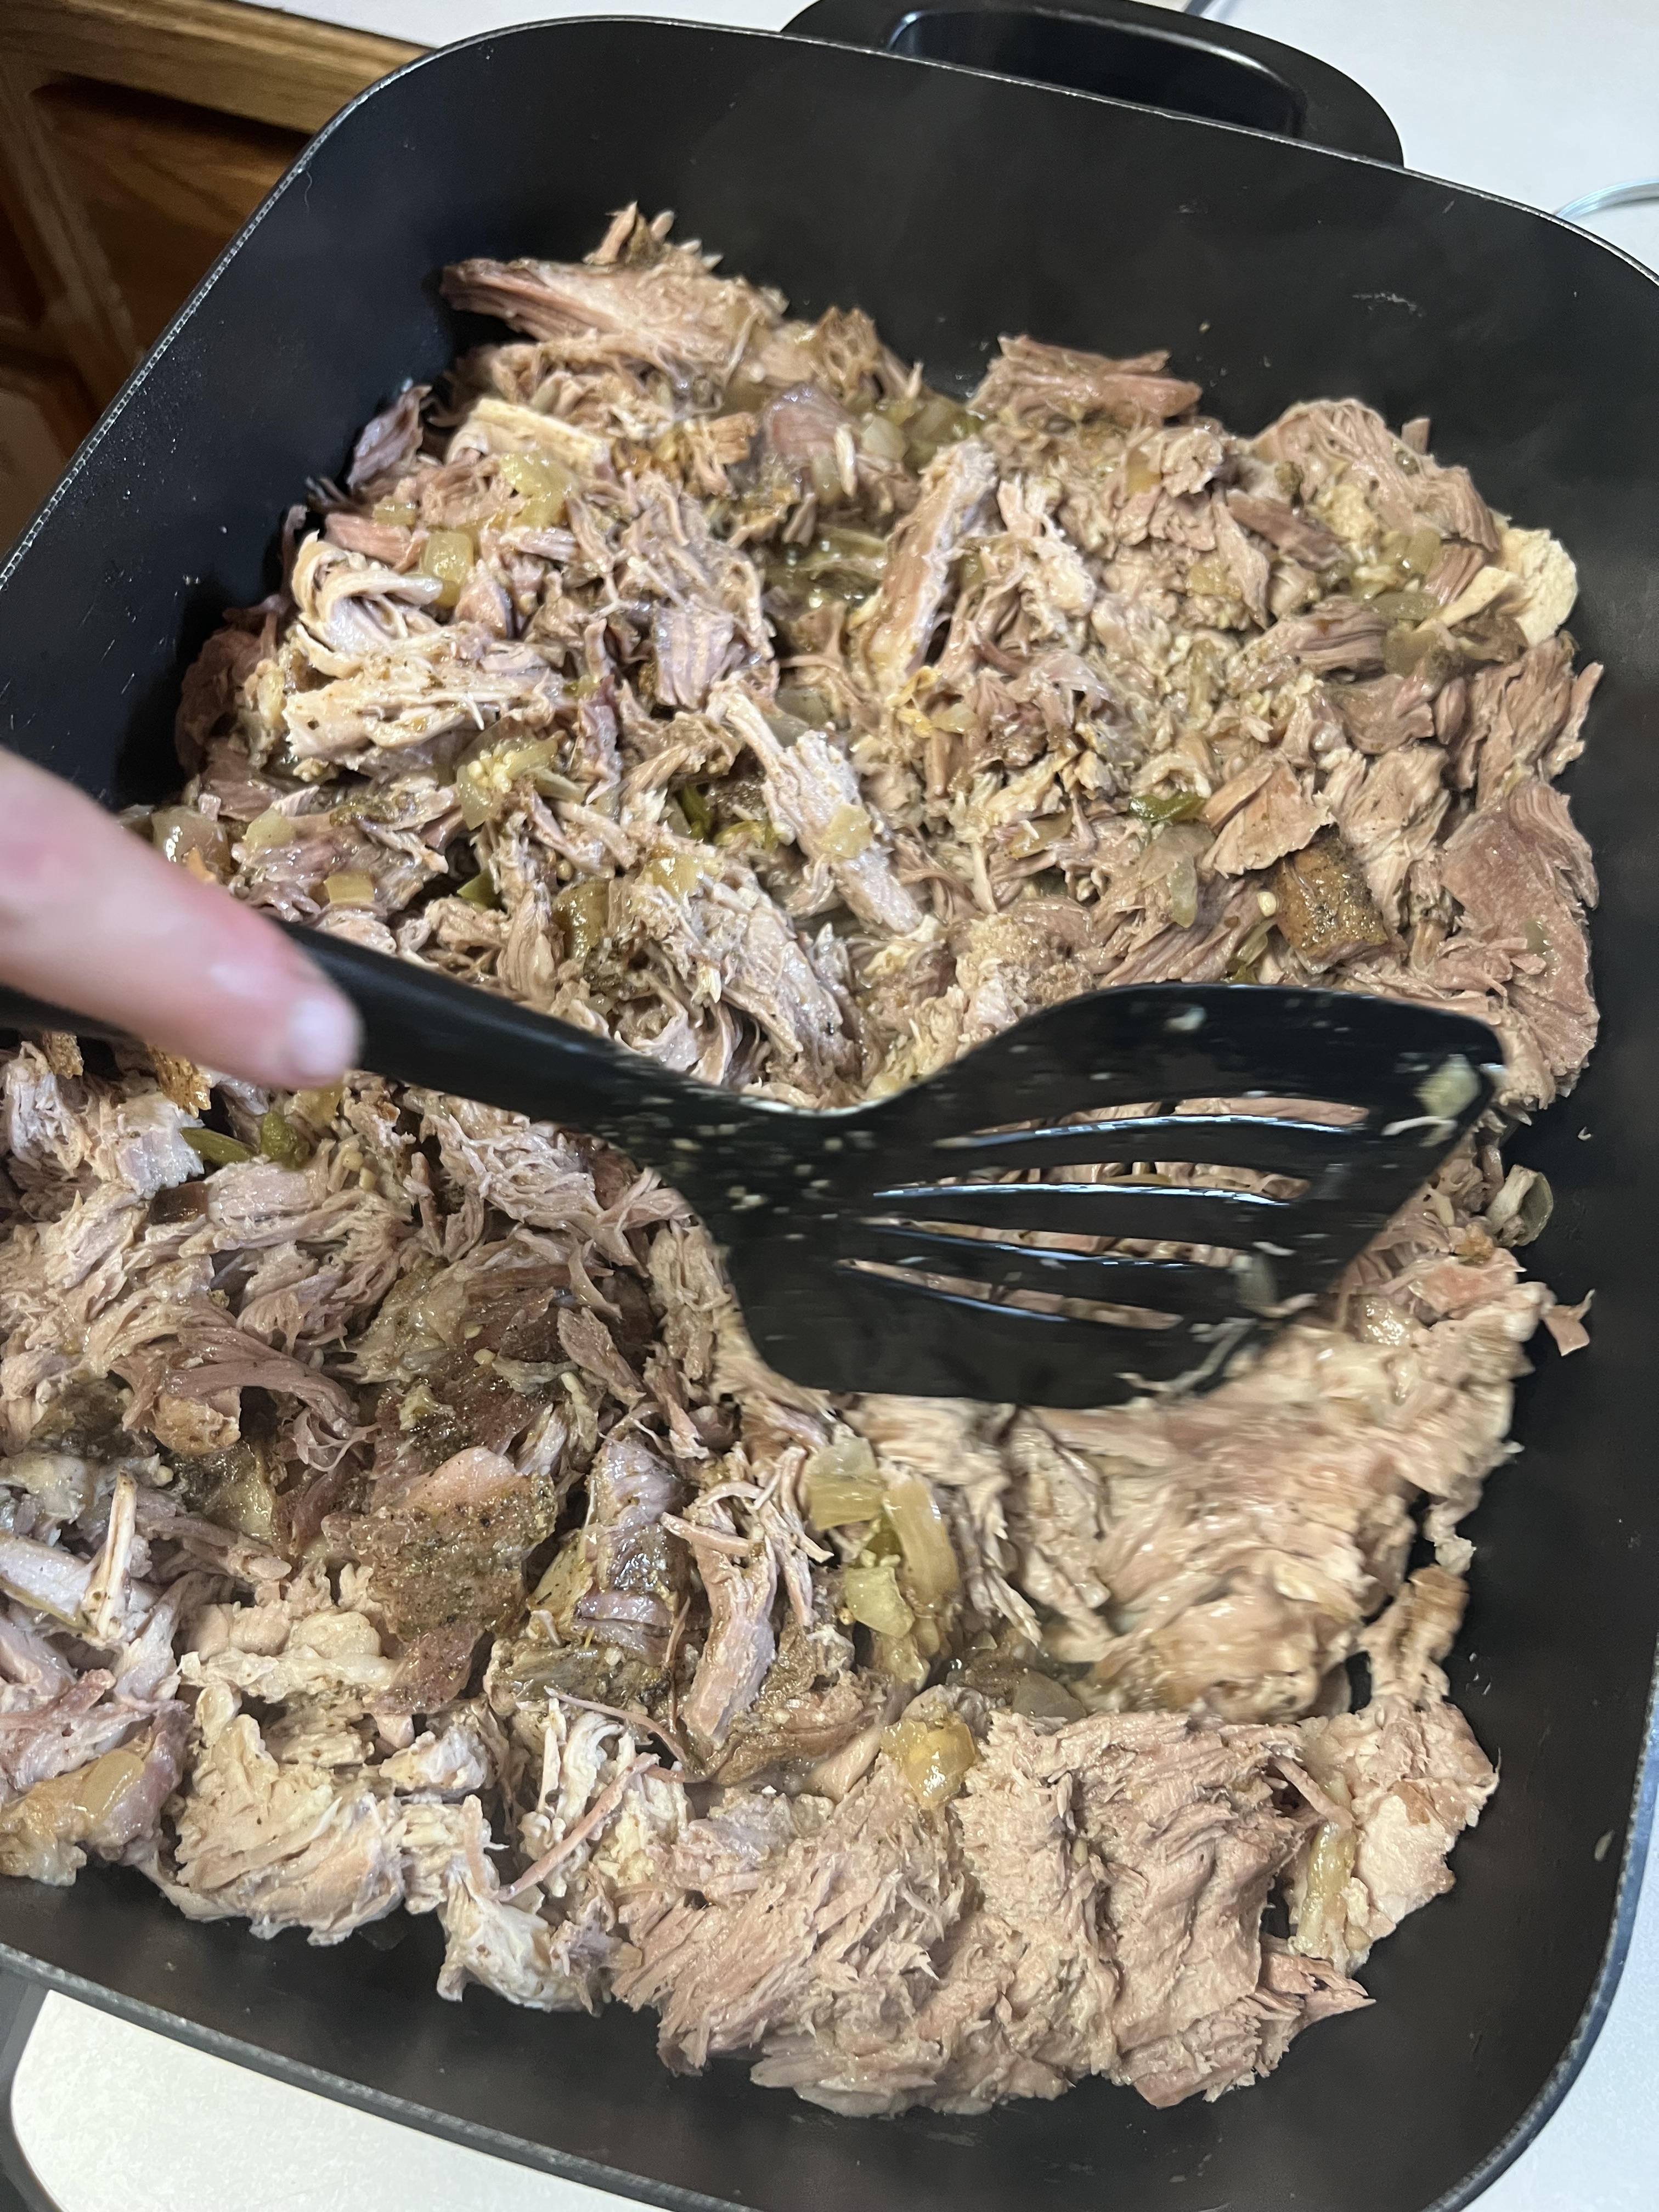
2. In a large electric skillet add meat and one cup of broth at a time. As meat cooks and broth dissipates, add 1 cup more at a time until the meat is fried tender.
Serving options:
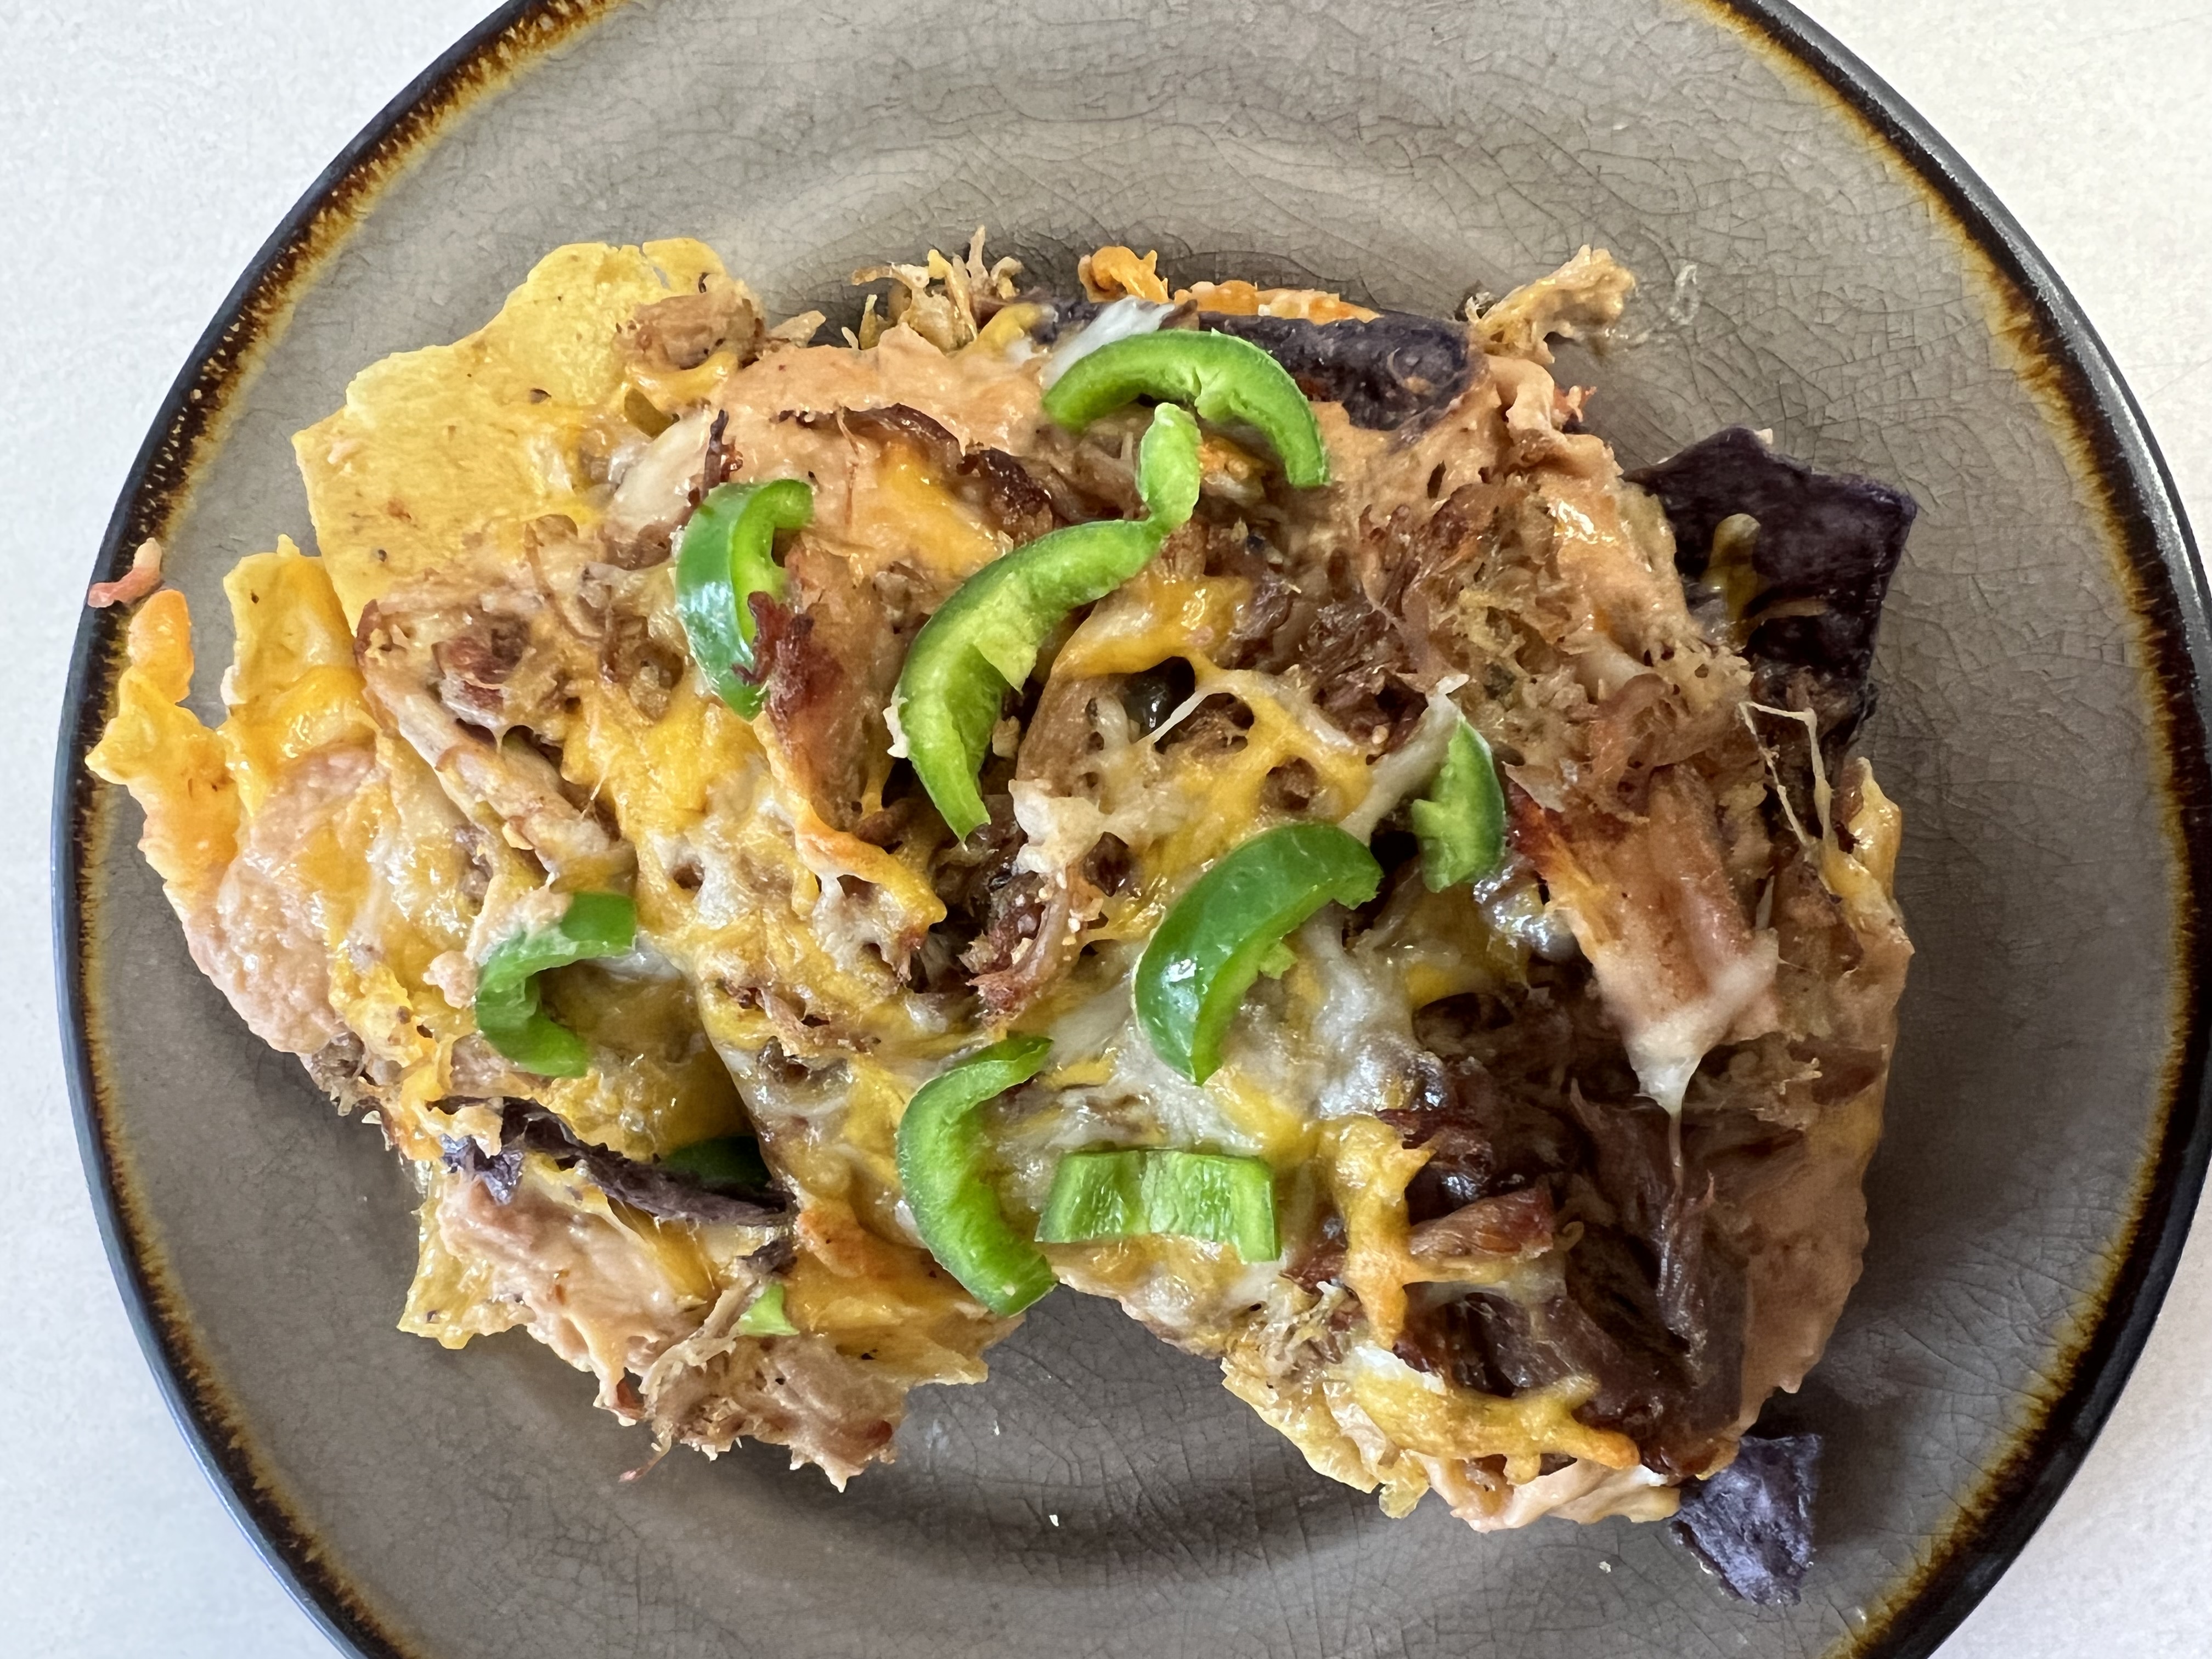
Nacho’s
Nachos- Place a single layer of tortilla chips in a small baking dish; sprinkle shredded cheese over top in an even layer; add refried beans spreading over top evenly; add tomatoes, and any other veggies you’d like. Bake in an oven at 350 degrees for 20 to 30 minutes until the cheese is melted.
Burrito’s
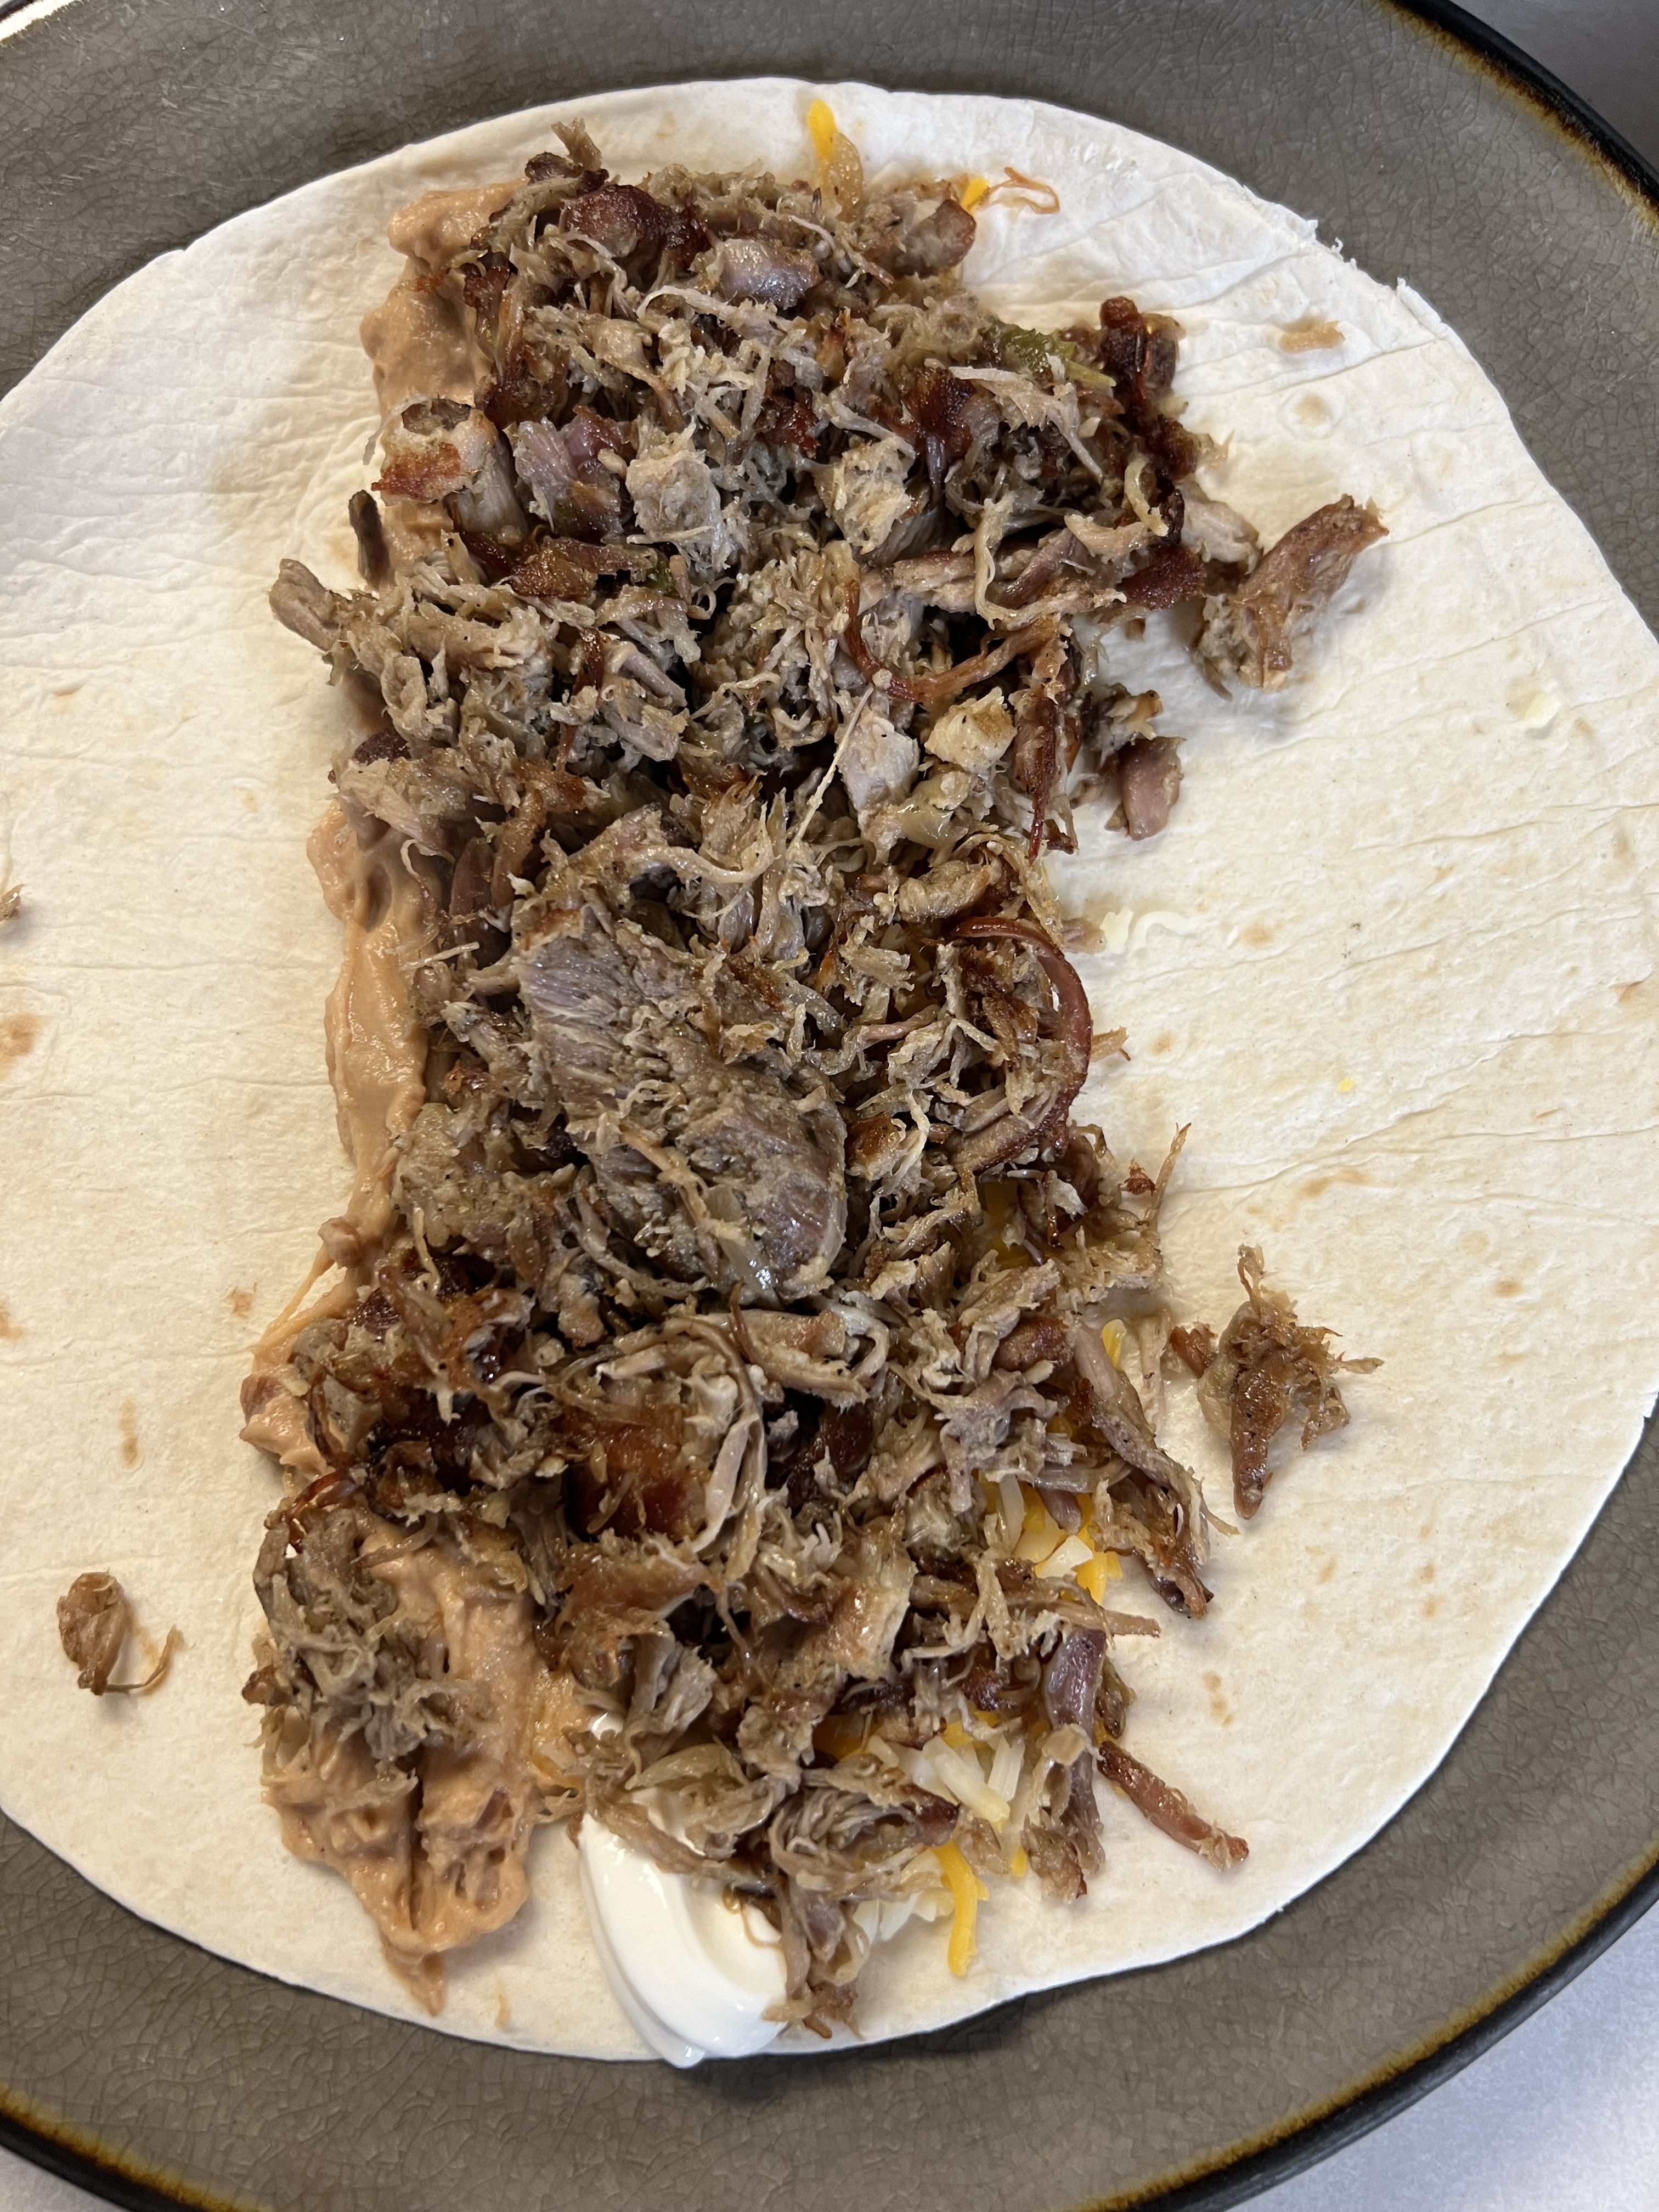
Burritos- fill a large soft flour tortilla with first sour cream, refried beans, shredded cheese and tomatoes. Top with your carnitas meat and whatever other toppings you enjoy.
Taco’s- use either a hard, soft, or corn shell tortilla and fill with whatever toppings you enjoy.
Pro Tip: How to make your refried beans the best!
Take 1- 1.25 ounce can of refried beans and put in a small saucepan.
Add ¼ cup of carnita broth and blend well.
Add 1 ½ cups shredded cheese, mix until well blended.
Add ½ cup sour cream and blend.
Heat until you can see the cheese is melted!
Stay tuned for next weeks follow up blog on what to do with your left over carnita’s… Homemade Mac & Cheese with Pulled Pork is on the way!
If you enjoyed this blog, please LIKE, Follow, Share & leave me a comment! I love your feedback!
If you aren’t following me on Facebook, go on over & give a LIKE & Follow me for daily tips & tricks for your home & garden!
Added bonus: You can go to my blog at www.fordragonfliesandme.com to purchase my original cookbook, Lovingly Seasoned Eats and Treats. The cookbook has almost 1000 recipes on almost 500 pages! Check out the Cookbook Testimonials while you’re there!
Happy Day, Jean
Copyright Policy
All text and images on this site are copyright of For Dragonflies And Me. Unless otherwise noted, you may not use this content without written permission.