Supporting Local: How Can I Do This?, 3/50 Project and Yummy Tuscan Soup & Onion Recipes!

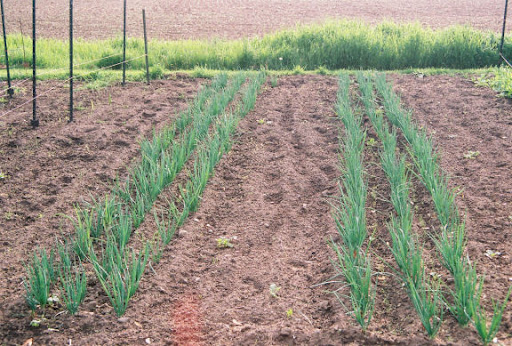
Local is an important thing to many people, not just to the businesses but also to the consumer.  I remember when I was a young girl growing up in Windsor, Ontario and going to ‘town’ with my grandma… the little downtown and the “five & dime” shops. I remember the ‘big’ store downtown where grandma use to do a lot of the domestic shopping… it had a little cafe in there that we would always get a bite to eat… my favorite- french fries and gravy, yeah that’s a Canadian thing!  Well anyway, I use to love to go to the little hardware store that she would by her canning jars and lids at, the Chinese food restaurant that we would patronize on grandpa’s pay day… memories of a small town… a lot of children in today’s society won’t know that as a regular experience.  It will more likely be a ‘vacation’ memory. So many of us want to know who grew those tomatoes, or who raised that sheep to produce the fiber that made those lovely mittens, or shake the hand with the farmer that milked that cow that you now can get fresh raw milk from.  It is a good feeling to ‘know your farmer’… it is good feeling to talk to Mary when you purchase that jar of cherry preserves she made… it is rewarding to hand your hard earned money over to a person that worked hard to provide you with something essential.  It is a win-win situation for all involved.

Many small towns of today have the big bad ‘W’ store along with others that have killed the mom & pop shops. It’s so sad really, but we can help keep things local by just doing a few small things: Shop in town, close to town and at least within your own state.  Local by most definitions allows a 100 mile radius from your home- that gives you a lot of options if you think about it!  Many of us are going to make New Years resolutions tomorrow… let at least one be to make a conscious effort to support your local community this year!

I thought it would be interesting to put some tips on how to buy local, support local and live local!
~Buy direct from the producer as often as possible. By doing this you can recompense them fairly for their work.  The best way to do this is to shop as locally as you can!  Find locally owned businesses in your area, go to the Farmers Market, check sites like Local Harvest, Local Dirt and Slow Food for producers around you! 
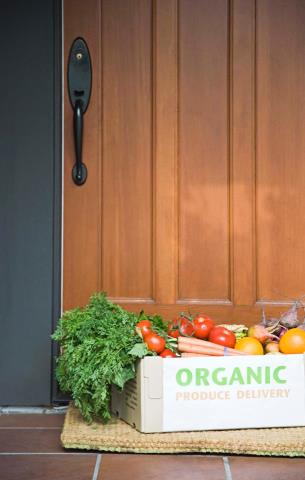
~Join a CSA.  Shares of seasonally grown vegetables, fruit, meat & eggs, dairy can be sent directly to your door or picked up at local Farmers Markets or area businesses.  Emphasis is always on local & fresh.
~Shop your local Farmers Markets. There are gobs of Summer and Winter farmers markets all around.  They not only provide you with a great selection of local products, you get to meet the producers first hand. 
~Shop small specialty shops.  These independent shops provide a more pleasurable shopping experience than the big box stores or super markets could ever offer.  They will even want to learn your first name!
~When you dine out, eat at a local restaurant that buys at least some of their menu ingredients from local producers/resources.  You’ll be surprised at how many restaurants are doing this. 
    
There are ton’s of great Local minded groups out there that are great resources for all of us- again both producer and consumer.  One that has a really good mission is the 3/50 Project   http://www.the350project.net

They encourage us to think of three businesses you’d hate to see disappear, pop in and say hello once a month; the goal is to spend $50 between those three businesses.  That really is not a lot when you look at where you spend your money in a month.

Their Mission:
• To promote and strengthen independent brick and mortar businesses owned by people in the community

• To thank consumers for their patronage

• To expand local revenue streams by showing how a small dollar amount can translate into enormous financial stability

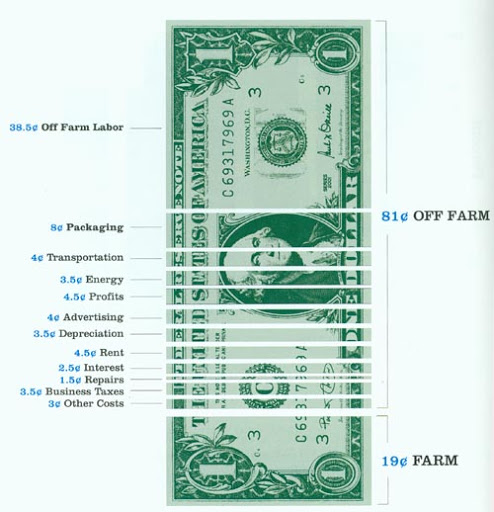
• To shine a light on the stark contrast between what an independent, locally owned brick and mortar business contributes to the local economy versus the significantly lower amount big boxes, franchises, chains, and internet purchases return

• To save the local economy…three businesses at a time
Be sure to check out their Facebook and website for lots more details I don’t have time to put here.

 
Other great Local Resources:~Edible WOW Magazine: This is one of the best resources out there for Southwest Michigan www.ediblewow.com
~Edible Communities: web site to direct you to an Edible publication in your area
www.ediblecommunities.com

~Local Harvest: list of producers in every state www.localharvest.org
~Google Farmers Markets to find local ones in your area
~Local Dirt: listing for producers
www.localdirt.com
There are gobs more out there and thanks to the internet you can find just about anything you want LOCALLY!

What to do with onions? There are lots of great things other than just throwing them on top of a salad. Here are a couple yummy recipes to expand your horizons. I threw in a yummy Tuscan Soup recipe for all the fresh Kale you are enjoying right now…Enjoy friends!

Sweet Onion and Sausage Spaghetti

6 oz uncooked Spaghetti
3/4 pound Italian Sausage Links, casings removed
2 tsp Olive Oil
1 sweet onion, thinly sliced
1 pint cherry tomatoes, halved
1/2 c loosely packed fresh basil leaves, chopped
1/2 c half & half cream
Shaved Parmesan cheese, optional

Cook spaghetti according to package directions.
Meanwhile, in a large nonstick skillet over med. Heat, cook sausage in oil for 5 minutes.   Add onion; cook 8-10 min.s longer or until meat is no longer pink and onion is tender.
Stir in tomatoes & basil; heat through.  Add ream; bring to a boil.  Drain spaghetti; toss with sausage mix.  Garnish with cheese if desired.

 
Baked Onion Cheese Dip
2 c shredded cheddar cheese
1 c shredded pepper Jack cheese
1/4 c cream cheese, cubed
1/2 c mayonnaise
1/4 tsp fresh thyme
2 c chopped sweet onions, divided
Assorted crackers

1.  in a food processor, combine the cheeses, mayo, thyme & 1 c onions; cover 7 process until blended.  Stir in remaining onions.
Transfer to a greased 3 c baking dish.  Baked, uncovered at 375 degrees for 20 –25 minutes or until bubbly.  Serve with crackers.

Tuscan Soup
4 cups chicken broth
1/2 cup heavy cream
3 medium potatoes
1 ob. Spicy Italian Sausage
1/2 tsp. salt
1/2 tsp. crushed red pepper flakes
3 cups chopped kale

Brown Sausage; cool.
Combine the broth and cream in a sauce pan; slice the unpeeled potato into 1/4 inch slices; add the browned sausage; add the kale.
Add the spices and let soup simmer for about 2 hours. Stir occasionally.

Happy Day,
Jean


More Organization Tips: The Office, The Daily Home Blessing and Yummy Market Fresh Sandwiches…

Our homes should be a blessing to our family… and whether we like it or not, we moms/wives/ladies can make it or break it!  We need to strive to create an environment that is welcoming, peaceful and cozy for all who enter.  A clean, well kept and organized home will make these elements much more easy to obtain.  As the ladies of the house, when things are out of order and chaotic, we too feel that and then in turn present that through our actions, attitudes and behavior… “if mom’s happy, then everyone is happy,” is too true a statement! In “Sink Reflections”, by Marla Cilley, she talks about having a Home Blessing (another Buzz word).  What this basically refers to is our Mission Statement for our home as women, wives and mothers… it our goal for what we want our home to be… what we want it to reflect. I took this very seriously because I have high expectations!  One thing to remember in all this is that even though we have routines and schedules, we must be flexible… we are not drill sergeants, even though I have been accused of that, we are still mommy and need to teach and train with a tender hand so our little helpers want to help and get excited about the process as well.  If you have children you fully understand what I am talking about… I have had some really good plans drawn up, but when the baby is puking up a storm from a sudden flu bug… zone cleaning comes to a sudden halt… so be what the Lord has us to be first… woman, wife and mommy!  Enjoy yourself in your organizational quests, otherwise it won’t last and it will be just another burden!

Here is my Daily Home Blessing…


DAILY HOME BLESSING

GOAL: To train our dear children in the Fruits of the Spirit and how to apply them to their daily life… not just our
dear children, but also myself.

  • Each day is assigned 1 to 2 fruits- 9 fruits of the Spirit in 7 days of the week.
  • That day at lunch we review the Bible verse, let them say one that they remember, how many; what book; etc.
  • Each one of us focus on one area to work on that day:  IE. Sat- Temperance/Self Control: Kyle work on self control with reading materials… devotions above hunting/sports; Ethan work on self control by doing a job even when he doesn’t feel like doing it… and so on for each family member.
  • Give each other encouragement- work together.
  • Try to create a more peaceful, happy environment~ especially for when dear husband comes home from working.
  • BREAKDOWN: Sunday- Love; Monday- Joy & Peace; Tuesday- Long suffering & Gentleness; Wednesday- Goodness; Thursday- Faith; Friday- Meekness; Saturday- Temperance/Self Control.

“But the Fruit of the Spirit is love, joy ,peace, long suffering, gentleness, goodness, faith, meekness, temperance; against such, there is no law.” Galatians 5:22, 23.

Next to my gardens I enjoy being in my office next best… that is probably because it is garden themed and very cottagy…  There are several elements in the office that need addressing so lets dig right in!

Zone Cleaning the Office: this is my weekly schedule unless otherwise noted.
*Dust ~around all ceiling lines and down corners of the room;
~inside wall pocket as well; dust shelf and all furniture- Book shelf, desk, all file cabinets, dresser, printer, computer and computer desk, white cabinet, all pictures/frames, knick knacks, lamps.
*Wash windows and ledges; take down curtains first week of month and wash
*Clean off all table top surfaces; organize all papers that need it; put all catch all stuff in proper places; file papers accordingly; clean up bulletin boards.
*Change garbage.
*Vacuum carpet.

Here are some tips on Storage and Organization that I use in my office… now please take into consideration I do all the paper and book work for our farm: meat/egg purchases; 50 member CSA; produce purchase; organization of what my growers will produce; my fields and gardens; seed saving & ordering; I am the Market Manager for our farms Winter Farmers Market and I have over 70 vendors and all the paperwork that goes with that, write three blogs, not to mention all my household stuff… and so on and so on… so I do a lot in my office. It does get out of hand at times… especially when ‘other’ people start putting things in my office and on my desk.
*Because I technically deal with five different elements within our farm and dozens of sub-categories within each element I need to keep things separated and very organized.  I have 3 file cabinets that help me with this.
~ One is for all Household Documents- such as tax papers, appliance manuals and warranties, large item receipts of purchase, bank statements, policies, and any other things that would fall into this category.
~One is strictly for our farm- one drawer for CSA and the other for market stuff/meat.
~The other holds catalogs, and any ‘other’ paperwork that I need space for.
*I use baskets to store a lot of stuff- they are cute & decorative and very functional.  I steer clear of round baskets- they take up more space then they provide.  I like shoe box size rectangle and square baskets.  They sit nicely on shelves and look very neat.  Books stand nicely in them and most containers fit as well. I have a five shelf bookshelf in my office that holds some office supplies; reams of paper, envelopes, files, etc.~ several baskets that hide containers of stapes, pens, rubber bands, paper clips, index cards and such. 
*This shelf also houses many of ‘my’ books- mostly the crafty ones, my cookbooks and several of my scrapbooks.
*On the top shelf I have a couple more baskets that hold all my rubber stamps and stamp pads… I don’t do stamping very often and this is a good, out of the way place for me… not to mention the baby hasn’t figured out they are there yet!

*I have a couple of those really cute storage boxes too: one holds my Cricut cartridges and small supplies and the other holds what ever scrap booking project I am currently on… which brings me to another point… my office is also my Craft Supply storage room… sigh!  I dream for a craft room along with a first floor laundry and a bathroom I can do cart wheels in too some day… just to be able to set up all my scrapbook and cricut supplies is a dream… no room and too many little hands for that these days.
*On the floor under the bottom shelf I have two more of those large rectangular laundry size baskets that hold back issues of my favorite magazines… Martha Stewart Living, Country Gardens and Organic Gardening in there.  I do a lot of referencing in these for blog ideas.
*I have a really neat old drop leaf table that is painted a light tealy green… this is my desk where I do my field plans, pay bills and keep my day planner. I have several family pictures, and other containers that hold pens, and misc. office supplies on it. 
*I have a Computer table/shelf that I picked up at a garage sale… really it isn’t a desk at all… it’s actually a long (6feet), narrow (2 feet) counter with a top and middle shelf… I love it!  I have my lamp, printer, and PC on the top shelf while I keep stackable file trays on the middle shelf with other totes that hold my Trade Publication magazines… Growing For Market and Farmer’s Market Today, along with any other ‘current’ documentation that I am working on. Under the middle shelf.  On the floor under the middle shelf I keep my Cricut, a few other totes that hold my other favorite magazines… Countryside & Small Stock Journal, Mother Earth News, Acres USA, and of course Country Living… among a few others like Hobby Farm, Mary Jane’s Farms, etc. I know the FlyLady says pitch those, but I truly do reference them all the time. They often give me inspiration for my blogs… they are a part of my work!
*I have several other pieces of furniture in my office that I store crafting supplies, current catalogs, receipts and more… but I don’t think necessary to get into…
Some key tips that I like to use in my office is to keep current!  Don’t hang onto years worth of catalogs… With my seed catalogs I keep the current year and one year back to compare.  With us being a farm, I get oodles & oodles of catalogs… If I don’t shop them, I don’t keep them!  Recycle them and do everyone a favor. 
*Paper work can be so troublesome!  My philosophy is pitch anything 3 three years or older. With exception of  tax & bank documents, large purchase receipts with warranties and any thing else you will REALLY NEED!
*I have two bulletin boards: one is above my PC desk and this has any current and due bills for the farm, CSA group name list & schedules, and of course some inspirational sayings, cards and photos… it has to be cute!
*I keep a wall calender right beside my office chair which is between my desk and PC counter, I only write ‘family’ appointments on this one. I keep my day planner on my desk as well as a full size desk calender on my desk top.  I use my day planner for everything; farm related, family and personal- it is my tell all!  The full size desk calender is where I keep my hired girls hours and any other farm related appointments. on.  They are all together and can be easily cross referenced.  Day planners are a girl’s best friend!    
We are abounding with all the good stuff coming in from the fields and gardens… here are a few yummy recipe’s to help you use it up!  Enjoy!

Heirloom Tomato Melt
1/4 cup shredded Colby jack cheese
1 everything bagel, split
2 slices of an Heirloom Tomato
2 Tbsp. fresh Parmesan Cheese, shredded

Sprinkle half the Colby jack cheese over each bagel half; top each half with a tomato slice; sprinkle half the Parmesan cheese onto each tomato; broil on low for about 4 to 6 minutes or until cheese is bubbly and golden.
Cornmeal Covered Green Tomato Sandwich1 1/2 to 2 cups finely ground cornmeal
1 tsp. sea salt
1/4 tsp. pepper
1/2 tsp. season salt
2 large green Tomatoes, sliced about 1/4 inch thick
Shortening for frying
2-3 Tbsp. butter, softened
8 slices french bread, cut 1/2 inch thick if not already sliced
1. Combine the cornmeal and all the seasonings into a 1 gallon plastic bag; mix thoroughly.
2. Coat each tomato slice gently, one at a time in the bag of cornmeal mix; remove from bag.
3. Heat shortening in a large skillet over medium heat; fry tomatoes until golden on both sides; remove from skillet onto several layers of paper towel to absorb excess oil; pat dry.
4. Spread butter on one side of each bread slice; arrange 4 slices, butter side down in skillet; top with tomatoes and remaining bread, butter side up and fry each side until toasted golden on both sides.
Happy Day,
Jean

More on Organization: Creating Routines with P.M.S.- Prioritize, Minimize and Simplify , The Kitchen & Pantry and More Market Fresh Canning Recipe’s!

Oh what a happy mom am I when the boys rooms are clean, the fridge is shining with no ‘science experiments’ going on it, the appliances are shining and the windows let in all the bright sunshine because the little paddy prints have been washed off… at least for fifteen minutes… so look fast!  After all I do have a just turned two year old that loves to stand on the kitchen chairs (… and the table…) and look at the out of doors… cry when everyone else is going ‘bye-bye’, and stand and wave at the dumpster guy pulling in the lane… yes windows are nice, but they don’t stay clean at our house for very long. The boys say why bother… I tell them can you imagine if we didn’t- think layers boys!  Well, the kitchen is the gathering place in most homes and it is at ours as well… It is where little boys get to lick the beaters and get a spoonful of homemade chocolate pudding… where soap bubble beards are made and wet towel ‘thwacks’ happen… yes the kitchen is the heart of the home… after all it’s where we nurish those we love… I will go into some more details of how I keep the kitchen and pantry tidy and organized.  Today I thought it would be fun to throw in a couple canning recipes for some of the good stuff that you are getting in your CSA shares and across our market table… an possibly out of your very own gardens!  

Today we’ll focus on the Kitchen and Pantry… read on next time for root cellar and canning room tips!  In ‘Sink Reflection’s’, by Marla Cilley I’ve learned much on keeping notes on what needs to be done through the use of my Control Journal.  She also discusses much on the concept of starting and maintaining ‘Routine’s’.  I have read that if you do anything consistantly for thirty days, it will become a habit or a routine~ that works with both good & bad stuff, so be careful!  I can testify that this is true… as I mentioned in the previous blog post, ‘Walk Through’ has become second nature in my life and that of my children’s. We have incorporated this aspect into our daily lives and now it is a ‘normal’ thing and no one looks at me with that, ‘What are you talking about?’ look!  It really is wonderful! When we write down the daily routines that we want to live by, we can visually look at these lists and see what needs to be done. It’s kinda like typing… for those of you who know how. I don’t think about where the key I need is, because as soon as I do, a mistake will inevidibly happen… I cannot even tell you right off the top of my head what letter belongs under which finger… I have to actually stop and think about how to spell a word and then I can see it in my mind… you typers know what I am saying… it’s also like walking… you don’t think each step, you’d probably trip, you just know how to walk.  Well that’s how our daily routines can and will become a part of our lives… if we are consistant with them that is!  So today lets look at creating routines! 

Creating and Maintaining Routines…
Here are a few tips from me & Marla!
*Think about yourself first… when you get up in the morning, brush your teeth, take a quick shower and be sure to put on some lovely organic face cream to make you feel fresh,  have a cup of tea or coffee and do a morning devotion to start your day out right!  If mom’s happy, everyone is happy!
*P.M.S.~ This is not going to be what you think… read on!  When you start your routine list, start small so you aren’t overwhelmed and don’t get a sense of failure if you don’t get all the jobs done!  I call this the positive way to look at P.M.S.- Prioritize, Minimize and Simplify your life!  What I would recommend is writing a list of all the accomplishments you want to do, then P.M.S. your list!  From this list create your routine~ Marla recomends a morning, daily and evening routine.  Have a routine for each part of the day and for each day of the week.  I love day planners, A.K.A. Control Journals! 
*Baby steps is another one of Marla’s buzz words… she highly recomends starting small in your routine lists… I think my P.M.S. system works great along with her concept of baby steps.
Here is a sample of my Morning routine as it is written in my Control Journal…


MORNING ROUTINE

“She riseth while it is yet night and giveth meat to her household…” Proverbs 31:15a

Week A:

  • 5:50am~ Rise & Shine with smile & praise in my heart! Start coffee if Neil hasn’t already.
  • Swish toilet & sink; get a load of laundry together to throw in.
  • Brush my teeth; get a quick shower; put lotions on; get dressed.
  • Have some quiet time with the Lord and a warm cup of coffee…
  • Check my email’s; read daily devotions; send any responses that need done; do blogs.
  • 6:45am~ start waking the rest of the clan up… get breakfast going.
  • Throw load of laundry in.
  • 7:30am~ everyone at table for breakfast
  • 8:00am~ Assign everyone their tasks for the day; children start morning chores
  • clearing off table; wash breakfast dishes; switch laundry loads.
  • 9:00am~ Think about my day; make list’s for jobs to be done; check my day planner
  • Check menu~ take anything that has to thaw out of the freezer; make sure we have all ingredients for the menu.
  • Everyone is on their way…
I also have routines for each day of the week written down in it so the children can see what needs to be done.  I use to keep the journal open on the counter during the day so everyone could see it freely, although over the years I have drifted from this simply because they really have become habits.  
 More on Room by Room Organization…

… so moving on here are tips from my home to yours!
*Here is my Kitchen routine as I have it in my journal.  This is to be done on a weekly basis unless otherwise noted.
~Wash down: *Counter Backsplash, fronts of cupboards, spot wash walls. Wash down counters & stove after every use
                     *Wash windows   
                     *put clean foil on stove burner plates; clean out fridge
                     *wash floors- Saturday; spot clean through the week
                     *sweep floor after each meal daily
                     *dust all around ceiling lines and through room
                     *wash floor carpets
~Monthly~ take down curtains and wash; pull fridge & stove out and clean; wash down ceiling fan; wash walls
~Seasonally~ Spring and Fall: wash walls and ceiling; empty out cupboards and wash; take all knick knacks off top of cupboards and wash; dust top of cupboards and wash; touch up any spots with paint.
   

Helpful Organizational tips for the kitchen…*I keep all my spices and herbs in half pint, pint and quart size mason jars.  I don’t like to use plastic with anything more than I have too!

*In the fridge, I always keep the older products up front so they are used first.  I do use Tupperware Fridge Smart containers in my fridge. They stack neatly and they really do keep things fresher longer.  I use them for my lunch meat, cheeses and even leftovers. They are not just for fruit & veggies. 
*I also prefer to use cling wrap over foil to cover things in the fridge~ it is easier to see what’s in the bowl. 
*I keep all my baking supplies: measuring items, spices, herbs, flour, baking pans & sheets on the same side of the kitchen in neighboring cupboards so I don’t have to run all over the kitchen for items.
*Use plastic totes to keep loose items like cookie cutters and other items that you don’t use every day in and then they stack neatly in the cupboard as well.
*I use baskets in my utensil drawers~ I like the way it looks better than the regular plastic utensil dividers.  I am all about cute~ especially if I can use baskets!
*If you do a lot of baking like we do, keep your 25# and 50# bags of sugar, oatmeal and flours in plastic totes with air tight lids.  This will keep it fresh and keep the bugs out!

I am very fortunate to have a nice size pantry right off my kitchen along with a closet in my kitchen to keep my big totes of flour, sugar & oatmeal in. I love my pantry and I get lots of compliments on how orderly and how cute it is!  Here is what I do to keep it organized…
*I have two floor shelves  and two wall shelves in my pantry. 
~On the one shelf I have four medium sized plastic totes that hold pasta, rice, crackers, small bags of flour and other grains. 
I have two larger totes that hold chips, cereals and other larger bagged items.  I made cute tag’s with stickers that spelled out the words of what is in each tote and then I laminated them.  I then hot glue gunned them onto each tote.  I also have two wooden peck baskets on the top shelf that; one hold potatoes & onions while the other holds coffee & tea.  On another shelf I have two baskets which hold linen place mats & napkins & extra table clothes and also a stack of other extra baskets for serving.  Each of these basket has a tag like the totes but they are tied on with a piece of raffia! 
~The other floor shelf is much sturdier and holds all my canned goods~ that is my jars of goodness I preserve.  I keep a few of the basics on this shelf so we don’t always have to be running to the canning room in the basement for stuff.  I also keep my larger mason jars of dry mixes, baking soda & powder, thickening agents, cocoa, along with baking supplies like Chocolate chips, walnuts and coconut on this shelf.  I used sticker labels on each jar to write what the contents are.  I have three baskets on one of the sheves that hold bread, fruit and veggies that don’t need refridgeration in.  On the top shelf I have three ‘fish bowl’ style jars that hold cookies, sugar and treats in. 
~One of the wall mounted shelves has three large ‘laundry’ size rectangular baskets; these hold extra plastic containers, party ware and miscellaneous canning equipment~ apple peeler corer, green bean frencher and such.
The other shelf has another three baskets that hold packages of jello and pectin, canning supplies and anything else that I need to put in them. 
… I love my pantry and the extra storage that it offers me.  If you have a small closet in or near your kitchen you can easily transform it into a pantry simply by adding some shelves and a little creative ingenuity!


Yummy Market Fresh Recipes…
Dilly Beans

2 pounds fresh, tender green or yellow wax beans~ make it interesting, use both
cayenne pepper
4 whole cloves fresh garlic, peeled
4 heads fresh dill or 2 tsp. dill weed
2 tsp. mustard seed
2 1/2 cups white vinegar
2 1/2 cups water
1/4 cup sea salt
*wide mouth canning jars work best for this.

1. Wash beans in cold water; drain on towel; trim off the stem and tail ends, otherwise leave beans whole.
2. In clean jars put one clove garlic, 1 dill head or 1/2 tsp. dill weed and 1/2 tsp. mustard seed; pack the beans in lengthwise into wide mouth jars- they should look like they are standing up.  Trim any that are too long; Add one dash cayenne pepper to each jar.
3. Combine water in vinegar and salt in a saucepan; bring to a boil.  Pour this over the beans, filling to within 1/2 inch of the top. Seal immediately.
4. Process in a hot water bath for 10 minutes.
*Wait at least two to three weeks before serving so the flavors have time to blend! 

Zucchini Relish
This relish is not only beautiful but no one will ever relize it isn’t cucumbers… no matter what they say!
5 cups shredded zucchini
5 cups shredded yellow summer squash
2 cups red onion, diced
2 cups yellow onion, diced
4 Tbsp. sea salt
2 cups sugar (may add up to 1 cup more if you like it sweeter)
1 tsp. turmeric
1/2 tsp. pepper
1/4 tsp. dry mustard
1/2 tsp. mustard seed
1 each: red, green and orange sweet bell peppers, diced

1. In a large bowl, add both squashes and onions; blend well; add salt. Refriderate overnight.
2. Drain.  Run water through the ingredients several times; drain again.
3. Put ingredients into a large kettle; add vinegar, sugar, turmeric, pepper, dry mustard and mustard seed.
4. Add chopped peppers and add to squash mixture; stir gently until well mixed.
5. Bring mixture to a boil and cook for 3 minutes. Laddle into pint jars leaving 1/2 inch head space; be sure to wipe rims of jars to ensure sealing.
6. Process in boiling water bath for 15 minutes.

Happy Day,
Jean


Canning Tips, To-Do List Tags & How to Can Yummy Sweet & Sour pickles and Mexican Style Salsa!

Read on to get the recipe for my Yummy pickles…

Heirloom Tomatoes… basil, garlic… oh my!  Summer goodness just keeps flowing into our kitchens from the gardens.  We are busy starting to put our food up for the coming cold months and how wonderful it is to watch those can shelves fill up with all that good stuff. Today we are going to busy making salsa and sweet & sour pickles.  Every time we add to the shelves, I just stand back and cannot help but be so thankful for all we have.  Life is good!  Today I am going to give some helpful canning tips that I compiled several years back for my cookbook, “Lovingly Seasoned Eats & Treats” along with my salsa & pickle recipe… and of course a cute crafty idea  too!  Have a wonderful day!


“Tips for Relaxed and Enjoyable Canning”, by Jean Smith, taken from Lovingly Seasoned Eats & Treats, pg. 389
*Always figure out approximately how many jars you will be needing.  Have them washed and ready to fill.
*Count out your lids and rings and have them ready.
*Keep a sink of hot, soapy water so you can wash as you go instead of having a pile of dirty dishes after you’re done canning and tired, and don’t feel like washing them!
*Have syrups, brine’s, etc., made before you start into the fruit or veggies.
*Put salt in a bowl with measuring spoon.
*Make sure you have all needed ingredients AND enough of them BEFORE you start a project.
*If it’s a ‘first time’ recipe, make a single serving to test if you and your family like it.
Make simple meals- use paper plates- don’t try to do it all in one day.
*Include the children- they can be more helpful than we often can even imagine.
*If in Doubt about anything- call an experienced canner!
*Try new recipes- make the season fun!

*Time Saver fro Pressure Canning– use 15 pounds pressure instead of 10 and cut your processing time in half!

*Sugar Syrups for Canning or Freezing Fruit:

~Light Syrup:  2 cups sugar and 4 cups water
~Medium Syrup:  3 cups sugar and 4 cups water
~Heavy Syrup: 4 cups sugar and 4 cups water
Method:  Heat sugar and water until sugar is dissolved.  for canning, keep syrup hot until used, but don’t boil down.  for freezing, refrigerate until ice cold.
to help maintain quality of canned fruits, use Fruit Fresh: 1/4 tsp. dissolved in 1/4 cup cold water, added to each quart of fruit.
*Use hot water bath for fruits, tomatoes, pickles, jams and jellies.  Use a pressure canner for meats, fish, chicken and other vegetables.

Tips for Canning Fruit, by Laurel Martin, taken from Lovingly Seasoned Eats & Treats, pg. 389
*Peaches: add 1/2 cup sugar to each quart. Bring water to rolling boil and turn off heat.  Time: Hard peaches for 15 minutes and soft peaches for 10 minutes.  Then remove from water bath.
*Pears: Add 1/2 cup sugar to each quart and 1/4 cup orange juice to each quart.  Bring water bath to rolling boil. Turn off heat and time 5 minutes.  remove from water bath.  The orange juice gives the pears a delicious looking color. 

There are tons more tips & ideas, along with almost 1000 recipe’s, 100 in the canning section alone in the cookbook.  I always have them at market for anyone interested!

To-Do-List Tag’s
Keep priorities in sight when planning your next trip by tying a to-do list onto luggage. We printed our list on card stock and used a metal eyelet to reinforce the hole through which a ribbon is passed. To be able to reuse the card for future jaunts, simply laminate it and check the things you’ve done with a dry-erase marker. Wipe off check marks and remove the tag when you head out on vacation.  (to see a photo, go to the website).

Here is my personal recipe for Mexican Style Salsa… It is excellent fresh as well as canned!

26 large tomatoes, cored and chopped into small bite size chunks
10 medium onions, chopped (you can peel them if you want to, I don’t bother)
7 Tbsp. dried cilantro or 1 cup fresh, chopped
20 fresh cloves garlic, minced- about 7 Tbsp.
1 1/4 cup lemon juice
7 Tbsp. olive oil
2 cups chopped Jalapeno peppers
3 1/2 Tbsp. oregano
Salt

1.  In a large bowl: chop all tomatoes, onions and peppers; mince garlic; add rest of ingredients except salt.
2.  Fill pint jars leaving 1 inch head space; add 1 tsp. salt to each jar.
Process in a hot water bath for 30 minutes.  Yields about 16 pints.

Sweet and Sour Pickles…
Bring to Boil: Brine~ 1 Quart White Vinegar, 2 quart water, 3 cups sugar, 2 Tbsp. pickling spices, 2-3 tsp. alum.
Prepare~ Wash cukes, removing ends and any bad spots.  Slice lengthwise and put in large bowl, sprinkle Kosher salt over each layer.  Mix with hands; let set 3 hours or overnight.
Pack cukes in clean jars, add 1 sprig dill to each jar.  Pour brine over till covered, leaving 1 inch head space.  Make more if needed.
Process in hot water bath for 5 minutes.

Happy Day,
Jean


Market Day At The Garden Gate Farm, Plant Tags, Plant Growing File & more yummy Market Fresh Recipe’s!

We have been busy… I thought today along with the normal fun stuff I like to share I would give a journal entry of “A Day In The Life…” at our farm on Friday while we get ready for market… so here it is… enjoy!

Here was our day last Friday…  it was 97 degrees with a heat index of 103 degrees…
“We take so much care in what we do because we do it for you!” Jean Smith

Friday is market morning… everyone gets out of bed starting around 6am through till about 9am~ those sleepy heads are typically the little guys!  We have a simple breakfast of cereal and fruit, clean up… I can’t stand dirty dishes on the counter~ especially when I know I will be working in there later!  Do a simple walk through the house, throw a load of laundry in and do everyone’s lists for the day… get the CSA list done…
~ Taylor is our runner on Fridays… off she goes to the butcher shop to pick up the animals that need to be processed for Saturday if they were not done on Thursday… later she will go and get all the produce and eggs that we purchase from our co-op of farmers… 
~ Our farmer friends the Bechtels have been in their field for some time already I am sure… one of their 20 acres of produce is dedicated to green beans… they are busily picking for us and their markets right now, as we are getting our day started…
~ Ryan is typically our ‘greens’ man… he does a really good job at diligently cutting the chard that he planted earlier this spring… with knife in one hand and crate in other he heads out in the already 85 degree day… as he brings me the crates of chard with sweat dripping off his young brow, I work at sorting baby leaves from large, purging any yucky ones and then rinsing & finish by bagging… about 2 hours later off to the cooler! 
~Kyle is our go to man and he is busy harvesting scallions (green onions), he very carefully looks at each stem so as not to pick them too young.  After he harvests about 200 or so… off to hose them done with cold water so they don’t wilt… as he rinses them he carefully gets all the dirt out of the roots that he will hand trim with a pair of scissors shortly… then take off the outer leaves so they look white and clean… bunching and bagging time… about 2 hours later he is off into the cooler to put his wares in a safe place. 
~Our Amish friends, the Millers are busy in their field picking those beautiful heads of cauliflower that will adorn your shares tomorrow along with our market tables… Broccoli is another story though… over 5000 heads and because of the very unusual heat that June has given, close to half the heads have bolted… what a lose! Yet they are diligently out there harvesting what they can and breaking off the bolts hoping for side shoots…
~Ethan is probably tilling in the dry, hot field with dust blowing up into his face as he walks behind the tiller where the tractor laid the plastic rows too close and now the tractor with pull behind tiller doesn’t fit… luckily there are only a half dozen or so… but it must be done.
~ In the mean time our hired girl Eva has arrived and she starts picking the beets that are on the list next… off goes Eva to pick, wash and sort… she needs about 300 or so to fill all the needs of our CSA and market friends… carefully going through and picking she carries each crate over to the wash & pack station and gives the beets to Kyle who will lay them all out and wash them with fresh, cold water to make sure they stay hard and beautiful for tomorrow… next he sorts them out by size and puts in the crates accordingly for Eva… who when done harvesting will take any yucky leaves off, bunch for the market tables and CSA… about 2 1/2 hours later then move on…

~The tomatoes were harvested on Thursday by the Yoder family and packed and ready for pick up… absolutely perfect in size and shape… all to please our CSA members and market friends…
~ next the herbs are cut and bagged… kale and any other greens… they must be first because the heat cannot get into the leaves…
~Kyle moves onto the potatoes… he needs to dig at least 3 bushels full to fill all the CSA shares and have enough to sell… down the hot rows he goes with potato fork in hand… digging away.  After he is done, about hour or so, off to the wash station… potatoes are fairly simple to clean… hose off in the crates and let air dry in the shade… package and off for lunch and then produce pick up…
~The heat is on and the cucumbers and squash must be picked before the heat gets into them… off go the Kempf’s, soft gloves on to be sure no scratches happen to the delicate squash… going into the prickly leaves, arms being scratched they pick bushels upon bushels in their fields…. cucumbers are beautiful…
~Lunch time… sandwiches and cold refreshing fruit and lots of cold, cold water, lemonade or garden tea…


~ Back at it… We need to get any other produce picked, washed and packed before Taylor & Kyle get back with the rest of the produce…
~ After they arrive we sort through all the beautiful produce our dear farmer friends have been spending the morning doing as we were. Eva works on all the produce that we will sell at market while I work at all the CSA stuff…
Kyle is cleaning out and loading everything we need for market and carrying all the heavy crates and boxes down to the cooler…Several hours later it is finally supper time and if everything is done we can go take cold showers and go to bed… oh but wait… I still need to do the inventory lists for the two CSA groups and email them… check the email… OK… 10:30 or so I can hit the sack
2am… Neil is up with the boys and loading all the meat into the freezer… there they go into the basement cooler and are going to haul up all the produce up and load into the trailer…
3am… Jean & Taylor’s alarms go off… up we go… check the email just in case before we are out… get my coffee…
4am… crank the engine and off we go to market on the wings of prayer!
… see you there!

Plant Tags... A market friend of mine taught me this nifty trick some years ago and I loved the idea as soon as I heard it.  We all have those old plastic vertical blind’s that have been bent and just jammed into the closet.  Well drag em’ out and put them to work!  Simply cut them to the length you need according to the height of the pot you wish to mark; next use a permanent marker and write the plant name on it!  Now there’s recycling at it’s best.

Plant Growing File’s
are nifty and quite handy.  To create an indispensable reference guide to your garden, staple seed packets to index cards and organize them in a recipe box. Staple only one edge of a packet, so you can flip it over to see instructions for growing. On the lined side, note when the seeds were sown, when they sprouted, and any other dates you might need for future seasons.  After the harvest be sure to add if you like the variety, any tips for a better harvest next year or any other pertinent info that you will want to remember for next year!

BBQ Station… A lattice panel is more than just a pretty backdrop. When hung near your grill on a section of your fencing or railing, it provides square upon square from which to hang your basic BBQ supplies: brushes, pot holders, and more. Use metal ‘S’ hooks to hang anything with a built-in loop, as well as bins, racks, and grill baskets. Corral small tools, such as basting brushes and meat thermometers, in stainless steel perforated bins and wire racks, which resist rust and won’t collect rainwater… go to the web site to see photo!

Some More Yummy Market Fresh Recipes…

Creamy Cucumber Crunch Salad

Yummy dressing and the crunch of garden fresh cucumbers, this salad will be hit with both family & friends!

8 cucumbers
1 tsp. salt
6 scallions, thinly sliced
6 radishes, thinly sliced
1 cup plain yogurt
1/2 cup sour cream
1/2 cup fresh dill,chopped and loosely packed
2 Tbsp. lime juice
1/4 tsp. pepper
1 clove garlic, minced

1. Peel cucumbers; cut lengthwise & scoop seeds out with the small end of a melon baller; slice into 1/4 inch slices.
2. Toss cucumbers with salt in a large bowl, then cover with cold water; set aside in fridge for half hour; drain all but about 2 tbsp. of the water.
3. Combine remaining ingredients in a large bowl, mix well; add to the drained cucumbers.
4. Cover with plastic wrap and chill fro at least one hour and up to overnight before serving.

Herb Roasted New Potatoes

… we had this for supper tonight… so yummy!

2 quarts new red skin baby potatoes
1 cup sweet onion, halved then sliced
1/2 cup thyme infused olive oil OR 1/2 cup olive oil and 2 tbsp.s fresh thyme leaves
4 tbsp. butter
3/4 cup crumbled feta cheese plus all juice
1 tsp. salt
1/2 tsp. pepper

1. Put potatoes and onions in a deep dish 9″x13″ baker; pour oil over; toss to coat evenly. 
2. Sprinkle with salt & pepper; dollop with butter; sprinkle crumbled feta cheese evenly over top
; pour the juice over top.
3. Bake in a 350 degree oven for about 35-45 minutes; stir potatoes to mix cheese in and coat  all potatoes with oil; bake for 15 to 20 more minutes or until the potatoes are fork tender.

Happy Day,
Jean

Decorative Garden Journal, Gardener’s First Aid Kit, Testing Old Seeds, Freezer Strawberry Jam & Yummy Heirloom Brushetta

“Flowers have spoken to me more than I can tell in written words.” Lydia M. Child

I often talk about my love for journaling and awhile back I talked about a Cookbook Journal I had made for my daughter Taylor.  Well, I also have created several Gardening Journals to show the progress of my gardens as the years go by.  It is fun to put the photo’s in along with magazine articles or pictures that inspired me to my newest creation.  As the years move forward seeing the growth and changes that naturally take place in a garden are both exciting and joyful.  This morning while I should have been busy harvesting, I just couldn’t resist taking a few moments to weed the Pergola garden and walkway… it is so relaxing for me… the cool morning with the light fog across the fields is so inviting as I prepare for the heat of the day.  Yesterday Taylor took the boys swimming and I had some quiet time… in my gardens… Well here we are at the end of June and I haven’t even given you a Strawberry Freezer Jam recipe… shame on me! Well they are still in season so here is my families favorite and if you were fortunate enough to be one of our Winter CSA members you got this in your shares… so here’s the not-so-secret recipe! Enjoy!

Tools and Materials that would be helpful in this endeavor: Ruler
Blank composition book
Scissors
Patterned paper
Glue stick
Bone folder or wallpaper squeegee
Craft knife
2-inch-wide self-adhesive linen tape- be sure the color matches your theme- can purchase at any craft store.

Customized Journal How-To
1. With a ruler, measure the front cover of a blank composition book. Adding 1/2 inch to all sides, measure and cut two pieces of decorative paper to size.

2. Apply a thin layer of glue to the front cover of the composition book including the spine. Lay a piece of decorative paper patterned or a photocopy of one that you have chosen side down on a work surface, and carefully center the book’s glued cover on the paper. Turn the book over, and use a bone folder or squeegee to smooth out any wrinkles; let dry. Carefully trim excess paper using a craft knife. Repeat process with book’s back cover.

3. Cut a piece of adhesive linen tape slightly longer than the book’s spine. Remove the tape backing, and carefully center the tape along the spine. Adhere the tape to the spine; use a bone folder to smooth out any wrinkles. Carefully trim excess tape using craft knife.
   

    As gardener’s we all should have a First Aid Kit handy in the potting shed or at least in the house.  Our garden’s have many hazards all there own and we should take precautions to be safe.  It harbors insects that bite, thorns that scratch, and other potential nuisances that may require simple first aid.
~ A basic kit should include the following: alcohol for cleaning wounds, triple anti-biotic ointment, cotton balls, bandages of all sizes, gauze and tape, Epsom salt for soaking, tweezers for thorns and splinters, organic insect repellent and sunscreen, anti-itch cream for stinging nettles and poison ivy, Benedryl, and of course some wonderful organic hand cream to sooth and soften your dry skin at the end of the day.
*Be sure that if anyone in your home has KNOWN allergies to bee stings you have an epee pen on hand at all times when out of doors.  Be sure to check with your physician for info on this.

Testing Old Seeds
Many of us are still planting and adding things into the garden.  We come across a spot that we are sure could fit one more thing in and decide to plant… what shall it be as we sort through all the leftover seeds? Or we may have some seeds that germinated spotty in the garden so we want to fill in and get a full row. Succession planting keeps us busy seeding and planting right through into late fall. With this in mind you will want to be sure your seeds are viable~ especially if saved over from last year.  I save seeds for up to 3 years, some think that is foolish, but I always do a germination test  and I have not had many disappointments.  This sounds much harder than it is, but anyone with water, paper towel, plastic baggie and seeds can do it~ really!  Seeds saved can be worth sowing — but only if they pass this germination test:

* Fold 10 seeds in moist paper towel, place in resealable bag, mark with date put in and the date germination if viable should take place, as well as the type of seed.
*Be sure to read on the package instructions how many days the seed takes to germinate~ add a couple to be sure.
*After the ‘day’s to germination’ have safely passed by, open the paper towel to see how many of the seeds germinated. *Multiply that number by 10 to calculate the percent of germination. More than 70 percent is passing. If between 40 and 60 percent, sow thickly. Below 40 percent, it’s best to buy fresh seed.
~Be sure to keep any seed you want to save for next year in the freezer in air tight freezer bags or plastic containers.  Also be sure to label any packages that may be tattered or where the labels may be faded. 

 Cute Personalized Herb Pots… make cute gifts or are a wonderful addition clustered together on your window sill or table top.  Personalizing them is so super easy, yet adds such a flare to the simplest pot!   Individually, they’re portable and easy to handle: Bring the basil indoors, for example, when making pesto, instead of stooping in the garden. When you plant the herbs, label the rims with a permanent felt-tip marker, and use these pots year after year!

Strawberries, strawberries… oh yummy strawberries!  Here is our families favorite Strawberry Freezer Jam recipe.  This is one of the few jams I don’t can… Strawberry Jam frozen is like eating them fresh picked~ there is no comparison with canned!
Strawberry Freezer Jam3/4 cup pectin – equivalent to 6oz. (like sure-jel)
1 1/4 cup water
4 cups whole strawberries (1 quart container)
4 cups organic raw sugar
*Following the instructions, especially with the amount of sugar is crucial to have proper set up!  DON’T SKIMP ON THE SUGAR!!!!
1. De-stem berries and then crush berries in a bowl; add sugar and stir for 3 minutes until sugar is dissolved. Let stand for 10 minutes.
2.  Boil pectin and water for exactly one minute and 45 seconds!  Start timing when the mixture is at a rolling boil.
3. As soon as the time is up add the pectin mixture to the strawberry mixture slowly pouring in and continually stirring for 3 minutes to dissolve sugar completely!  It will be grainy if it is not stirred long enough.
4. Pour into either freezer containers or canning jars.  Leave 1 inch head space in either container.
5. Let set on your counter for 24 hours before freezing.
Super yummy!

Heirloom Tomatoes, fresh garlic and just picked basil… this all adds up to Brushetta at our home! Here is our families favorite recipe!
Brushetta
1 loaf Persian Bread from Sunflour Bakehaus or a loaf of fresh bread.
7-8 Roma tomatoes or 4 to 5 large ones, diced~from Garden Gate~ multi colored looks best!
2 fresh garlic cloves, minced
1 tsp. sea salt or earth salt
1/2 cup olive oil from The Olive Oil Store, plus extra for brushing on bread
1/2 cup fresh snipped basil leaves from Garden Gate
Fresh Parmesan Cheese
1. In a 2 quart bowl put chopped tomatoes; sprinkle salt over top. Let set for about 10 minutes.
2. In the mean time snip basil finely; add basil, minced garlic and 1/2 cup olive oil to tomatoes; stir gently as not to mash the tomatoes. Place in refrigerator for at least 1 hour before serving so flavors blend.
3. Just before serving, cut bread into 2-3 inch wide pieces, then slice diagonally; lay on a cookie sheet and brush olive oil onto one side, flip over and brush oil on other side; place in oven under low broiler and toast until golden, about 1-2 minutes; flip and brown other side.
4. Top bread with brushetta topping; grate fresh Parmesan over top.  Serve immediately.

Happy Day,
Jean


Farmers Markets & Foodshed’s, Succession Planting & Three Yummy Farmer’s Market Recipes!

        What’s a Foodshed you ask?  Most people who call themselves Locavore’s, Foodies or the like will probably be familiar with this term, but for those of you who are not, here is a brief description and how you can make or find one!  *Though it may be unfamiliar, the term “foodshed” was used almost 80 years ago in a book entitled How Great Cities Are Fed (Hedden, 1929) to describe the flow of food from producer to consumer. Seven decades later, the term was used to describe a food system that connected local producers with local consumers (Kloppenburg et al., 1996). In this project, the general definition of a foodshed is a geographic area that supplies a population center with food. However, the Mapping Local Food Systems Project focused specifically on potential local foodsheds, areas of nearby land that could theoretically provide part or all of a city’s food needs (Peters, 2007).
*Used from Cornell University web site, 2012
   

If you search the web go to Foodshed Maps and you will be amazed at how much info is out there. Some of these maps are interactive and can lead you the consumer to sources for organic produce, farmer’s markets, orchards, artisan cheese makers, organic meat and egg producers or other specific categories within a 100 mile radius of your home- which happens to be the ‘acceptable’ radius for which we define things as local! I am currently working on creating one of these for our farm.  With us being a Co-operative farm, I think it would be very interesting for our CSA members as well as our farm market friends, (known to most as customers), to visually see where all the farms that we work with are located.  (see printable attachment Foodshed map for the Mad River Valley coop)

Food anonymity is becoming a thing of the past for some of us… we are tired of buying bread that came off an assembly line in a ‘factory’… we want that hand formed sour dough bread from Fostoria Bread Factory or the beautifully imperfect baguette that Matt from Golden Wheat made…  we can hand the green stuff right into the hands that formed them… take them home and tell the family how nice Ed & Julie are and their boys are so sweet, and man they make the best sour dough anywhere around… We can rip up the fresh homegrown Heirloom lettuce that we just picked out of our raised beds, slice some Heirloom tomatoes hand picked off the vine and put some of Micheal’s real goat Feta cheese from Hickory Knoll Creamery crumbled on top… oh it’s so good!  Then of course pair all this together with Tracina’s gourmet ricotta knocci… what more can you want?  All this can and will be had at the Farmers Market…

Most of you know that we are farmers at The Farmington Farmer’s & Artisan’s Market in Downtown Farmington, Michigan during the regular season where you can find all this great stuff and so much more! The farmers market is the best place for you to create your own Foodshed map… you will be able to share and talk to your market vendors. Building relationships are a natural part of the market atmosphere… I am so happy that I can honestly say that I know most of our market friends names as well as their children’s… and they know our family~ they trust our family to provide them with great organic produce, eggs, pork, beef and chicken!  The Downtown Farmington Farmer’s & Artisan’s Market is the best summer time market anywhere in Michigan… come on out and see us!

**As a CSA farm and market vendor I need to be sure I will have produce all season.  Succession Planting is basically the following of one crop with another and is the most important tool for maximizing a garden’s yield. It is a must if you want to have garden fresh produce for the full season we call spring, summer and fall!  Here are a few tips on how to plan your garden’s planting:
*Get started by making a list of all the veggies you want to grow. You must have a good understanding of their individual growth habits and preferences.
*You need to take into consideration the days to harvest from planting, whether it be seed or plant; how long a plant will produce.
*Standard succession planting works if you plan to direct seed every two weeks~ although be sure to plan your last seeding according to the harvest date listed on the package.  For example, most radishes are about 40-45 days; therefore you can determine your last available seeding date by going to your calender, deciding on the last day you can harvest- typically your first frost date and then counting backwards 45 days and adding 5 days for safety- there you go, that is when you direct seed your last planting.
*Create a Planting schedule~ simplify this procedure by drawing a spring, summer, and fall diagram of each of your garden beds or raised beds. Plug in early and then late season crops.  Be sure to note the approximate date each crop needs to be sown or transplanted and when the expected harvest date will be.
*Manage same crop successions by sowing small amounts of seed or transplanting a few seedlings at regular intervals, either in the same bed or a different times in various parts of your garden.  Leafy greens can be seeded on a weekly basis.
*Planting varieties that mature at different times, such a early, middle, and late ripening sweet corn is another way to extend the harvest of a single crop.
*Choose the Right Varieties~ climate, weather and growing conditions affect variety choice and succession timing as well.  Sow cool weather varieties of lettuce in early spring and then sow heat tolerant varieties later for summer harvest and then cool weather ones again toward the end of summer for fall harvest. 
*Doubling Up~ When planning successions and selecting veggies varieties, consider how two or more crops might share the same space.  For example, planting scallions beside rows of potatoes… the onions will be mature before the potatoes need the room and they will also help deter pesky potato bugs.  Also, planting lettuce transplants along side tomato plants~ again the lettuces will be ready long before the tomatoes become gigantic and take over the space.
*Planting tricks~ be sure to space your plants accordingly, if they are crowded they will not grow to their potential.  Try planting seeds and transplants of the same veggie along side each other, the transplants will be ready to harvest as the seed’s grow and then take over the space. 

Here is a **Three Season Garden Plan~ see attached copy of the plan.
Spring~ plant three rows- one Swiss chard, peas on a trellis down center and then baby beets on other side.  The beets and chard will grow short beside the tall peas. 
Summer~ When the peas are done pull the plants and then plant a row of cucumbers to climb on the trellis.  Leave the chard in place; harvest the beets as babies and then plant lettuce seedling and a  row of dill in their place.
Early Fall~ remove the summer veggies and plant half the row with spinach and the other half with alternating rows of tatsoi and bok choy. 
 
You can get some really great tips in Elliot Coleman’s, Four Season Harvest!  Great book!
**Information adapted from Organic Gardening Magazine, “Keep It Coming” By Barbara Damrosch. Feb/Mar 2010, pg.s 42-47

Here are some yummy recipes for all the summertime yummies you can pick up at the market this weekend!
Roasted Basil Tomatoes
1/3 cup olive oil from The Olive Oil Store
8-10 tomatoes from Garden Gate, halved
2 Tbsp. fresh basil from Garden Gate, chopped
salt to taste
Fresh Parmesan cheese

1. Heat oil in a saucepan over medium heat; place tomato halves cut side down in saucepan; cook 5-8 minutes.
2. Arrange tomatoes, cut side up in a lightly greased 8″x8″ baking pan; pour any liquid in saucepan over tomatoes; Sprinkle with basil and salt.
3. Bake uncovered at 400 degrees for 25-30 minutes; garnish with cheese.

Grilled Market Veggies
2 zucchini from Garden Gate, sliced 3/4 inch thick lengthwise
2 yellow squash from Garden Gate, sliced 3/4 inch thick lengthwise
1 sweet onion, sliced 3/4 inch thick
2 tomatoes from Garden Gate, sliced 1 inch thick
2 cloves fresh garlic from Garden Gate, minced
1/2 cup balsamic vinegar
1 1/2 cup oil from The Olive Oil Store
1 Tbsp. EACH FRESH HERB: rosemary, minced; oregano, chopped; basil, chopped; parsley, minced
1 Tbsp. sugar
salt & pepper to taste

1. Combine veggies in a large bowl; whisk together remaining ingredients and pour over veggies; toss to coat; marinate for one hour.
2. Remove veggies from marinade with a slotted spoon; arrange on a grill over medium hot heat; grill 2 to 5 minutes on each side, basting often with marinade, until tender.

Here’s an old time favorite!
Fried Green Tomatoes

You can also use summer squash or okra using this method of preparation!
1 cup all purpose whole wheat or white flour- from Garden Gate
1 cup cornmeal, from Garden Gate
1/2 tsp. salt
1/2 tsp. pepper
3 green tomatoes, sliced
1/4 cup oil for frying, from The Olive Oil Store

1. Whisk together all ingredients except tomatoes and oil.
2. Dip tomatoes into mixture; heat oil in a cast iron skillet; fry tomatoes until golden and crispy on both sides.

Happy Day,
Jean


A Companionate Herbal for the Organic Garden, Herbal Therapeutic Concoctions & Yummy Herb Butters Recipe’s!

Summer is here and we are in full swing! I am finding it harder and harder to get to this blog with all the responsibilities I have around on the farm.  I am constantly thinking of things to write about and share, but finding the ‘thyme’, or should I say making the ‘thyme’ is just taking more effort than I would actually like.  But here I am and of course I love being here.  Lets talk more on herbs shall we? I just can’t seem to get enough of herbs, they are so versatile and useful in so many areas in life… the kitchen, bouquet and right into the personal care line! I love to go out to the gardens and pick them… as I brush against their leaves they just welcome me there with their lovely aroma’s telling me to pick & enjoy!  I have often touched on companion planting and I recently came across a great list that I thought I would like to share with all of you. Today I am going to focus a bit on the personal care end with of course a few yummy recipes for Herb Butters! Thanks for coming… see you again soon!

A Companionate Herbal for the Organic Garden~  This list was adapted from The Rodale Herb Book; How to Use, Grow, and Buy Nature’s Miracle Plants; published by Rodale Press, Inc. 1974, pg.s 268-269.

HERB:                          COMPANIONS AND EFFECTS:
Basil                             *Companion to tomatoes; Improves growth and flavor; repels flies and mosquitoes.
Bee Balm                       *Companion to tomatoes; improves growth and flavor
Borage                           *Companion to tomatoes, squash and strawberries; deters tomato worm; improves flavor &
                                      growth.
Caraway                         *Plant here and there; loosens soil.
Camomile                       *Companion to radishes; improves growth & flavor.
Chervil                           *Companion to cabbages & onions; improves growth & flavor.
Chives                            *Companion to carrots; improves growth & flavor.
Dill                                *Companion to cabbage, improves growth & flavor; dislikes carrots  
Fennel                            *Plant away from gardens.  Most plants dislike it.
Garlic                             *Plant near roses and raspberries, improves growth & health; deters Japanese beetle
Horseradish                     *Plant at corners of potato patch to deter potato bug.
Hyssop                            *Deters cabbage moth; companion to cabbage & grapes; Keep away from radishes.
Lovage                            *Improves flavor and health of plants if planted here and there.
Marigold                         *The workhorse of the pest deterrents.  Plant throughout the garden: discourages                                             Mexican bean beetles, nematodes, and other insects.      
Mint                               *companion to cabbage & tomatoes; improves health & flavor; deters white cabbage moth.
Marjoram                        *Here and there in gard3en; improves flavors.
Nasturtium                     *Companion to radishes, cabbage & curcurbits; plant under fruit trees.  Deters aphids,
                                       squash bugs, striped pumpkin beetles.  Improves growth and flavor.    
Pot Marigold                   *companion to tomatoes, but plant elsewhere in garden too.  Deters asparagus beetle,
                                        tomato worm and general garden pests.       
Peppermint                      *Planted among cabbages, it repels the white cabbage butterfly.
Rosemary                       *Companion to cabbage, bean, carrots & sage; deters cabbage moth, bean beetles & carrot fly
Rue                                *Keep it far away from sweet basil; plant near roses and raspberries; deters Japanese beetle.
Sage                              *Plant with rosemary, cabbage & carrots; keep away from cucumbers; deters cabbage moth
                                       & carrot fly.
Summer Savory              *Plant with beans and onions; improves growth and flavor; deters bean beetles.
Tansy                             *Plant under fruit trees; companion to roses & raspberries; deters flying insects,
                                        Japanese beetle, striped cucumber beetles, squash bugs and ants.       
Tarragon                         *Good throughout the garden.
Thyme                            *Here and there in garden. It deters cabbage worm.

Of course as usual this is only a small amount of information in a world of endless info!  These are the most commonly used herbs in the kitchen, but doesn’t even touch on medicinal ones.                 

 Aromatic herbal baths are one of the most pleasurable ways to cleanse your skin and revitalize your whole body after a hard day at work.  You can add particular herbs to promote relaxation or stimulation.  Therapeutic preparations can be made at home from essential oils and herbal infusions quite easily.  In an earlier blog I gave you the how-to’s on Oils and Vinegars for cooking, here are some personal care recipes!  Enjoy!

Antiseptic Wash~ Among oils with antiseptic action are thyme, lavender, tea tree, and eucalyptus.  Add 8 drips of one of these to a small bowl of water and apply to minor wounds.

Foot Bath~ You will need: Fresh leaves of bay, eucalyptus, lavender, lemon balm, thyme, marjoram, spearmint.
*Sprinkle 1-2 handfuls of herbs into a large bowl.
*Add 2 tsp. of salt and enough hot water to cover the feet and ankles.
*Soak feet for at least 10- 12 minutes while breathing in the delicious aroma’s!

Hand Cream~ You will need: 1 cup rose water, 1/4 cup glycerin, 1/4 cup cornstarch and 3 drops chamomile oil.
*Blend rosewater, cornstarch and glycerin.
*Heat gently in a double boiler to thicken, then cool for about 15- 20 minutes.
*Stir in oil.
*Store in screw top jar for up to 3 months.  

Lavender Spritz~ For a classic skin freshener, fill an spritzer bottle with distilled water and add a couple drops of lavender essential oil.  Shake to blend and before each use.

Lip Balm~ You will need: Oil of eucalyptus, lemon, thyme, jasmine, lavender, geranium, juniper, OR  peppermint.
*Add 2 drops of one of the oil’s listed above to 1 tbsp. of warmed cocoa butter.  Put in a small jar and let it cool. 

Stretch Marks Massage Oil~ You will need:  5 drops of EACH~ lavender oil and neroli oil, 6 drops frankincense and 1/4 cup almond oil.
*Add oils to a small stoppered jar and shake to blend.  Massage gently into the skin to firm it up and to combat stretch marks.

Rosewater Toner~ You will need: 2/3 cup rosewater, 2/3 cup witch hazel and 6 drop glycerin.
*Pour all the ingredients into a bottle and shake will before each use.


Herb butters add a lovely finishing touch to cooked veggies, fist or chicken and are so easy to make!  All you need to do is beat your favorite fresh or dried herb9s0 into some softened butter, cover with some plastic wrap and chill until you’re ready to serve it up!
Here are some yummy Herb Butter Recipes to try this year!

Lemon & Fennel Butter ~ the flavor of fennel goes very well with fish or grilled corn on the cob!
1 Stick salted butter, softened
2 tbsp. chopped fennel fronds
zest of half lemon, grated
1/8 tsp. pepper
Mix all ingredients together in a bowl until thoroughly blended; pat into a roll about the size of a tangerine, cover with plastic wrap and chill.  When ready to serve, cut into chunks~ very cute!

Cilantro & Scallion Butter
~ Use this on some new potatoes and enjoy the sweet savor of scallions blended with the pungency of cilantro!
1 Stick salted butter, softened
2 tbsp. chopped fresh cilantro or 1 1/2 tsp. dried
1 scallion (green onion) finely chopped.
Follow prep method above.

Chive Pepper Butter ~ So yummy on grilled chicken or roasted cod fillets!
1 stick salted butter, softened
2 tbsp. chopped fresh chives or 1 1/2 tsp. dried
1 tbsp. mixed peppercorns, lighted crushed
Follow prep method above.

Happy Day,
Jean


Raised Bed Gardening

Raised Bed Gardening, Plant Container Ideas, Yummy Savory Garden Cornmeal Pancakes and more…
         

“We do not see nature with our eyes, but with our understandings and our hearts.”  William Hazlitt
This year I  put in a new raised bed garden over by our barn hill that will be specifically for Neil’s sausages!  I am so excited about growing and drying all the herbs. Raised beds are such an easy way to go for anyone, especially if you don’t have a large area.   If you want to have a no fuss, no muss garden try raised beds, they require very little maintenance and can grow almost everything! 


Raised Bed tips on how to make & grow!
*The lumber you use should be at least 10″ high or higher if you want it. Although for proper root growth this is the minimum. 
*Do NOT use old rail road ties, no matter how many you get for free- they contain a poison called Creosote that will leach out into your soil, be taken up by the roots of your plants, nourish the plant and you get all the by-product in the fruit that it bears when YOU eat it! Yuck!  Stay away from treated lumber for the same reasons.  (this pertains only to those who want to grow organically!)
*Your raised beds can be as long as you want them to be, but the best width is 4′ wide.  With this width you can easily ‘reach’ in from both sides.  You never want to ‘step in’ your RB, this compacts the soil, which makes proper root growth more difficult.  My farms RB’s are either 4’x4′ or 4’x8′, these work best for me.
*Find a sunny location in your yard and decide how many you would like, or should I say how many would fit!  I would not have a stitch of grass if I didn’t have boys that need ‘play space’!
*Fill your box with from the bottom up with a mixture of well rotted manure, compost, old grass clippings, hay or straw and top with a rich, loamy soil. 
*After you have your box filled with all the plants you want to grow, put a layer of newspaper (NOT colored print sections) about 3-4 sections thick between your plants, top with a layer of grass clippings or straw to act as a mulch. You will have virtually NO weeding!
*Water thoroughly and enjoy your hard work! 
For a very concise book on Raised Bed gardening I always recommend ‘Lasagna Gardening’ by Patricia Lanza.  I also recommend companion planting with all your growing ventures. I use Louise Riotte’s, ‘Carrots Love Tomatoes’.  Both these books will give you a great start to your gardening ventures.
Other nifty ideas for plant containers:
1.  Old galvanized chicken feeder or waterers, tin buckets, watering cans, old metal double burner caners (see picture) enamel ware anything… be sure to put drainage holes on the bottom- unless there it is well rusted and has time worn ones, even better!
2.  Wheel barrow’s or old wagons can be found at any flea market or garage sale.  You can either put the plant pots directly in the containers or fill em’ with dirt and direct plant.  Either way, totally adorable!
3.  Barrels or metal wash tubs are great as well.  I have a old half barrel at my back door with a bleeding heart in it.  When it is in full bloom it is simply stunning. 
4. Old drawers, crates or even an old wooden trough (yes I have had one).  These work great in your garden’s to add depth and interest.  You can plant anything in them. 
The idea’s are endless, if it has a hole to put dirt in you can plant it, just depends on your taste!  The key to successful container gardening is proper drainage.
*One more tip- to save on dirt when filling very large containers, recycle packing peanuts, old broken Terra cotta pots, small plastic pots, etc.  Put these in the bottom of your container until about half filled, then pour on the dirt!  They will also be much lighter if you need to move them!
       

Here’s a yummy recipe using Taylor’s Cornmeal Pancake Mix!
Taylor’s Savory Garden Cornmeal Pancakes
1 Pkg. Taylor’s Bake Shoppe Cornmeal Pancake Mix – follow instructions and add to batter:
1 cup niblet corn, drained                                                            

1/4 cup diced bell pepper (any color 1/2 cup diced red onion                               
 1 small peeled & shredded carrot, from Willow Ridge Farm
1/2 tsp Taco Seasoning

1/4 oil
       

1. Stir together all ingredients except oil. 
2. Heat oil in a frying pan over medium-high heat.  Drop batter by 1/3 cupfuls into hot oil.  Cook 3-4 minutes on each side until golden brown.
Garnish with fresh chopped Cilantro, sour cream Salsa !
Happy Day,
Jean


Make a Blooming Chair, How To Make Herbed Vinegars & Oils and Recipes!

Beautiful dill can be added not just to dishes
but also in bouquest

 Flowers are bursting open everywhere and the fledglings are leaving the nest… young robins are hopping all over the garden eating creepy crawlies and enjoying being out of the nest… glorious, glorious summer!  The fields are starting to bear and the harvest will soon be coming on heavily… that means ‘puttin’ up time is just around the corner.  Of course we’ve been busy with rhubarb and now strawberries are ripe for the pickin’ and that means the yummiest jam of all…  Strawberries scare me though… that is growing them. They are really the only ‘garden’ fruit I don’t grow. The runners and weeding they require have never tempted me… until this year! I think I have figured a way to keep them… I will blog more on this next week, so keep watching.  Today we’ll stick with more herb stuff and of course some garden junque too! Enjoy and thanks for comin’ over!

Blooming chairs you ask… I am all about big & beautiful now with certain things. I am sure you have all seen those cute chairs that have potted flowers growing right out of the seat. I just love them, and of course I have some.  Here is the simple ‘how to’ to make your own.
Step 1~ If you don’t have  an old chair already, you can easily find one at any thrift store, antique shop or flea market.  If you can find one that has a cane seat you are doing great, because this will make your job all the more easy.
Step 2~ remove the caning from the chair seat to make an open hole where your container can be placed.
Step 3~ I would simply go to a nursery and purchase an already big and beautiful hanging basket- be sure it will fit in your seat hole… take it home and put her in! Presto, instant blooming chair…
* to make it cuter if you can by chance see the pot it’s in, put it in an old tin bucket!
… of course if you want to plant your own, do just that.
        

Notice the chair in the forground… I purchased
a patunia hanging basket, transfered into an old
tin bucket and then placed in seat hole.  I also
just put pots on top of chairs as you can see the
potted geranium in a tin bucket on the chair on
my front porch.  Have Fun!

Herbed Vinegars & Oils can be made quite easily and inexpensively, especially when you are growing your own herbs. For those who love to grill or roast, or have salads often,  you will find that having these oils & vinegars on hand to be a real treat… and what a way to wow your guests.  Here is the ‘how to’ and some ideas on different combinations…

**How to make Herbed Vinegars~
You can use the leaves, seeds and flowers, singly or in combinations of freshly picked herbs to make herbed vinegars.  The vinegar should be the best of the cider or wine varieties available, as herbs will not disguise the sharpness of a bad vinegar.
1. Pick the herbs for the vinegar in the morning after the dew has dried but before the heat of day has driven off some of the essential oils that give herbs their flavor.  Use only perfect leaves and flowers, discarding any that have tuned brown or show signs of having been eaten by garden pests.
2. Bruise the herbs slightly before putting them in a glass bottle or ceramic crock with a tightly fitting top.  Use about 1/2 cup of herbs for each pint (2cups) of vinegar, more if you want a stronger taste.
3. Then follow one of these two traditional methods:
  ~A. Pour the vinegar over the herbs in a clear glass bottle and close tightly.  Set the bottle in a sunny window for two weeks, turning it frequently.
  ~B. Heat the vinegar; then pour the hot vinegar over the herbs in a bottle or crock and close tightly.  Let steep overnight.
  Whichever method you use, you may want to strain and re-bottle the vinegar at the end of the steeping time, adding a fresh, unbruised sprig for decoration.  This is a matter of aesthetics- a choice between one simple spring in the bottle or the generous bunch of herbs used to flavor the vinegar.

**HOW to make Herbed Oils~

Herbed oils can be as simple or as complex as you like.  To make you own, simply add the desired herbs and spices to the oil (olive oil is best, but you can also use a good vegetable oil) and steep in a closed bottle or container in a warm but not hot place for a few weeks before using.  

 Here are some yummy combo’s for you try now that you have the ‘how to’s’….
~Vinegar idea’s:
*Tarragon is most common alone~ or add lemon thyme, basil, chive blossoms, burnet work well in salads
*Burnet and borage~ add borage flowers to white vinegar and it will tint it a lovely pale blue while giving it a subtle cucumber flavor…
*Dill with whole seed head intact ~ add a bit of lemon and garlic for delicious variety
*Mint for lamb dishes and fruit salads
*lemon thyme for fish
*Basil for tomatoes ~ add borage and burnet for a yummy twist
*sage for marinating rich meats and fowl
*chive blossoms for a faint oniony flavor
*nasturtium buds, flowers and leaves for a lovely peppery flavor
*oregano, fennel and garlic
*lemon thyme and garlic
*raspberry leaves and lemon balm… yummy for a salad
*and of course garlic… for everything!

~Oil idea’s:
*Thyme and rosemary make a quick pasta oil to toss the noodles with
*garlic, chili peppers, rosemary and thyme make for a yummy barbeque oil that is wonderful to marinade and baste your grilled meats
*Peppermint, garlic, cumin, coriander, cloves, mace and fennel adds a taste of the Middle East
*Thyme alone is wonderful to brush on veggies for the grill and chicken
*Fennel and garlic are yummy on fish
*garlic, thyme and a bit of sage go well with grilled veggies

You know what you like… so be daring and try new things with all your wonderful herbs!

**Taken and Adapted from, Herbs, Gardens, Decorations, and Recipes, by Emelie Tolley and Chris Mead, published by Clarkson N. Potter, Inc./Publishers, 1985

Here are some yummy recipe’s to try… 

Spiced Vinegar
3″ cinnamon stick
1 whole cracked nutmeg
4 cup red wine vinegar
1 Tbsp. whole cloves
1 Tbsp. allspice
1 Tbsp. black peppercorns

*Follow instructions above; let steep 4 weeks in a cool place; when ready strain the mixture and bottle. Store in a cool, dark space.

Rose Petal Vinegar
3 cup white wine vinegar
1 rose bud to place in bottle
5 cup rose petal, lightly crushed

*Follow instruction above; steep 4 weeks in cool place; when ready strain the mixture and bottle. Store in a cool, dark space.

Cucumber Dill Sauce
1 cup water
1 cup organic raw sugar
1 Tbsp. sea salt
1/3 cup white vinegar
1 cucumber, peeled, seeded and diced
1 cup sour cream
1 Tbsp. fresh dill, chopped

1. Combine water, sugar, salt and vinegar, stir until thoroughly dissolved; add cucumber.
2. Refrigerate for 1 hour before serving; when ready to serve, drain cucumber, fold into sour cream and add dill. 
*use on top of baked potatoes… yummy!

Happy Day,
Jean