

As I mentioned the other day, I’ll be doing a series of posts on how-to freeze and can your garden fresh produce. I’ll provide you with step-by-step instructions on canning many things over the next couple months. This is a busy time for me and I thought it would be great fun to show you the process by which I feed my family. I hope you’ll learn something that will last a life time while encouraging you to step out and try new things. I want to inspire those who are seeking knowledge in this area to see just how easy it can be. I want nothing more than to know you are learning a skill that will help you feed your family. All I ask is that you teach someone else… especially your children or grand-children. Don’t let this art be lost over another generation.
Early apples have arrived and many other varities are soon on the way! I thought it’d be timely to show you how easy it is to make and can apple sauce so you can have this wonderful staple on hand all winter long.
Here are step-by-step instructions as well as the supplies you’ll need!
Supplies you’ll need to get started.
*Victorio Strainer **see note at end of blog for info on this machine
*Large dish pans/ tubs/ bowls/ kettles
*Clean Jar’s, lids and rings- not necessarily new
*Jar filler and lifter
*Towels, hot pads or/and cooling racks, several
*Ladle or small pot with handle
*Wet and dry dish rag
*Water bath canner or pressure canner- you can use a pressure canner to water bath, just don’t seal the lid
Step-by-step instructions:
1. Have all jars you’ll need ready to be filled along with lids and rings for the jars. Be sure to wash jars in hot, soapy water. Be sure to check all jars for any fractures or cracks and chips off the rim. Discard if you find any. Be sure if you are re-using lids that there are no rust spots on the inside, the rubber seal is still attached to the metal and that it is not bent inward at all, if any of these symptoms appear, discard.

2. Wash all the apples; sort any yucky ones and discard.
3. Quarter the apples; cut the stem and blossom end off along with any bad spots. Don’t worry about skins or seeds, the strainer deals with that.


4. Put about 2 inches of water in the bottom of your kettle; fill kettle with quartered apples right to the top; cover with tight fitting lid; cook on medium heat until the apples are soft. Stir occasionally, watching that the apples do not stick and scorch.


When apples are soft and have cooked down about a third, remove from heat. Time will depend on size and quantity of apples.

While the apples are cooking, set up your Victoria Strainer at a table where you plan to work. I recommend a kitchen or dining room table with plenty of room. This will be your work station.

5. Have your Victorio Strainer set up along with jars, rings, lids, jar filler, ladle or small pot and cooling rack, towel and dry and wet dish rags ready in your work station. Place hot pot of apples on cooling rack or hot pad. Have a bowl on the floor under the handle for drippings, a pan to catch the sauce as it comes out and a bowl to catch the skins and seeds that come out the slop shoot.
Have jars ready and set up on a towel on the table. Do not leave them on your counter or table because the jars could crack.

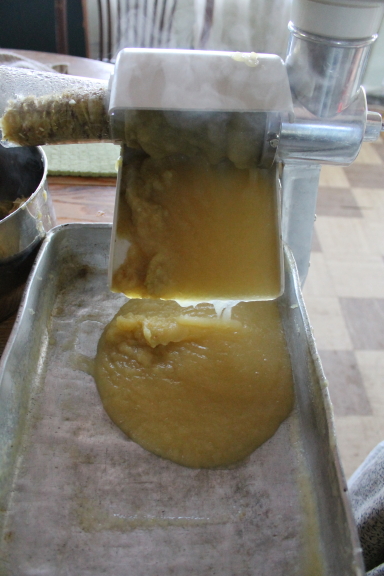
6. Carefully fill the hopper off the strainer and start pouncing down while cranking.


7.Place the jar filler in your first jar and start filling; leave about an inch head space in each jar.
8 Once all the jars are filled, wipe each rim to be sure there is no sauce on it. If there is, the jar will not seal- new lid or not. Once all the rims are cleaned, place lid on and secure with ring tightly.
9. Place in water bath canner or pressure canner and process quarts for 30 minutes and pints for 20. Place on a cooling rack or towels on your counter for up to 24 hours to ensure the jars have sealed. Remove the rings and put your yummy jars on your beautiful canning shelves.

10. If any of your jars did not seal, either store in fridge for up to a week or place in freezer. You can also try to change the lid and re-can. That’s one beautiful thing with sauces, you can’t over process!

If you don’t have a Victorio Strainer but would like to look into getting one, here is the direct link to the company. I have had mine for over 12 years and I use it very hard. I suggest you ‘shop’ around, but at least you can look at the product and get a good idea.
http://www.victorioproducts.com/store-catalog
Apple sauce goes a long way and has many uses other than simply enjoying it as a yummy fruit dish with a meal.
Apple Sauce Pancakes
2 eggs
1 cup buttermilk
2 Tbsp. salad oil
2 cups flour
2 Tbsp. sugar
2 tsp. baking powder
1 tsp. baking soda
1 tsp. salt
1 cup applesauce
In a bowl, beat eggs, then add remaining ingredients, except applesauce. Beat until smooth, then add applesauce.
Yields about 16 pancakes.
Happy Day,
Jean
